midlifecrisis
Observer
Finished up a couple of little projects yesterday that I've had on the drawing board for a while now, mentally anyway.
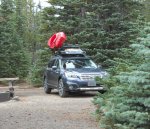
First was an update on the spare carrier situation. If you've been following this thread, you'll know that with my build setup I opted to pull the spare out of the tub in the back to make room for my water tank and pump. Up to this point when the back-end is converted, I've been simply dumping the spare up into the cargo basket on the roof, held down with a big J-hook I whipped up. That has worked fine, but it's also a short term fix I've had my eye on improving since the spare eats up A LOT of the cargo basket space.
I originally thought the hitch was the most likely location it would end up, but I like having the hitch free and I was never settled with having to tinker with the spare every time I want to open the rear, no matter how easy it is (or isn't). Also, my mindset has been to get the spare as far out of the way as possible since it should literally be the LAST thing (knock wood) I need to access. Makes me long for the under the rear end approach MFR's used to use.
So after much mental manipulation, I decided the roof was the place it needed to stay but I wanted to get it out of the basket, so I came up with the following solution.
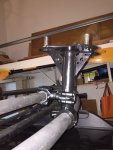
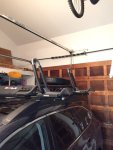
This is a spare carrier for ATV's, with a 1.5" clamp size to fit the larger back bar of the basket, and a combination of the two types of Easton clamps I used for the rack mounts. The two Eastons were modified to go back-to-back with a single bolt between so they can adjust to the angle, etc. Since the Easton's are 1-3/8" openings, I had to hog out the one clamp to fit the 1.5" bar on the spare mount, and I took up the excess space between the other mount and the small front bar (1") with my 1/8" hard rubber gasket material. Worked out pretty well.
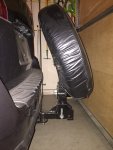
The carrier came with a 4x150 bolt pattern so I figured I'd probably either have to either do an adapter or abandon the supplied lugs altogether and drill in new ones, but as it turns out two of the lugs fit two of the holes in the 5x114.5 pattern perfectly, and the other two get out of the way inside the rim. I figure I'll probably drill in the other two lugs at some point just to be symmetrical, but this is just tinkering with the factory mini-spare and I'll get a full size spare at some point when I'll worry about that. In the meantime, the two bolts make everything tight as can be and I have no worries.
In the first pic below, the left two lugs are the ones that get used, and you can see I've scratched on where two new "lugs" would get drilled in to have four of the five holes in play when the spare is cinched down.
The right two lugs get abandoned eventually, but they don't interfere anyway because the rim has space for them, magically.
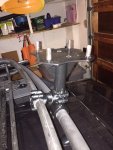
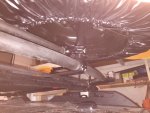

I rolled the whole mess back as far as possible towards the hatch in the open position so now it is up out of the basket and about 60% of the way behind the basket cross bars in the rear. Not completely out of the basket storage footprint, but it lets you utilize the space under the spare for carpet or tents or whatever and leaves a ton more space in the front of the basket. I've had it on there running around town up to freeway speeds with the cover and no issues so far. It's extremely solid with the brace installed (wasn't sure it really needed the brace, but seemed like one of those better safe than sorry moments).
Next item was also rack-related.
Moving everything around and getting the top side situated after I re-did the rack mounts and whatnot, I decided I ultimately wanted to be able to leave the cargo basket in place regardless of the other gear program I am following at any particular time. That means I need to be able to install my other rack pieces without uninstalling the basket.
The bike racks work perfectly installed outboard of the mounting points, but I found that my kayak racks were a bit too long to mount fully outboard, so I needed the bars longer. However, since the only time I need the longer bars is when I am carrying kayaks, and because I tend to hit my head on EVERYTHING, I didn't want to simply buy longer bars. It will be said I could get longer bars and swap them out when I need the extra length, but I am headed towards a program here where the top side stays as-is all of the time with little to no tearing apart and reinstalling of the rack, bits, pieces, etc.
So instead, I opted to do some short bar extensions that are only installed when the kayak racks are in play. They extend the bars ~4" which is just enough for the kayak racks, and with the racks installed they essentially disappear. As it turns out, 1/2" galvanized pipe fits really nicely inside the Yakima round bars (~7/8" OD, but if you buy 7/8" OD solid bar it's too big...trust me). The covering is some awesome shrink tube I found online with an adhesive inside that is really almost as tough as the factory Yakima coating, and you can tinker with the layers to get the thickness just right. A 1/4" drop pin and some caps and it all seems to work really nicely.

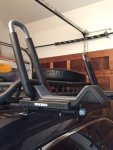
I'm going to whistle up some little rubber plugs to seal up the 1/4" holes where the drop pins install when the extensions aren't in place to keep the water out-ish.
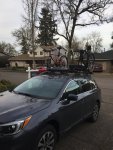
So now I can have the cargo basket in place and have either a kayak or a bike just outboard of the mount points, on each side. Let's me carry two bikes or two kayaks....and I also can do two kayaks on the bar extensions and then throw a bike or two up on top of the cargo basket with short bars (don't have those at the moment) using Yakima Rail Grabs on the cargo basket top rails (do have those).
At some point I'll probably start wondering about weight limitation, but with the whole mess locked down at the tie-down points I'm not too concerned. Two kayaks, two bikes, the spare, and the basket are probably something 150#, then you start adding gear, so it's probably not too far out of max-spec anyway, unless you're carrying lead bars up there.
First was an update on the spare carrier situation. If you've been following this thread, you'll know that with my build setup I opted to pull the spare out of the tub in the back to make room for my water tank and pump. Up to this point when the back-end is converted, I've been simply dumping the spare up into the cargo basket on the roof, held down with a big J-hook I whipped up. That has worked fine, but it's also a short term fix I've had my eye on improving since the spare eats up A LOT of the cargo basket space.
I originally thought the hitch was the most likely location it would end up, but I like having the hitch free and I was never settled with having to tinker with the spare every time I want to open the rear, no matter how easy it is (or isn't). Also, my mindset has been to get the spare as far out of the way as possible since it should literally be the LAST thing (knock wood) I need to access. Makes me long for the under the rear end approach MFR's used to use.
So after much mental manipulation, I decided the roof was the place it needed to stay but I wanted to get it out of the basket, so I came up with the following solution.

This is a spare carrier for ATV's, with a 1.5" clamp size to fit the larger back bar of the basket, and a combination of the two types of Easton clamps I used for the rack mounts. The two Eastons were modified to go back-to-back with a single bolt between so they can adjust to the angle, etc. Since the Easton's are 1-3/8" openings, I had to hog out the one clamp to fit the 1.5" bar on the spare mount, and I took up the excess space between the other mount and the small front bar (1") with my 1/8" hard rubber gasket material. Worked out pretty well.
The carrier came with a 4x150 bolt pattern so I figured I'd probably either have to either do an adapter or abandon the supplied lugs altogether and drill in new ones, but as it turns out two of the lugs fit two of the holes in the 5x114.5 pattern perfectly, and the other two get out of the way inside the rim. I figure I'll probably drill in the other two lugs at some point just to be symmetrical, but this is just tinkering with the factory mini-spare and I'll get a full size spare at some point when I'll worry about that. In the meantime, the two bolts make everything tight as can be and I have no worries.
In the first pic below, the left two lugs are the ones that get used, and you can see I've scratched on where two new "lugs" would get drilled in to have four of the five holes in play when the spare is cinched down.
The right two lugs get abandoned eventually, but they don't interfere anyway because the rim has space for them, magically.


I rolled the whole mess back as far as possible towards the hatch in the open position so now it is up out of the basket and about 60% of the way behind the basket cross bars in the rear. Not completely out of the basket storage footprint, but it lets you utilize the space under the spare for carpet or tents or whatever and leaves a ton more space in the front of the basket. I've had it on there running around town up to freeway speeds with the cover and no issues so far. It's extremely solid with the brace installed (wasn't sure it really needed the brace, but seemed like one of those better safe than sorry moments).
Next item was also rack-related.
Moving everything around and getting the top side situated after I re-did the rack mounts and whatnot, I decided I ultimately wanted to be able to leave the cargo basket in place regardless of the other gear program I am following at any particular time. That means I need to be able to install my other rack pieces without uninstalling the basket.
The bike racks work perfectly installed outboard of the mounting points, but I found that my kayak racks were a bit too long to mount fully outboard, so I needed the bars longer. However, since the only time I need the longer bars is when I am carrying kayaks, and because I tend to hit my head on EVERYTHING, I didn't want to simply buy longer bars. It will be said I could get longer bars and swap them out when I need the extra length, but I am headed towards a program here where the top side stays as-is all of the time with little to no tearing apart and reinstalling of the rack, bits, pieces, etc.
So instead, I opted to do some short bar extensions that are only installed when the kayak racks are in play. They extend the bars ~4" which is just enough for the kayak racks, and with the racks installed they essentially disappear. As it turns out, 1/2" galvanized pipe fits really nicely inside the Yakima round bars (~7/8" OD, but if you buy 7/8" OD solid bar it's too big...trust me). The covering is some awesome shrink tube I found online with an adhesive inside that is really almost as tough as the factory Yakima coating, and you can tinker with the layers to get the thickness just right. A 1/4" drop pin and some caps and it all seems to work really nicely.


I'm going to whistle up some little rubber plugs to seal up the 1/4" holes where the drop pins install when the extensions aren't in place to keep the water out-ish.
So now I can have the cargo basket in place and have either a kayak or a bike just outboard of the mount points, on each side. Let's me carry two bikes or two kayaks....and I also can do two kayaks on the bar extensions and then throw a bike or two up on top of the cargo basket with short bars (don't have those at the moment) using Yakima Rail Grabs on the cargo basket top rails (do have those).
At some point I'll probably start wondering about weight limitation, but with the whole mess locked down at the tie-down points I'm not too concerned. Two kayaks, two bikes, the spare, and the basket are probably something 150#, then you start adding gear, so it's probably not too far out of max-spec anyway, unless you're carrying lead bars up there.
Last edited:

