2016 JKU Backcountry AKA "The Goat"

Eagle05

Adventurer
More Pics - Write up to follow... Eventually

Pics and Words.

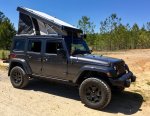
So far I'm really happy with the black perimeter paint with the white top. Every time I've had to be up on top the surface has been fairly cool to the touch. The Yakima mounts will probably get replaced with a set of rails. I had Ursa Minor install them, and don't like them as much as I thought I would. I think the rails will serve me better and allow a fixed solar panel to be installed. It's my daily driver and my commute is so short I worry the fridge will run the auxiliary battery down because the alternator just doesn't have enough time to charge it. There was supposed to be a solar plug pre-installed in the roof, but due to a mix up, I'll be doing that. I wanted all the roof drilling to be done by UM so I wouldn't do it wrong. It seemed a little daunting until I looked up seeking guidance, and (aha!)I realized the roof mounts are all on the outer edge of the tent. Which means if I screw it up and don't get a great seal, at least it's not a hole inside the tent. So in theory it should be a simple plan. Nothing ever goes wrong with those, right?

With the top down I love the look and the taller height. There's just something about it that makes it feel so much larger.
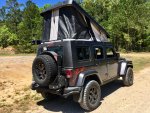
I had a chance to deploy the Manta awning a few times and it really is simple in comparison to the Foxwing that was on my previous trailer. It's still not as robust as the Alu-Cab Shadow awning I really wanted, but it was guaranteed to work so we went with it. I do wish Eezi-Awn could modify the design a bit and make the rectangular cover over the tailgate in addition to the one off the driver's side. All it would take is a bit more fabric and another small arm. Perhaps that would make it too bulky or heavy. As it is now, the tailgate and rear window can be covered from rain if you don't open the swing out all the way. Which is fine. The rectangular portion of the driver's side is really nice and spacious and that compensates for it.

IMG_8027.jpg
IMG_8029.jpg

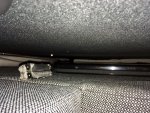
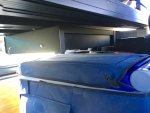
I've seen a lot of folks ask about space up top when the lid is closed. Here is a picture of my Leatherman on the cushion for reference.
IMG_8039.jpg


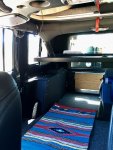
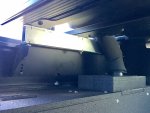
The interior shelf was a lot of work to install. The J30's slider windows took up some interior width and the front few slats of the shelf are snug up to them. So much so I actually put a inch slice into one of the screens. The rear slat had to be trimmed down about an inch in order to make it fit, and the mounting brackets wouldn't fit under the screen slider without modifying the mounting location with some extra washers and a little brute force. The aluminum risers seemed like a straightforward idea, but ended up being pretty difficult to measure, drill, and mount. Mostly because it all had to be assembled and in place to truly know where it would all line up. They'll get some felt glued to them at some point so they don't look so out of place.
Glad it's done now. Plenty of room underneath for the fridge slide, fridge and the drawer. Plus, the passenger side fits a few boxes just right. Above the shelf has plenty of room for a water jug and some Front Runner boxes. The narrow gap between the upper rear window and the shelf makes for some coordinated effort and planning, but once it's there it's secure with room above to stuff soft items.

IMG_8034.jpg
IMG_8040.jpg
IMG_8041.jpg
IMG_8042.jpg

Mounting the awning was a bear to do solo. Definitely wouldn't want to do that again.
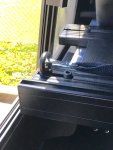
Once installed, I realized the nuts would make contact with the rubber seal on the J30 if the top wasn't lifted up with the passenger side leading the way. So FYI, don't do it like that if you ever install one. I took a while tonight and swapped most of them around so the more narrow bolt head should clear the top at the wider points. (No instructions - lots of trial and error there.) Picture is from driver's side rear looking forward.
IMG_8026.jpg
 
Last edited:

Eagle05

Adventurer
Wow - fantastic !

Wow you weren't kiddin!:Wow1::Wow1::Wow1:

That's sick dude.


New top looks great.

Looks great

Sent from my SAMSUNG-SM-G890A using Tapatalk

Thanks, all. It's been a lot fun getting it all put together. Just some fine tuning to do, some lights and such in the rear, and of course lots of miles to put on it once I can get some time off.
 

Eagle05

Adventurer
Have you gotten the chaser already? Curious why you added the rear shelf if you will have the trailer.


No Chaser for me.

We've been talking about getting a cargo trailer or something for storage and such to free up the interior space, but that's a ways off. The shelf for now it just to maximize functionality inside and it makes a pretty great step up into the Ursa Minor too.
 

rubicon91

Explorer
Eagle05 if you don't mind can you tell me how the install was of the goose gear side cubbies? I have the floor plate and have ordered the side cubbies. Probably another 2 weeks or so before I get them and was curious what I am in for.

Sent from my SAMSUNG-SM-G890A using Tapatalk
 

TTEPHOTOS

Organizer
Eagle05 if you don't mind can you tell me how the install was of the goose gear side cubbies? I have the floor plate and have ordered the side cubbies. Probably another 2 weeks or so before I get them and was curious what I am in for.

Sent from my SAMSUNG-SM-G890A using Tapatalk


Floor Plate and Cubbies are on my list of things to install the first week my Jeep comes in so I am interested to know this as well. I have heard the Floor Plates are super easy?
 

Eagle05

Adventurer
Floor Plate and Cubbies are on my list of things to install the first week my Jeep comes in so I am interested to know this as well. I have heard the Floor Plates are super easy?

Eagle05 if you don't mind can you tell me how the install was of the goose gear side cubbies? I have the floor plate and have ordered the side cubbies. Probably another 2 weeks or so before I get them and was curious what I am in for.

Sent from my SAMSUNG-SM-G890A using Tapatalk

For some reason my set did not come with instructions, and I had some trouble with the passenger side cubbies due to some factory applied caulk just below the door hinge. Once I had GG email me a set, and trimmed the excess caulk back it was pretty straight forward. The hardest part is getting the sliding flat nuts that go into the aluminum track when joining the panels to line up just right to put the bolts in. I also had a little trouble with the one screw per side that connects the forward portion of the upper lid of the cubbie to the tub/hard top, but it was an annoyance not a real problem. Once I swapped out to a longer bolt the problem was solved. The side walls don't actually attach to the floor plate that I recall, but are definitely easier to put in prior to installing the floor. The rear floor goes in really simple. Getting the seat out was the worst part up front. My only issue was I stripped the wood on one of the screws that joined the front and rear panels, and had a lot of trouble getting it out. It was all operator error as I was in a hurry using my drill. I bought a larger one from Lowes and it's good now. Noticeable if you're looking for the larger bolt head, but functional and secure.
My issue now is I removed the forward facing panels (the ones that would be directly behind the seat back) from both sides in order to have better access to that tub/top screw while attaching the UM top, and now I'm struggling to reinstall the panels due to those pesky sliding flat nuts. The aluminum track is vertical in that position and the nut just drops down and falls out. Maybe I need to glue them in place. The panels are just wedged in right now and will get fixed eventually.
Hard to describe without using pictures, but once your kit shows up, I think you'll see it.
 

rubicon91

Explorer
For some reason my set did not come with instructions, and I had some trouble with the passenger side cubbies due to some factory applied caulk just below the door hinge. Once I had GG email me a set, and trimmed the excess caulk back it was pretty straight forward. The hardest part is getting the sliding flat nuts that go into the aluminum track when joining the panels to line up just right to put the bolts in. I also had a little trouble with the one screw per side that connects the forward portion of the upper lid of the cubbie to the tub/hard top, but it was an annoyance not a real problem. Once I swapped out to a longer bolt the problem was solved. The side walls don't actually attach to the floor plate that I recall, but are definitely easier to put in prior to installing the floor. The rear floor goes in really simple. Getting the seat out was the worst part up front. My only issue was I stripped the wood on one of the screws that joined the front and rear panels, and had a lot of trouble getting it out. It was all operator error as I was in a hurry using my drill. I bought a larger one from Lowes and it's good now. Noticeable if you're looking for the larger bolt head, but functional and secure.
My issue now is I removed the forward facing panels (the ones that would be directly behind the seat back) from both sides in order to have better access to that tub/top screw while attaching the UM top, and now I'm struggling to reinstall the panels due to those pesky sliding flat nuts. The aluminum track is vertical in that position and the nut just drops down and falls out. Maybe I need to glue them in place. The panels are just wedged in right now and will get fixed eventually.
Hard to describe without using pictures, but once your kit shows up, I think you'll see it.

Eagle05 thank you for the response. I really appreciate that! I will have Brian at GG email me the instructions. I am super excited and patiently waiting to get it from GG and get it installed.
 

Eagle05

Adventurer
More Stuff

After some more time away in the Goat I decided to try out a few changes. The first one was to swap the Yakima feet for a longer rail to allow for some solar panels that will be installed in the near future, and maybe leave room for other odds and ends too.

The other is a few fairly simple modifications to the way we access the tent or cabin via the removable panels.
I never loved the way they were designed to flip towards the middle or the way they would fall through if you weren't careful. One time I dropped one down and it karate chopped my wife's arm. She wasn't happy, but at least it wasn't her face. I had a sew shop attach a length of heavier zipper to two pieces of nylon strap. Then I removed the old handles from the panels before riveting and screwing the new zippered hinges in place. The idea being I can now rotate them up from the middle, and still be able to remove them completely if needed. It's solved the problem of the panels dropping through even if the inner tilt versus outer tilt is slightly more difficult at night. To help keep them out of the way I repurposed the old strap handle and reattached it with a rivet and added a snap so it would attach to the grab handle already built into the top. This allows the panel to stay up and out of your way during the climb in or out, as well as just out of the way during the day. So far I'm pretty happy with the results.

The Velcro on the upper side keeps the cushion from sliding off.
The picture of the zipper from below (the one with the poor lighting) shows how it supports the panel and cushion when it's folded up and suspended by the nylon strap and the snap button.
 

Attachments

  • IMG_8088.jpg
    IMG_8088.jpg
    571.1 KB · Views: 60
  • IMG_8087.jpg
    IMG_8087.jpg
    557.6 KB · Views: 62
  • IMG_8086.jpg
    IMG_8086.jpg
    526.7 KB · Views: 60
  • IMG_8090.jpg
    IMG_8090.jpg
    525.5 KB · Views: 61
  • IMG_8092.jpg
    IMG_8092.jpg
    545.4 KB · Views: 61
  • IMG_8079.jpg
    IMG_8079.jpg
    540.2 KB · Views: 58
Last edited:

Comanche Scott

Expedition Leader
Great idea, and execution on the panels. It took me a bit to figure out what you'd done in the pictures due to the mirror finish of the panel.
Once I figured that out, yeah, great work! :beer:
 

Eagle05

Adventurer
Solar Power

After a bit of trial and error, along with some emails and phone calls to Overland Solar, and some help from Amazon even though UPS lost some stuff... The Goat is finally wired up to the sun. Since the fridge runs all day and my commute is so short, I don't get a chance to recharge very much during the week. This 90°+ Alabama heat has just been killing the auxiliary battery during the day. I can't imagine what the hotter part of the summer would do. So I'm happy to report the 30 amp charge controller and two 100 watt panels are working really well thus far. I also wired in a P3 foldable panel so I can connect that when I'm parked in the shade. All in, that should be more than enough to get us around with the lights on, and a few fans and cold drinks too. We'll survive this southern exposure now.

I wired a circuit breaker and fuse with the solar controller to the front face of the Goose Gear flooring behind the passenger seat. For the roof I used a 100" length of aircraft L track that I trimmed down to secure them together and to the rails. It is definitely a bit tougher to raise the top up and I may have to replace the struts with a heavier version at some point. Since I installed the longer 60" rails there is still room for some small stuff in front of the panels if needed. So we'll see there. Maybe maxtrax or something.

Supremely jealous of everyone heading to the Expo this week. We were out west this time last year and had a great time stopping through. Hopefully we can get back out there again next May. If not, the east coast version in October is calling my name.
 

Attachments

  • IMG_8137.jpg
    IMG_8137.jpg
    572.1 KB · Views: 58
  • IMG_8136.jpg
    IMG_8136.jpg
    582.3 KB · Views: 55
  • IMG_8135.jpg
    IMG_8135.jpg
    582.4 KB · Views: 54

Forum statistics

Threads
188,000
Messages
2,900,866
Members
229,233
Latest member
cwhit5
Top