2020 Northstar Liberty - Expedition Truck Camper Build!

montypower

Adventure Time!

Everyone has advice and tips for how much solar power (watts) you need. I’ve found there is the theoretical, mathematical formula and the real world practical aspect.

There are many factors to consider:

1. Solar only. Will you have any other power source? Generator, alternator, shore power…

2. Seasonal travel. You can make do with much less solar if primarily traveling in the summer months. However, you will benefit from doubling the solar power for use in adverse weather and winter.

3. Parking location & tipping panels. Are you willing to always park in the sun vs shade? Will you move your solar panels and tip them to follow the sun?

You’ll want to go “overkill” if you plan to have a solar powered rv, van or camper and never “think” about it. What this means is you’ll want to take the adequate amount of solar needed during “summer” months and double it. This will allow for you to not worry about tipping your solar panels and chasing the sun. It will also be functional on cloudy, rainy and winter months.

Yes, the amount of power you use is an important factor. But just as important is when and where you use your truck camper.

Overall, I’d install absolutely as much solar as physically possible. 600+ watts of solar is a good base number for year round functionality. We are running 800watts and that has worked well this year in all conditions. We only had a couple times where the DC charger was required (once when the roof was covered in snow).

How much solar do you use?
 

dayHiker

New member
Nice solar panel requirement summary. But do not forget, what is plugged in is critical.

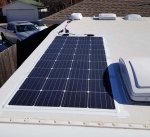
For me, a single 175 W panel works well with two AGM (210 amp-hr total) batteries. Note, I do not use it in the winter. I also have a spare 100 W panel with 50 ft cable under my bed (seriously, that is where it is stored since the flexible panels are so thin). It can be plugged in (y-connector at roof) and placed in the sun and tilted if parked in shade. It supplements the 175 W panel on the roof. I camp for about a week at a time off grid and do like shade (no AC).

This is the main power (no generator) other than when I drive. I do not use the 12v power option on the 3-way standard refrig (eats 9-11 amp-hr ever hour). I do not have a TV. But I have multiple phones, tablet, two computers (do technical writing and programming), satellite radio and cell booster. All the lights in the Liberty are standard LED (about 0.4 amps).

solar on roof2.jpg
 

montypower

Adventure Time!
@dayHiker
Thanks for sharing your experience! Yes, it absolute depends on usage.

We had 200W of solar on the FWC Hawk camper. It had a compressor fridge (consistent power draw) and only 12V otherwise (no inverter) with the stock dual AGM batteries (think around 150ah). It also had a small power feed from the alternator (FWC installed wiring - poor at best). It worked alright in the summer months but we were constantly monitoring. It was poor in the winter months. Even with driving nearly everyday. When stationary parked the batteries would not regain full charge. This was partly due to the slow AGM charging.

Our Winnebago View had ~ 930W of solar with 400ah AGM batteries. The biggest hinderance was the slow AGM battery charge (really frustrating). It worked awesome generally except one trip when we were parked for over a week (NW Winter w/ clouds).

That's what I wanted to explain in the video. Time of year makes a massive difference! You could get away with 50% less solar for summer use. Winter your power usage will increase with the heater use while the sun angle and hours decrease significantly.

Time of year, weather, power draw and battery type are the biggest factors with determining solar required. And nothing replaces testing for how you travel and work. And the more you use the rig easier it is to justify a more robust system. For us, we would always choose more solar than less. :)
 

montypower

Adventure Time!

We’ve owned our 2020 Northstar Liberty camper for 1 year and used the camper for 154 nights! In this video, we give a quick update and share some of the problems and overall ownership experience has been.

Our truck camper has been extensively modified. Be sure to check out the earlier videos to see the changes we’ve made.

Problems:

1. Cut the roof edge on tree branches. This was resolved by installing aluminum corner trim along the entire roof edge (front/back). It allows the branches to slide along the camper edge without cutting the TPO rubber roof.

2. Acrylic Window Scratches. This is fairly easily resolved with some acrylic buffing/polishing compound. It takes 30 minutes or so to get them shined up after a trip.

3. Fridge door not staying closed. We are still working on solutions. We removed one of the interior shelves and secured the other one in place. We may add an additional lock for off road travel.

4. Propane smell. Propane cabinet is not vented. It has a small drain hole and propane gas has come into the camper through the fridge compartment (setting off the CO2 detector). We will be installing a cabinet vent.

5. Rear exterior light failed. May be the LED bumb or contacts. Will investigate further.

Overall, we love the camper size and it’s rather comfy for such a compact space. It allows us to travel for 10+ days completely off grid.
 

knutsCO

New member
Hey Peter,

I have a 2020 NS Laredo SC and have worried about ripping the roof edge as you described in your 1st year review video. I have thought about installing SS grab bars along the roof edge to act like tree branch sliders, but have not followed thru because of the added weight up high.

I really like your corner trim solution! Would you mind sharing the part number and sourcing details for this mod?

Cheers,
Ken
 

montypower

Adventure Time!
Hey Ken -

We purchased the trim through a local RV dealer: Arizona RV Service Part # 20-6935 - Roof Trim Mill 16ft

It was much cheaper having them order the trim and pick up due to the length and shipping cost. We ordered 2 sticks. It was aluminum and easy to bend to roof contour. We painted it white before installing. Used SS screws and plenty of Dicor 501.

Here's what it looks like: https://www.ebay.com/itm/92-White-A...Molding-RV-Trailer-1-1-8-x-9-16-/331953771436

Hope that helps! Easy to install and fixed the branch issue.

-Peter
 

kpredator

Adventurer
Man, this is such a nice run down of stuff, you guys are great. So, we have very little experience here but have a similar-ish Scout Kenai coming would like to do some similar things. The proper battery charging from the truck is great, sounds like a typical charging line wouldn't work with our Yeti Lithuim 1500X. Cool to hear how you are handling grey water as we aren't storing that either (nice).

Questions:
1- What are you doing for a step into the camper?
2- Are you leveraging the storage area between the lower camper sidewall and the truck wheel well? If so, how are you securing it being that you don't have a tailgate on?
3- What are you using for a bike rack? (we were thinking of getting a vertical MTB rack, LoLo, that swings out to the side)
look at Brophy Hitch steps!!
if off road I take it out of the receiver ,
on pavement I just slide it further and
Bungee!!!
works great for us!!
 

rruff

Explorer
look at Brophy Hitch steps!!

I like the concept, but wish they made ones that were more ladder style (didn't stick out much) that could be raised above the hitch... so that it wouldn't need to be removed (and stashed somewhere) when offroad.
 

montypower

Adventure Time!

Our Winnebago View had the Weboost Drive X OTR with the “baseball bat” style antenna on a spring mount. This antenna was mounted 1ft above the roof and hit trees and other low hanging things (not ideal). It was fantastic to have additional cell coverage on remote trips. However, there were some limitations… it never could reach signal if our phones were offline and often it provided no real increase in speed or assistance. Overall, it was less than impressive.

We installed the Weboost Drive Reach “car version” on our Northstar Liberty truck camper over 1 year ago. This “new cell booster” has twice the power requirement as the old “black” style booster found with the Drive X. This increased power has proven to be a game changer! This unit has a tiny “shark fin” antenna mounted on a 1ft square metal plate (for grounding plane) with a tiny .5 dbi gain vs the previous “baseball bat” antenna yielding 2-4 dbi gain. However, even with the tiny antenna it beats the old booster!

We’ve had numerous situations where the booster has reached cell towers and turned our cell phone from “offline” to enough service to text message. This is a game changer! It has made a noticeable difference in both speed and reach. Still not magic… and doesn’t always help drastically.

Nevertheless, this new Drive Reach is significantly more useful than the old Drive X.
 

dayHiker

New member
Thanks for the info on the weBoost Drive Boost. I have been using the "weBoost Drive Sleek (470135) Vehicle Cell Phone Signal Booster with Cradle Mount" ($200 on Amazon). I mounted it in the same location as your booster. As your video noted, easy access through the wall since with the refigerator on the other side. This also gives access through the refigerator roof vent. No roof drilling needed!!

I usually get 1 to 1.5 added bars. Not perfect, but worth it when on the edge of reception.

The antenna is only 5 inch high bat style. Roof top fan covers are taller than that, so their is no added height. Used 3M mounting tape. Has not blown off yet.
 

montypower

Adventure Time!

We arrived in Moab, UT and decided to offload the truck camper! Removing the camper makes off roading much easier… We show the complete truck camper removal with tips. Plus, we will reload the camper which has increased difficulty off road where the ground is uneven.

- It’s a massive help to have 2 people! The driver should follow instructions from the “spotter”. My wife likes to drive because she just follows directions (not responsible for mistakes).

- Level ground makes the process easier (especially when loading).
- Be careful of wind! You’ll want at least 1 person holding the camper to help stabilize if there is wind.

- Take your time! We can unload the camper in 19 minutes (or 9 minutes once jacks are attached). It takes 31 minutes to load the camper (save 10+ minutes if not removing the jacks).

- Always keep the front of the camper higher than the rear. A majority of the camper weight is on the front 2 jacks. By tipping it towards the rear it adds stability and transfers additional weight to the rear jacks.

- Electric jacks (wireless) make the process much safer and easier!

Feel free to share any additional tips or things that help you…
 

runaway

New member
Did your jacks come with the quick release electrical connectors or did you install them? Ours are hardwired so we haven't removed them yet. So far we haven't unloaded the camper except at home so it would be nice to leave the jacks home sometimes. Thanks for the how to video, will bookmark that as a reference...
 

montypower

Adventure Time!
Yes, the camper and jacks had the electrical connectors. It would be easy to add them... However, you may already have them... remove the electrical cover where the wiring goes into the camper. I'll bet you have the same connectors. If not... it would be simple to wire connects.
 

Ultimark

Active member
That was a pretty good description of how to dismount and mount a slide-on camper with wireless controlled electric jacks. We've had wireless controlled Happijac jacks on our camper for the last 11 years; on our second vehicle with it. We've gone from a ute based vehicle like yours after 9 years, to a truck based vehicle, both tray backs.

I thought your directions using the words passenger and driver, to indicate which way to steer, is brilliant. Obviously very effective and I must admit something I had never thought of.

The wireless control mechanism allows you to operate all four, the front two, the rear two, left side or right side two and individually. Which wasn't that clear in your description, unless I missed it; which is certainly possible. Or, is your remote unit and/or jacks not the Happijacs brand?

When you were putting your camper back on, I thought you could have extended the left rear leg to give the unit more stability, as it was, your unit appeared to be effectively standing on three legs. In the first 9 years of our ownership we've had our camper on and off around 30 times a year on average. I take it off and on on my own, so stability is utmost for my situation. As I don't have an observer/helper, I really need to have our camper well above the bed of the vehicle. We also have a tray back vehicle instead of a tub back like your vehicle, which could be slightly easier for our situation.

I thought your use of vehicle stands plus a length of wood to stabilise the front of your camper, was a very good idea; something I haven't thought of.
 

Forum statistics

Threads
188,197
Messages
2,903,720
Members
229,665
Latest member
SANelson
Top