3D printed Locker latch guard

clydeps

Member
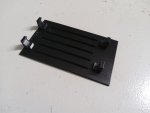
Problem - the latches on my under-body lockers can be jammed by the contents of the locker shifting and preventing the latch from opening. This happened last weekend - I was able to pry the other end open a bit and poke in a long stick to shift the object in the way, but it could be serious since there is absolutely no other way to get into the locker.

Solution - add a guard over the internal latch mechanism to stop anything moving into the danger area. I ran several off on my 3D printer.

Here's what the latch looks like originally in the open position - it swings down to open.
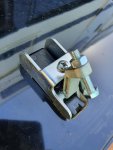
2021-11-16 09.18.24_copy_1209x1612.jpg

And here it is with the guard in place:
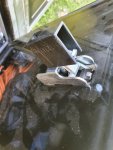
2021-11-16 09.20.53_copy_1209x1612.jpg
 

outback97

Adventurer
Nice! This is maybe something for another discussion, but if someone wanted to get into 3D printing to be able to make small problem solving projects like this, where should they start?
 

clydeps

Member
Well, you need three things;

1. Design software. I use Fusion 360 (free on a startup licence, just requires some hoops to be jumped through each year) or there are other free options like Tinkercad and Sketchup (have not used this lately.) This is what you use to create the 3D model.
2. Slicing software - converts the model into instructions to drive the printer. There are various choices, I use Simplify3D which came with the printer I bought.
3. A printer (you can send your files off to someone else to be printed, but having your own makes for rapid turn-around and prototyping.) With printers you get what you pay for. I bought a Makergear M3 which is a mid-range model and I'm very pleased with it.

There is a huge amount of material online about 3D printing. It was not as difficult as I expected to become productive - the slicer and the printer have been really easy to use, so learning how to create the models was the hardest part.

There are various different materials available - I have used PLA which prouduces nicely detailed prints but is not very strong, and ABS which comes out a little rougher but is very strong. It used to be that you needed to tune the printer settings to get good results, but the M3 (and any other good printer) will come with predefined profiles for different materials that work well.
 

outback97

Adventurer
Well, you need three things;

1. Design software. I use Fusion 360 (free on a startup licence, just requires some hoops to be jumped through each year) or there are other free options like Tinkercad and Sketchup (have not used this lately.) This is what you use to create the 3D model.
2. Slicing software - converts the model into instructions to drive the printer. There are various choices, I use Simplify3D which came with the printer I bought.
3. A printer (you can send your files off to someone else to be printed, but having your own makes for rapid turn-around and prototyping.) With printers you get what you pay for. I bought a Makergear M3 which is a mid-range model and I'm very pleased with it.

There is a huge amount of material online about 3D printing. It was not as difficult as I expected to become productive - the slicer and the printer have been really easy to use, so learning how to create the models was the hardest part.

There are various different materials available - I have used PLA which prouduces nicely detailed prints but is not very strong, and ABS which comes out a little rougher but is very strong. It used to be that you needed to tune the printer settings to get good results, but the M3 (and any other good printer) will come with predefined profiles for different materials that work well.

Thanks for the reply, I appreciate it. I have had a few things that others designed printed at the library and it's a bit frustrating because there's a long lead time and the quality has been all over the place. I think it's been the printer operator and maybe settings they've used that has been the variable. So, I've been considering getting a printer to play around with and learn.
 

clydeps

Member
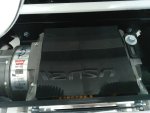
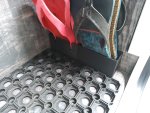
Other bits I've done; winch cover - made in two parts because my printer wasn't bit enough to do it in one. It clips onto the top rods of the winch frame and protects the rope from UV.

20211121_114516.jpg
20211121_114437.jpg
 

clydeps

Member
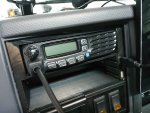
Custom 2-din mounting bracket for UHF CB, also provides a place to mount the USB ports from the rear of head unit.

20211029_073737_copy_1209x1612.jpg

20211121_115129_copy_1651x1238.jpg
 

Forum statistics

Threads
188,256
Messages
2,904,605
Members
229,805
Latest member
Chonker LMTV
Top