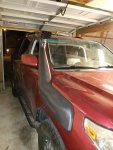
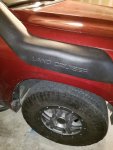
40 Guy builds a 100 Series

Rezarf <><

Explorer
Cleaning up the holes, you can see the burrs left behind and the red paint from the hole saw.
img_0716-jpg.1221490


After filing and the touch up paint you should be good to go on preventing any rust down the road.
img_0718-jpg.1221492


I cleaned up every hole, I think you make about 10 all together.
img_0717-jpg.1221491
 

Rezarf <><

Explorer
This is the nutsert tool I use if you haven't seen one before, works like popping a rivet would. It has different attachments at the end to attache different size nutserts, you can make a poor mans version with a bolt, nut and and larger nut as a bearing in a pinch too.
img_0722-jpg.1221661


One thing to remember is to use a high quality pure RTV silicone caulk like this for each of the nutserts. I glob it on so that when the nutsert it compressed it oozes out and fills all the gaps. FWIW, I used it on each of the bolts generously too, this should keep water out of the A-Pillar.
img_0721-jpg.1221660


This nutsert is popped into place with the silicone already covering the backside. You can see that before I compress it how "deep" the threads rest inside the insert.
img_0723-jpg.1221662


Once you clamp it down, the backside mushrooms creating the mechanical bond and simultaneously squeezing out the excess silicone. You can see how the threads are drawn to the surface as you clamp down on the nutsert. I used these all over my trailer and haven't had one come loose yet. They are slick when done correctly. I wiped up the excess silicone and had a nice set of threaded holes to mount the A-Pillar bracket to.
img_0724-jpg.1221663
 

Rezarf <><

Explorer
Goop, insert, set and snug up the nutsert, repeat. I find pop rivets harder to set than these little guys, so just know they easy to work with.
img_0726-jpg.1221664


Three all set, I just wiped off the excess silicone before mounting up the stainless bolts (also coated with silicone).
img_0727-jpg.1221665


Here is the finished bracket with the stainless hardware installed and the bracket ready to mount the snorkel for the final time.
img_0728-jpg.1221666


Now it was time to install the snorkel for the final fitting. I used blue locktite on the studs and found that if I mounted all the bottom studs before mounting the snorkel onto the fender then the final two upper studs could be installed easily. The kit came with nice wide stainless fender washers and nylock nuts to finish off the mounting.
img_0729-jpg.1221667
 

Rezarf <><

Explorer
I added a dab of blue Locktite to the A-Pillar bracket for good measure as they have no lock nuts or other means to keeping them in.
img_0731-jpg.1221671


The snorkel mounts up VERY solidly, I can shake the whole 100 by the snorkel and there is no movement. I also liked that the hose clamp for the snorkel head was colored black to match, even my Safari snorkel didn't mind that detail.
img_0730-jpg.1221670


Looks good if you ask me...
img_0733-jpg.1221673


Done, now to order some parts for the CV boot and the other things that need repairing. But I had to get a fun mod done that actually had something to show for it! :D
img_0737-jpg.1221674
 

Rezarf <><

Explorer
Tore the front axle out yesterday, to fix a torn inner boot. Got the axle out, cleaned it up, checked it out... everything was nice and tight still, and repacked the grease and installed the new boots...

...only to tear the same joking boot upon reinstalling. Ugggh! Next week, I get to redo the boot and tackle the starter contacts.

On a happy note I traded my m12000 winch for a Warn xd9000 winch plus some cash. So I am tossing the cash at new synthetic line I have on the way. I should have time to knock that out next week. We have an 80* day forcasted next week so I am taking the day off to crank on the 100. If my day goes perfect, I'll fix the starter, the CV boot, install and wire the winch, and if I have time, wire up my Hella 4000s.
 
Great build
looking to do some similar mods on my 100 now that I have sold my 40 (dont kick me I bought a defender 110)
excited to hear aboht the ARB as im pulling the trigger on one for protection

Keep going !!!!!!
 

Rezarf <><

Explorer
I could have spit nails having split the boot I was trying to replace upon reinstalling it using a suggested method of driving the axle home with a towel wrapped wood 2x2. This didn't work out for me. However, the second time I had the axle out, fixed and reinstalled in just over an hour. :bounce:

Just after "fixing it" the first time...
img_0747-jpg.1239270


Ready for another tear down...
img_0748-jpg.1239271


At least I didn't have to repack with new grease! Ha!
img_0749-jpg.1239272


I noticed a torn upper control arm boot, it was just split but I tore it off to get at the inside and check it out. Everything was solid, so I ordered up a new boot from Mr. Toyota.
img_0753-jpg.1239273


One thing about the Toyota OEM stuff is you know it is gonna fit, be quality and they include all the little stuff like the grease for the ball fitting, and the key ring to clamp the top down tight and not let any gunk in. I personally feel that getting the OEM stuff is well worth the price, also if you make friends with your local dealer guys and ask for an enthusiast discount, most of them will hook you up.
img_0752-jpg.1239274
 

Rezarf <><

Explorer
Well, I finally got the last little details done on the HAM radio, hooking up the wires, and mounting the external speaker. I used a Motorola External Speaker at some friends recommendations from my local Denver 4x4 Club, Rising Sun. This is a small speaker but it is really clear and has a lot of volume. I bought a 3 pack of them off ebay and plan on adding the other two into my FJ40 for my HAM and CB radios. I will toss them on with a quick fist and attach them to the roll bar, but for the 100 I went ahead and hard mounted the speaker.

I just used the supplied bracket and screwed it into the kick panel, high and tight along the upper edge and as far back as I could mount it and still get the little "nut" that secures the kick panel. I did this on the passenger side aimed at the driver. It came out clean and works great. I can hear it very clearly and it is barely noticeable (visually) from the drivers or passenger seats. It doesn't interfere with any foot room in the passenger area. I might add a little piece of foam behind the speaker as it is now pretty heavy and could rattle against the kick panel structure behind the plastic but I will wait to see if that is an issue off road, on road it hasn't made a peep.


First up... mark up the bracket and drill some holes. I am not a fan of drilling a bunch of holes into things, but for the right reasons it is the best option. I wanted a secure mount and didn't trust any other fasteners with something as heavy as this little speaker. It has some heft to it.
img_0763-jpg.1248151


I had the multi meter out because my radio called for a speaker impedance of 8 ohms. Just an FYI but speakers have an impedance of around 6.3ish when they are an 8 ohm speaker, not sure why, but a 4 ohm speaker runs around 3.2ish as well. I just used a few countersunk sheet metal screws to attach the bracket to the kick panel, just be sure not to strip the plastic when you tighten them up.
img_0764-jpg.1248152


Here is the speaker tucked up into the passenger foot well. It is nice and out of the way and still very loud and clear when needed. I am stoked about hiding such a relatively large speaker without adding clutter to the cockpit.
img_0769-jpg.1248153


Here is my view from the drivers side seat (actually I had the camera low so you could even see it), it is barely noticeable that it is even down there. In fact, it has startled a few people when I have the squelch turned up and a signal breaks through. I am glad I wired an external speaker that can be run totally separate from the stereo and runs with the power of the vehicle and accessories turned off. The bonus was I bought it off a friend and local cruiser head and it has all of his repeater stations and popular local stations already programmed and listed by name... JACKPOT!
img_0765-jpg.1248154
 

Forum statistics

Threads
188,040
Messages
2,901,503
Members
229,411
Latest member
IvaBru
Top