79 series dual cab build

Rumpig

Adventurer
I was certainly unaware of the problems associated with the dual cabs. I would have thought Toyota would have solved or at the least been aware of that issue. Quite interesting.
That ute box is a real beauty though. I am interested in your trailer. We don't come any where close in North America with the crazy great trailers you build down under. Mind, it
would seem you pay for what you get!! Look forward to the rest of the build. J
I'll post some pics of the trailer soon, have done so previously on this forum and you can see some in the trip reports i've done previously, aswell as the one i'm in the middle of doing currently http://www.expeditionportal.com/for...and-back-again-an-Australian-7-week-adventure
70 series Toyota's certainly aren't the most common brand when it comes to bending chassis rails in dual cabs here in Australia, but they aren't 100% immune from it happening either. At the end of the day it all comes down to how you load / set your vehicle up in the first place, and a major part of that IMHO is getting the weight as far forward as possible in the rear tray area....having a lot of weight hanging off the very rear of the vehicle, bouncing up and down on corrugated and rough roads can't be a good thing for any make or model. The companies will tell you that brand X vehicle has a load rating capacity of X amount, but you simply can't put a fair whack of that load at the very rear of the vehicle like many peope do, they aren't designed to take it that way. What i am mentioning is a subject that has become abit of a talking point on various forums here in Australia due to how many dual cab utes are bending their chassis here, many people have no idea how much (more like how little actually) weight they can carry in the back of their vehicle, and still be within it's designed limits (both legally and structually). This link will hopefully work for you to see a thread on the very subject i'm talking about http://www.myswag.org/index.php?topic=44221.0 you'll see various pics on the 2nd page that show how badly some people are loading their vehicles, oblivious to the idea it is bad for their vehicles structual integrity.
 

Matto

Observer
Nice work Rumpig - that's an awesome "clean slate" base. And it's even in the right colour :).

I love the canopy - very well thought-out. I'll send everything you've said about dual cabs bending when overloaded, and the spare tyres seems to be a bit factor in that. Great idea having it so far forward. Nugget's (Aulro) canopy on his new Deefer 130 has both spares mounted right behind the cab in their own little sealed-off section to keep the mud and dirt away from the interior (linky here) . It's a neat setup, but it's more complex (read, heavier and trickier to access) than your design. Either way, I think it's telling that a lot of people doing serious outback kms are all now mounting things like tyres and water tanks as far forward as possible.

Speaking of water tanks, are you fitting a tank into the canopy?

Keep the updates coming - I can live vicariously though your build!!! :wings:

Cheers,
Matt
 

Rumpig

Adventurer
Nice work Rumpig - that's an awesome "clean slate" base. And it's even in the right colour :).

I love the canopy - very well thought-out. I'll send everything you've said about dual cabs bending when overloaded, and the spare tyres seems to be a bit factor in that. Great idea having it so far forward. Nugget's (Aulro) canopy on his new Deefer 130 has both spares mounted right behind the cab in their own little sealed-off section to keep the mud and dirt away from the interior (linky here) . It's a neat setup, but it's more complex (read, heavier and trickier to access) than your design. Either way, I think it's telling that a lot of people doing serious outback kms are all now mounting things like tyres and water tanks as far forward as possible.

Speaking of water tanks, are you fitting a tank into the canopy?

Keep the updates coming - I can live vicariously though your build!!! :wings:

Cheers,
Matt
Cheers Matt...looks like you need to be a member of that forum to view that link you put up mate. As for the water tank question...currently i am not looking at putting one on the vehicle, but never say never. I guess one would be handy though, so maybe down the track i might look at adding one somewhere. For now i'll stick with the plan of our camper trailer supplying water when family is on a trip somewhere, and if it's just myself out somewhere, there'll be plenty of room to chuck in a jerry can of water in the rear cargo area and tie it down.

As to the updates....yesterday (which yes was a Sunday some may realise, but my mate owns the store so i emailed him and 45 minutes later it was all sorted...lol) i ordered a
#1 - TJM T13 colour coded steel bullbar for the front of my Cruiser, and I'm getting it powdercoated in the same colour as my canopy is, which is Aztec Silver.
#2 - I'm also fitting my old Lightforce 240 XGT spotties on the new bar, plan is to HID them before they go on, but i don't think i'll actually have enough spare time before that happens to be truthful (am in the middle of helping organise a 4wd event that is happening in just over a months time).
#3 - TJM IBS dual battery system...Aswell as the second battery (fitting a 12 inch Optima Yellow), this will give an incab display for both batteries, alternator monitor and manual link circuit
#4 - Outback roof console...need somewhere to mount my old ICOM 400 PRO uhf radio, so going down this route for doing that
#5 - Mongoose replacement 5" rear vision mirror....for running a reverse camera through. Finally i won't have to rely on my wifes poor guidance for hooking up the camper trailer...lol
 

1leglance

2007 Expedition Trophy Champion, Overland Certifie
Oh that is very very nice looking with the canopy on back.
You guys will be having a bunch of family fun and I bet the girls won't mind being dropped off to school in that ride :)
Glad to see the build going but I forgot what the prices are like for you folks, ouch. No wonder she will be a slow build.
Looking forward to the trip reports and can't wait to someday get over to spend time with you fun family again.
Oh and feel free to fly over here to Arizona and take a trip in my old time Suburban, it is gasoline and the steering wheel is on the wrong side for you, but you are welcome to use it anyway :)
 

Rumpig

Adventurer
Oh that is very very nice looking with the canopy on back.
You guys will be having a bunch of family fun and I bet the girls won't mind being dropped off to school in that ride :)
Glad to see the build going but I forgot what the prices are like for you folks, ouch. No wonder she will be a slow build.
Looking forward to the trip reports and can't wait to someday get over to spend time with you fun family again.
Oh and feel free to fly over here to Arizona and take a trip in my old time Suburban, it is gasoline and the steering wheel is on the wrong side for you, but you are welcome to use it anyway :)
Hey Lance,
Funny you mention taking the girls to school, i may or may not have swung by their school the day i picked the vehicle up and gave them a lift home in the new rig...lol. It's only a short distance from home, so i thought the chances of getting pinged by the police for driving it without a tray on it were pretty minimal.
I still recall your offer of the fourby and camping gear if we ever get over to your home land mate, just need to stop spending money on other stuff and make the effort to get over there one day for sure. As you've mentioned, prices for vehicles over here are scary stupid, especially if you want to buy a Toyota...so this purchase has certainly given the bank account a fair whalloping, meaning no big holidays for a while now. The price of the Aussie dollar doesn't help much for travel to the States either sadly.
You know you and your family are always welcome back here if you manage to get back to Australia again, it's no problems dragging the Kimberley Kamper out to set up in the back yard for ya's.....lol
 
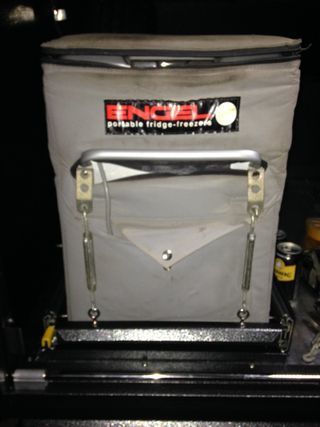
PUT IN 2 EYELETS IN THE FRONT FOR TURN BUCKLES TO ATTACH TO


I attached my fridge in the same way, but having it loaded till the top for a year I saw that the friedge became loose - turned out the handles started to bend. Quick tip for all would be to unscrew the handles of the fridge and turn them up side down, making you be able to put more downward strength on them.

Enjoy the dual cab!

Yep, major design flaw.

I am making a new handle out of aluminum that will bolt to the sides and the ends with more mounting locations just so I never have to worry about that again. I just came back from a trip to Barrett Lake trail and I noticed mine is starting to fatigue.
 

Rumpig

Adventurer
Yep, major design flaw.

I am making a new handle out of aluminum that will bolt to the sides and the ends with more mounting locations just so I never have to worry about that again. I just came back from a trip to Barrett Lake trail and I noticed mine is starting to fatigue.
you do realise the brackets you picture aren't attached to the handle don't you? there are proper mounting tabs (an actual Engel product for this purpose) that attach the turn buckles to the fridge itself, the handle has no pressure on it at all. I had my 80ltr Engel fridge bolted down in position like this in my last vehicle for nearly 10 years, never had a problem with it. I am getting more straps to change the rear that is strapped to the centre of the handle currently. That vehicle traversed some pretty seriously corrugated roads and 4wding in that frame, so I can't really see it being an issue for this fridge either, seeing the exact same set up has survived for that period previously.
 
Last edited:
you do realise the brackets you picture aren't attached to the handle don't you? there are proper mounting tabs (an actual Engel product for this purpose) that attach the turn buckles to the fridge itself, the handle has no pressure on it at all. I had my 80ltr Engel fridge bolted down in position like this in my last vehicle for nearly 10 years, never had a problem with it. I am getting more straps to change the rear that is strapped to the centre of the handle currently. That vehicle traversed some pretty seriously corrugated roads and 4wding in that frame, so I can't really see it being an issue for this fridge either, seeing the exact same set up has survived for that period previously.

Cool, didn't know that they were mounted to the fridge itself. Nonetheless, for those not wanting so spend additional money on accessories it serves as well to turn the handles around.
 
you do realise the brackets you picture aren't attached to the handle don't you? there are proper mounting tabs (an actual Engel product for this purpose) that attach the turn buckles to the fridge itself, the handle has no pressure on it at all. I had my 80ltr Engel fridge bolted down in position like this in my last vehicle for nearly 10 years, never had a problem with it. I am getting more straps to change the rear that is strapped to the centre of the handle currently. That vehicle traversed some pretty seriously corrugated roads and 4wding in that frame, so I can't really see it being an issue for this fridge either, seeing the exact same set up has survived for that period previously.

I did not realize that. In that case, totally bulletproof and I like it. I still want to beef up the handles on mine though.
 

Rumpig

Adventurer
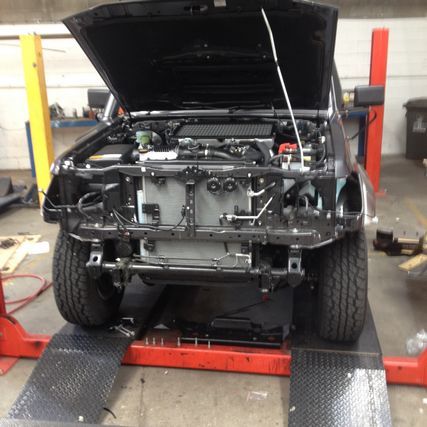
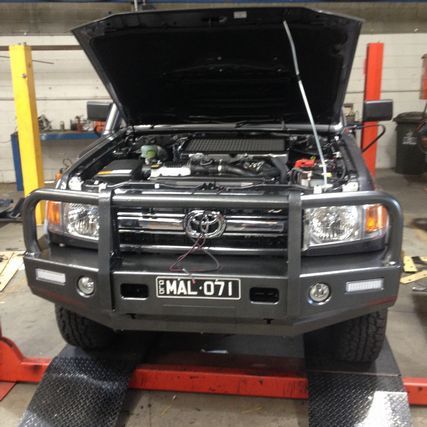
I dropped the Cruiser off at my mates 4wd shop yesterday arvo after work to get a few goodies fitted to it today and tomorrow. Messaged another mate who runs the fitting area of the shop today and told him to send me a few progress pics if he had time. Here's what i got sent back to me....


The bullbar is a TJM T13 steel deluxe winch bar, i got it powdercoated the same colour as the canopy i had fitted on ther back. Eventually down the track i'll get a winch fitted to the bar, but for the moment funds don't allow this to happen, and i'll be looking at doing suspension / lift and new tyres on the vehicle long before i spend the coin on getting a winch for it. Will update the list of other stuff i am having fitted to the vehicle once it's all on so i can photograph it for you, i should have it back tomorrow arvo all going well.
 
Last edited:

Rumpig

Adventurer
What is the weight of the canopy empty?
Thx
to be honest, i have no idea. It was a question i meant to ask, but never did remember to do. The majority of it is aluminium so it won't be overly heavy, but i truthfully have no idea just how heavy it is.
 

Rumpig

Adventurer
What is the weight of the canopy empty?
Thx
so i made a call the other day to find out the weight of the canopy, as it's time to look at doing some new suspension now that i've sold my Ford Maverick 4wd ute i had. The entire body i got made, including the fridge slide, internal storage box, underbody draw, storage boxes behind the rear wheels and also including the spare wheel mounted in there (basically everything pictured)....comes in just over 250kg. We've called it 260 kgs just to be on the safe side. So armed with that knowledge, i can now start choosing what springs to chuck under the rear of the vehicle.

Nice rig. I wish we could get those in the US.
cheers mate
 
Last edited:

Forum statistics

Threads
188,022
Messages
2,901,256
Members
229,411
Latest member
IvaBru
Top