Adventure Trailer From Vanagon Chop

Karmann Vandiego

Well-known member
While taking a break from a much larger project, I decided to fill some of my time and expel some of my creativity into an adventure trailer.

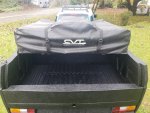
The base to the trailer is this, the cast off back end from my monster build.


1.jpg
2.jpg

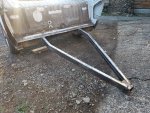
The back of the Vanagon seemed ideal as an off-road adventure trailer simply for its size and factory use of independent suspension. After sourcing a dilapidated boat trailer to source the tongue from, I began to mock it all up.

3.jpg
4.jpg5.jpg
6.jpg
7.jpg
8.jpg
 

Attachments

  • 9.jpg
    9.jpg
    1.1 MB · Views: 23
  • 10.jpg
    10.jpg
    472.4 KB · Views: 20

Karmann Vandiego

Well-known member
I felt the tongue would be too weak for its intended purpose, so I boxed it in using 2 pieces of 1.5" square tubing stacked inside of the C channel frame. I removed and discarded the coupler since it would be replaced by a new one shortly.
9.jpg
10.jpg

I sourced some aluminum wheels from an Audi A6 I have sitting in the side yard (another project...). I'm not sure I like them, and they probably won't stay in the long run, but the tires are new and makes the trailer easier to move around. I also installed a Vanagon bumper I built a while back.

11.jpg
12.jpg
13.jpg
14.jpg

And of course, a shot of what makes this nearly free build all worthwhile. Look at all of that clearance.

15.jpg
 

Karmann Vandiego

Well-known member
I think we should slow things down a bit and actually discuss the plan...?

Don't be fooled. Although I may look like a man with a plan, I am nothing more than a man with a disorder! I get a picture in my head, and then reach the goal by braille. Let's just call this a bar napkin build. There are stains and smudges...and sometimes I can't read my own hand writing!

The end goal is for a rack to be added to span over the top of the trailer. This will act as the platform to mount a CVT MT. Shasta RTT. It will open to the rear of the trailer when deployed. Under the tent will be the cargo shelf for bulky items, which is the original rear floor of the van. Under the engine lid will reside a boxed in storage area that will also house a diesel parking heater.

The tongue to the trailer received the final touches before paint, and a front bulkhead was added.

16.jpg
17.jpg
18.jpg

Inside of the lower compartment, the diesel heater was fitted inside of a small hole that was originally a fresh air vent for the engine. Using some flexible exhaust pipe, I ducted the heater vent up to where the roof tent will reside and welded a bung. The ducting will then be attached there and be ducted into the tent.

20.jpg
21.jpg
22.jpg
23.jpg
 

Karmann Vandiego

Well-known member
This brings us to today. I began prepping the body to be coated in rubberized bed liner. I sanded down the entire body and pressure washed it to remove any left over dust. The side rails were added for the rack, and weld spatter removed from multiple areas around the project.

24.jpg
25.jpg
26.jpg
27.jpg
29.jpg
28.jpg
 

UHAULER

Explorer
I thought I saw your van abandoned in front of a pick-N-pull, but it turned out to just be a dumpster:ROFLMAO: Just kidding of course. I love different, wierd vehicles.
This was my 84 Toyota back in 1998.
84toy02.jpg


84toy05.jpg
84toy07.jpg
84toy09.jpg


84toy11.jpg
 

screwball48

Explorer
This is cool. There is a rear portion of a Westy not far from me that I would love to place on a trailer frame.
 

Karmann Vandiego

Well-known member
Working around the weather, I was able to apply the bed liner to the outside of the trailer. The product I used was Herculiner. I have never used a roll on bed liner product before, so I was pleasantly surprised by the process and results. It's just above freezing at night with steady rains as it dries in the car port, so the process is anything but quick. The outside of the trailer required 3 coats to obtain "full coverage" which used 1 full gallon. I expect the inside to take another full gallon.

30.jpg31.jpg33.jpg32.jpg

In the following picture, you can see how the business end of the diesel heater is plumbed.
34.jpg

Today, I will be adding a floor to the storage compartment and fabricate the rear tailgate. Once that is done, the inside of the trailer can be coated in the bed liner as well.
 

Herbie

Rendezvous Conspirator
Unless you are putting everything in totes, bed liner can be rough on gear like tents, duffle bags etc.
That's a good note. Way back when, I built a box for my house battery and (I thought) fluids and tools, so I lined it with brush-on bedliner to protect things. Tough stuff, but when I ended up using that space for general storage, I was sorry that I kept barking my knuckles on the sides of the box - rough like 40 grit sandpaper.
 

Karmann Vandiego

Well-known member
For the tongue box, I repurposed an old military footlocker, and coated the outside in bed liner. I took some advice from other posters, and did not line the inside of this cargo box.

44.jpg45.jpg46.jpg47.jpg48.jpg49.jpg

The handles on the tongue box have been left intentionally, so that they can be painted in semi-gloss.

The heater now needs its fuel tank mounted and controller plugged in.
 

Forum statistics

Threads
188,483
Messages
2,905,500
Members
230,494
Latest member
Sophia Lopez
Top