Advice for my first camper and pan american highway trip

sonora

New member
Great purchase price you did well!!!

I used rachet straps to bring my camper home for the first time and they worked fine for that. After I got it home I worked on getting a proper tie down system.

I also did my own camper plug-in wiring install using the helpful info doing a search on this forum. The Rv places wanted $400 - $700 to install it. 8 gauge wire, fuses, plug in, connectors, and isolater cost me around $100 and my labor was free. LOL

If the propane line just has surface rust and is not deeply rusted and too far gone, I would just wire brush it and sand all the loose rust off real good and then paint it by hand a couple of times with some white rustoleum paint.
 
Last edited:

vicmillon

New member
Great purchase price you did well!!!

I used rachet straps to bring my camper home for the first time and they worked fine for that. After I got it home I worked on getting a proper tie down system.

I also did my own camper plug-in wiring install using the helpful info doing a search on this forum. The Rv places wanted $400 - $700 to install it. 8 gauge wire, fuses, plug in, connectors, and isolater cost me around $100 and my labor was free. LOL

If the propane line just has surface rust and is not deeply rusted and too far gone, I would just wire brush it and sand all the loose rust off real good and then paint it by hand a couple of times with some white rustoleum paint.

Yes I finally decide to use heavy duty rachet straps for this time and then try to find the best system based on the truck than Im going to buy...

:ylsmoke:
 

Stan@FourWheel

Explorer
Here are some old pictures I have saved.

Twist the black knob over to the "pilot" position.

Push the black knob all the way down so it goes as far down as possible.

Keep holding it down while you are trying to get the pilot light going.

Use the long automatic BBQ lighter to make your life easier.

I used to tell customers that if their thumb was not sore from trying to hold that black knob down, they weren't holding it down long enough.

:)

It can take a couple of minutes before the pilot light will fire up.

Once the piolt light is going you can twist the black knob over to the "ON" position and the hot water heater should fire up.

* important -- make sure your water system is full, and that the hot water heater is flushed and full of water before trying to light it up *


PS: gotta love those paper wasp nests !

:)

I see those all the time on campers that have been sitting for awhile.


.
 

Attachments

  • hot water drain plug.jpg
    hot water drain plug.jpg
    57.8 KB · Views: 3
  • hot water pilot light 1.jpg
    hot water pilot light 1.jpg
    50.1 KB · Views: 2
  • hot water pilot light 3.JPG
    hot water pilot light 3.JPG
    67.5 KB · Views: 3
  • hot water pilot light 2.JPG
    hot water pilot light 2.JPG
    70.3 KB · Views: 2

vicmillon

New member
Thanks again guys! really!
Stan, that was an amazing step by step description
squatchout:eek:ne of the things that i did was to jump on the bed, laid down, like i was sleeping... It was a good feeling with the camper.. after a while is going to be your home...
Tomorrow we go to pickup the camper...
I cant believe it, I spent so much time searching for the right one...
I promise pictures and keep you updated with the evolution and progress of the camper and the truck!

thanks again!

best
 

AeroNautiCal

Explorer
I'd make a point of joining the owner's forum specific to your camper type, as that's where the main wealth of knowledge could be found, likewise the modifications carried out on type.

Known modifications, service issues, faults, etc, should all be in that knowledge base.

You look to have bought a lovely camper and I look forward to following your preparatory work.
 

vicmillon

New member
Hello to everyone!!!!

Sorry i disappear for a while, i was very busy with a lot of stuff, including moving the camper from Langley to Pemberton, what was a big adventure... find a new job, and more stuff

SO we finally got the camper...!!!!:wings: and now is safe in home waiting for a truck...

We moved the camper from Langley on a crazy rainy day, the rear lights of campers didnt work, but the problem was not not the campe... the truck plug was broken, so we had to buy some lights, glow sticks and put it on the back of the camper!
We came back around 9 pm in one of the most rainy days ever on a non easy track , the sea to sky corridor in BC.
But we finally did it! It was a long day but it worst...

Now we make a list of the the things we need to buy for the camper and also a list of things than we want to improve.
I would like to share all this info with you guiys so you can help me a little bit.
Im already did a lot of research, so i have a good idea of what I want, but is always better to ask the experts...

Ok, lets start from the begining

PIMP MY CAMPER PROJECT

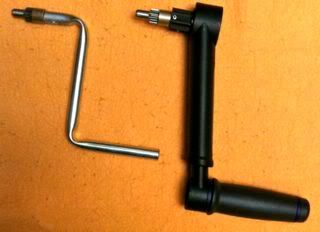
1. LIFT SYSTEM This is first priority, because I broke the hand crank the second day. The original was really bad quality and I found than many owners had the same problem.
This is my idea> Im already bought a heavy duty glide uo crank on ebay I want to make it stronger like this one

SHORTHANDLEsmall.jpg


Here's an image of the destroyed crank, very bad quality, by HECO lift system...

DSC_0057.jpg


PLUS I want to add roof lifting helper shocks. I found this is a good idea

Im just wondering where is the best place to install the springs...
Any brand suggestions for the springs???

3. Battery. I want a deep cycle battery, i dont want to spend a lot of money on this item. There[s a lot of space for batteries on the camper, I was thinking, maybe 2??? Im still doing some research on this item... Any suiggestion???

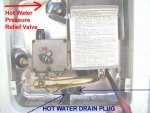
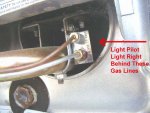
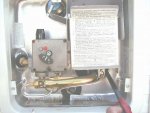
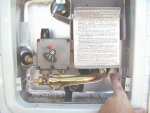
2. Water heater. I can make the pilot turns ON, but when I move to ON position, its turn off. I wait 3 minutes and didnt work. I try everything you recommend me , but nothing works. I think i would have to replace something....

3.LED lights. We want to change all the inside lights to LED, I didnt do any research about this item yet

4. Lock system for doors, water heater, propane tank and rear fridge acces.

5. Solar Panel. I like the UNISOLAR 68 w. Is light, perfect for pop up and good price.

6. Fantastic fan vent. Can i use one of the roof vent than already have on the camper???, or do i have to make a new one??? Do i have to install a vent cover or is not necesary??? Wich model is the better and not so expensive??, i was thinking on the Fan - Tastic Vent® Model 4000 with reverse

6.Waterproof paint for the roof

7. Water proof canvas spray

8. Change rusty pipes and bolts

9. Curtains, and new decoration :sombrero:

As you can see a LOT of things to do....
Any help is welcome!

I want to post pictures when I can manage to raise the roof... for now i just can put this one

This is me reading Kafka on the camper, just to check how comfortable is

camper1.jpg


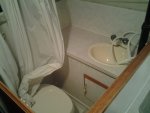
The super big and comfortable bathroom

camper2.jpg


Outside view with the roof up :drool:

camper_3.jpg
 

Attachments

  • camper2.jpg
    camper2.jpg
    157.1 KB · Views: 1
Last edited:

DesertBoater

Adventurer
I'll chime in on the vent and Fantastic-Fan. I replaced the vent that came with my camper this summer. Mine is a Four Wheel Camper, however, in my research it sounded like most vents are the same size 14"x14". I ordered the same one you mentioned (4000R) and it was a very simple installation. Remove the old vent, wire the new fan in (FWC pre-wires all of their roofs for a fan regardless of whether or not they will be installing a powered vent). Then drop the new unit into the square hole with a bit of sealant tape (the fan comes with a foam gasket, however I used Butyl tape and it's held up very well. Then inside to re-install the original molding/plastic cover piece, and some self leveling caulk sealant outside, and it was ready to go!! 2 hours maximum.

I've also added gas struts to assist in lifting the roof. I've got solar panels on the roof, plus a thule cargo box and often 2 whitewater or sea kayaks, each around 40-50 lbs. I have 4 80 lb struts and they work marvelously!! Sometimes if the roof is empty (just solar panels) it's annoying to lower the front (lighter, thus i need to pull down from the outside and latch) but otherwise, they're absolutely worth the investment.

For me those have been the two biggest additions to the camper.

Good Luck!!

West
 

vicmillon

New member
I've also added gas struts to assist in lifting the roof. I've got solar panels on the roof, plus a thule cargo box and often 2 whitewater or sea kayaks, each around 40-50 lbs. I have 4 80 lb struts and they work marvelously!! Sometimes if the roof is empty (just solar panels) it's annoying to lower the front (lighter, thus i need to pull down from the outside and latch) but otherwise, they're absolutely worth the investment.

Hi West

Where did you install the gas struts? front/rear, side/side, inside, outside??
I was thinking on 40 lbs, or 60....
Im not planing to add extra weight to the roof, maybe, maybe a thule box, but i dont know yet cause the camper is plenty of space and cabinets inside....
 

DesertBoater

Adventurer
I added two struts to each end (front and rear). If you're looking into this, and my apologies if it's already posted somewhere, there's a great thread over on Wander the West on "Roof Lifting Helper Shock Thingys". That's where I found most of my information. It's a long thread, but there's lots of good info and photos. Forum member Overland Hadley also has a pretty sweet setup going on inside of his camper, and a good write-up on his reasoning/design as well as links to where one can buy the brackets, struts, etc.

I didn't really expect to have a Thule box on the roof, and probably still wouldn't have one except that it was given to me. I've found it really really useful to store everything from kayaking/skiing gear (wet, stinky, long/oddly shaped) to dirty laundry, extraneous camping/backpacking/climbing gear. Mostly things that aren't used on a day to day basis, but are still being brought along. I hope that helps!

Cheers,
West
 

vicmillon

New member
Thanks for the links!

My first option was to add 4 struts, 2 on the front, 2 on the rear, but i have this little issue

This is the back of the camper

DSC_0083.jpg


As you can see the door is not in the middle, is no symmetrical, and theres not enough space above the door to put the brackets...
So the only possible place to put the springs in the rear part is one each side of the door, like here

DSC_0081.jpg


and here

DSC_0082.jpg


The other option are 2 in the front, and 2 on a rear side, or 4 side by side

DSC_0080.jpg


there's one more thing, the brackets...
the space between the roof and the base is not flat as you can see on the picture

DSC_0085.jpg


i think Im going to use this mounting brackets

bracket.jpg


Im still have a week before the springs arrive...

Thoughts on this?
 
Last edited:

freeskier125

Observer
The other option are 2 in the front, and 2 on a rear side, or 4 side by side
I ran into the same issue, ended up going with 2 in the front/2 on rear sides. Works fine. Used 40lbs on each corner but could have gone with more. I used the same bracket for the bottom and drilled out one of the rivets on the roof corner cap with a ball head bolt.

IMGP0003.jpg


If I was to do it all over again, I might consider mounting them at a steeper angle (maybe the 2 rear straight up and down? although it may be difficult to crank back down?). There is no real advantage until they become somewhat vertical. Regardless, I'm satisfied and its a worthy improvement.

ALSO! when mounting consider any interfearence with the roof running lights when closed. Mine are too close and have popped off/cracked the lens cover on the front :mad:

IMGP0799.jpg


By the way, I don't see any roof clamps on the rear of your camper? I've slowly learned that they're kinda important and to have them set properly. I'll only share one story....
I'm cruising along on a sunny afternoon :ylsmoke: somewhere down in Georgia, when a similar loud red 'gasser' Dodge Ram pulled up next to me and gave me the thumbs up. Yeah, sweet, so I got on it and bellowed out a rather large cloud of black coal .... but then the thumb turned into a pointing up, and repeatingly pointing up... then with both hands he gave me the 'you're roof is lifting up' motion. HEYYY OOHHH... Paranoid, I pulled over at the next exit and found 2/3 (one is broken) my roof clamps undone and the canvas flopping around outside. I can only assume the roof was lifting up at highway speeds (I think I adjusted the roof clamps when some of the canvas was pinched between, after miles of bumps and wind force the clamp popped off)

Despite that, I still have my roof :p

Good luck with the build!
 

vicmillon

New member
Hey freeskier, thanks for the advice I was looking forward to hear your experience..
At the end I didnt order the Suspa springs.. Im still waiting...

As I am in Canada if I order the SUspa they charge me around 80 USD in shipping and custom clearance, what i think is a lot...
I found this attwood springs, basically the same, cheaper, 50 bucks for shipping and custom clearance.... and is a good brand, but the 40 lbs are out of stock.. so I have to wait...

There is one more option, is a Canadian company call gemini I sent them an email explaining everything and the reply me very soon regarding more information like weight of the roof, dimension, angles, so they can choose the best spring....Unfortunately the best available spring is out of stock until 1 or 2 more weeks... because an RV company bought all the stock...

So the gods doesnt want to see the roof up, until the next week..
At least the crank was shipped! :)

And dont worry about the clams, i just took it to repainted with anti rust :ylsmoke:

Best!
 

Forum statistics

Threads
188,586
Messages
2,907,392
Members
230,704
Latest member
Sfreeman
Top