(Another) Forest Living Suburban Build Thread

rayra

Expedition Leader
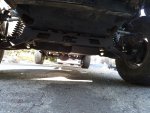
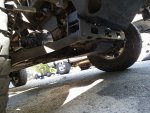
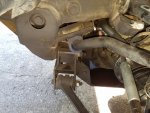
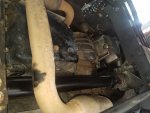
Am I interpreting that undercarriage image correctly, the new mount sits HIGHER than the factory cross brace did, while simultaneously dropping the front diff? or is that just the larger 9.5 with no change in CV / output height /location, making it look like the diff is lowered? I mean it IS lower. And seems much more exposed to me now. But that is sans the factory plate that covers everything anyway. So what does the trailing end of that factory plate bolt to now?
 

Burb One

Adventurer
Sorry, the last picture with the skid plate will make it more clear, I'll get that tonight (It was dark when I finished and I didn't get a picture)

Maybe this will clear it up

Stock height 8.25- self explanatory
6 inch lift with 8.25- Drops the diff 5.5 inches from stock (along with the front and rear cross members as can be seen- thus keeping the stock CV angles while allowing the truck to be raised 5-6 inches) IE the bottom of the diff height is actually the same height or close as it is on a stock height truck, however obviously, the rest of the truck moves up. IE center axis of the diff is the same in respect to the wheel.
6 inch lift with 9.25- The diff sits at the same same center axis as the 8.25 with six inch lift, however since the diff is bigger the lower edge of the 9.25 is probably .5 inches lower than the 8.25. However the bottom of the diff still higher than the skid plate, so no loss of ground clearance. The steel bolt-on diff mount from the lift kit (for a 2500 lift) puts the mount at a lower place than the 1500 lift kit mount for whatever reason (I think it's because of the size of the 9.25 diff doesn't allow the mount to be directly in front as there would be no room, they had to put it lower so it can sit closer to the diff.... )This is why I had to reweld the mounts, however the diff itself is at the same (or within .25 inches) same center axis.


Let me know if that make sense. The picture with the skid plate will probably help.... My bad.

EDIT- Also after saying this. Might be interesting since, I believe the cross members on a 1500 and 2500 on the lift kit are the same width, possible sourcing a 2500 front cross member, with the proper spot for the front diff mounts, may make this bolt on to a truck with a lift. IE only parts you would need are 6 inch 1500 lift, and then the front cross member and the bolt on steel diff mount from a 2500 of the same brand lift. Would be interesting.

Also- the trailing end of the diff plate bolts to the "stock to the lift kit" location on the rear lift kit cross member
 
Last edited:

Burb One

Adventurer
Rayra-

Maybe this picture helps

1- is rear mount points for the skid plate on the rear lift kit cross member (same mount point as before the 9.25) Mounts to the back side of the cross member.
2- Is the modified/new L bracket mount point for the front of the diff (and skid plate) This uses the 2500 front diff mount on the diff which is A different location in respect to the diff and cross member than the 1500 (2500 puts the bushing/mount lower than the 1500).
3 and 4 are new mounts I made (out of view) for the skid plate which are simple brackets to the front cross member. My picture tonight will make that more clear.

Notice, that the diff still sits above the plane created by the rear lift mount/ diff drop cross member. This plane is where the stock rough country skid plate sits from the lift kit and then the the skid plate \angles up to meet the front cross member, protecting the front of the diff. Thus, no loss of ground clearance (and you would actually be hard pressed to even see that a 9.25 sits in there as the rough country skid plate is the same.)
View attachment 401790

Typical 1500 lift kit diff mount
gm-lift-kit_27920-base.jpg

Typical 2500 lift kit diff mount
gm-lift-kit_297n2-base-v2.jpg
 
Last edited:

rayra

Expedition Leader
Thanks I'm tracking fine now, I missed / forgot that your diff was already lowered as part of the prior 6" lift.
I've been thinking about spacers for lowering my own stock diff an 1" or so, I think there's room, after my previsou diff drops / oil pan gasket changes. But I haven't taken a hard specific look at it with that in mind. I recall watching a suspension lift kit install that used some sort of spacers with longer bolts to hang the diff a little lower and recoup some of the CV angle. Been thinking about doing a similar low / no budget lowering. Just have to explore it and see how much movement I can steal without having to change anything else.
Also vaguely recall seeing someone on YouTube that used hockey pucks as axle spacers, amusingly enough. Delrin, effectively. I'd rather use steel. Even if I have to drill some round bar stock. If I can lower it an inch without changing anything else, I'd consider it worth doing. That would recoup ~15%+ of CV angle, if I'm guesstimating it correctly. 5-10deg? Have to take some measurements and do the math.

Seeing those beefier CV shafts and it apparently be a straight swap on a stock axle? Got me thinking along that path as well. Like you said in another topic, start with a 1500 and wind up working towards the 2500 where it matters. Front wheel / shaft bearings have been on my mind, preventative maintenance -wise. Will see where I'm at when I finally get around to swingarm bushings and ball joints. Right now I have no visible play or problems, other than unkown (lack of) maintenance in its first 116k mi.
 

Burb One

Adventurer
Here are the pictures with the skid plate. Hope it will help someone in the future.

Front view, looks exactly the same as pre 9.25
1.jpg

Side view: (You can also see my friend's suburban in the background with his new 14 bolt:) )
2.jpg

One of the new skid plate mounts
3.jpg
 

Burb One

Adventurer
Thanks I'm tracking fine now, I missed / forgot that your diff was already lowered as part of the prior 6" lift.
I've been thinking about spacers for lowering my own stock diff an 1" or so, I think there's room, after my previsou diff drops / oil pan gasket changes. But I haven't taken a hard specific look at it with that in mind. I recall watching a suspension lift kit install that used some sort of spacers with longer bolts to hang the diff a little lower and recoup some of the CV angle. Been thinking about doing a similar low / no budget lowering. Just have to explore it and see how much movement I can steal without having to change anything else.
Also vaguely recall seeing someone on YouTube that used hockey pucks as axle spacers, amusingly enough. Delrin, effectively. I'd rather use steel. Even if I have to drill some round bar stock. If I can lower it an inch without changing anything else, I'd consider it worth doing. That would recoup ~15%+ of CV angle, if I'm guesstimating it correctly. 5-10deg? Have to take some measurements and do the math.

Seeing those beefier CV shafts and it apparently be a straight swap on a stock axle? Got me thinking along that path as well. Like you said in another topic, start with a 1500 and wind up working towards the 2500 where it matters. Front wheel / shaft bearings have been on my mind, preventative maintenance -wise. Will see where I'm at when I finally get around to swingarm bushings and ball joints. Right now I have no visible play or problems, other than unkown (lack of) maintenance in its first 116k mi.

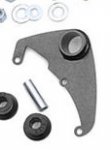
I think on a cranked setup, lowering the diff an inch would be awesome! Any better CV angles is worth it. It would be pretty easy I think too, on the passenger side mount would just maybe need some inch spacer (out of bar stock- heavy but effective) The other two mounts, you can easy make a drop bracket with a plate or something. Wouldn't be too hard to do.

Also, unfortunately/ fortunately, the 2500 axles are not bolt on to the 8.25. The outboard spline fits and works great in the 1500 wheel bearings, but the inboard flange to the diff is larger on the 2500, and it won't bolt to the 8.25. I'm sure you could make an adapter/ spacer though.

I wouldn't worry about the axle shaft bearing unless it's making noise. The two diff's I have opened up had 190k+ on them when I regeared and rebuilt one and had to replace a seal on another and the bearings looked brand new.

The wheel bearings, though I am going to treat as a 100k wear item, so I would replace them if you have it open. The wheel bearing is the only thing I've had this truck strand me with. It was my fault, when I put the lift kit in, I didn't want to go back to the store for new bearings/ hubs that day, so I put in the old high mileage ones and told myself the next weekend I would replace them (and get Timken from RockAuto, rather than get the expensive, not as good autozone/pepboys ones.) After cleaning them with brake cleaner slightly, I must have used a little too much and it probably took whatever grease that was left in them away, and on the first drive one failed.
 

Burb One

Adventurer
Well I have 4wd again. Driveshaft is shortened and balanced and installed with all new u joints. No vibrations at highway speed and 4wd in gravel works.

Just waiting on some CV spacers to put the tripod joint at the perfect length. I'll post details when they come and I can confirm the brand works. Without the CV spacers the tripods are a little closer to the rim at full droop than I'd like, but are probably still much stronger than the 1500 CVS, especially on a cranked setup.

Other than that project is done! 9.25 front axle into a 1500 is definitely possible with a lift and minimal custom work

20170526_165220.jpg
 
Last edited:

rayra

Expedition Leader
Man you work fast. It would take me forever to get that project done.


"I must have used a little too much and it probably took whatever grease that was left in them away, and on the first drive one failed." That's an ouch. Wheel bearings and ball joints are on my mind now, but I've got no indications of trouble. Going to see if there's a way to re-pack that front hub?

Earlier this week the missus' Tahoe alternator imploded. I did that swap and temporarily swapped idler pulleys too as hers was shot. Got the rockauto parts amazingly quick and Thurs night went ahead and swapped he AC belt, both tensioners and installed her new idler pulley and put mine back where it belonged. Real quick evolution. it's all got bearings on my mind, now. I've already done full drivetrain fluid swaps on both vehicles. Leaves me wondering about her wheel bearings. But hers has been 180k mi of no-/low-load.

My next priority though is oil cooler and Spohn boxed trailing arms on the Sub. Worried about bending the crap out of the factory arms in a rock-filled dry streambed. Does anyone even make a pinion guard for a 8.25?
 

Burb One

Adventurer
The front hub I think are sealed for good. Good timken replacements are around 90 bucks a corner on Rock Auto.... might be cheaper insurance. Wheel bearings over 150k miles in a position to cause faliure for wheel detachment gives me extra attention.


I haven't had a ball joint fail but it seems to be a point of contention online... I'd just make sure to keep them grease and pay attention to any play....

I can fully recommend the b&m cooler, not badly priced as well.

The box arms on the rear I feel have helped a lot(as well as the panhard). The upper control arms not sure, nice they are adjustble for my lift, but on a small lift not sure that would add much. They do allow pivot of the upper mount however. I would say panhard before arms as the stock panhard seems the weak point... you can find their all encompassing rear kit for ~400 near black Friday(which is what I did)

I have not seen a pinion gaurd for the 8.5(assuming you meant 8.5.) I haven't been able to find one for the 9.5. the only ones seem to be for the 10.5 because it has bolts....
 
Last edited:

Jelorian

Adventurer
Glad it all came together fairly easy! Your rig is becoming more and more of a beast! I need to get on the ball and upgrade some of my front end components.
 

maxfederle89

New member
Hey Burb One
Been reading through your build and adventures since I started researching coilover conversion for my 2002 silverado 2500hd. You have some so many great things! I'm really impressed and inspired. I've also been talking to Richard with AFP. Going to measure my truck soon to get a quote for the conversion myself. I read how you said this is hands down the best thing you did and that makes me excited to improve my old pickup 200%. Thanks for all your posts and how much it has inspired me. I'll be posting whatever I do on the Overland Bound forum. Hope I can make this happen.

Sent from my SM-J320V using Tapatalk
 

Burb One

Adventurer
Thanks Max!

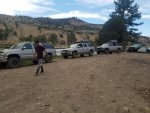
Broke my patella a month ago, so i've been out of the action for a bit and haven't driven the truck... A few of us here met up and had a 4 suburban trip back in June. I don't have any great pictures, but should be a good show of lift heights and stances. Maybe Jel or boss can post some more!

From front to back
2500 w/ 2 inch and 33's, 1500 with 2 inch and 33's, 1500 with 5.5 inch/coilovers and 33's, 1500 with 5.5 inch and 31's.

20170624_181037.jpg
 

maxfederle89

New member
Thanks Max!

Broke my patella a month ago, so i've been out of the action for a bit and haven't driven the truck... A few of us here met up and had a 4 suburban trip back in June. I don't have any great pictures, but should be a good show of lift heights and stances. Maybe Jel or boss can post some more!

From front to back
2500 w/ 2 inch and 33's, 1500 with 2 inch and 33's, 1500 with 5.5 inch/coilovers and 33's, 1500 with 5.5 inch and 31's.

View attachment 413387
Oh I love it! Sorry you hurt yourself. I am surrounded by Wrangler people where I'm at and it's so refreshing to see people do "Jeep stuff" with full size IFS vehicles. I'll admit I'm not going to be running a big lift and tires anytime soon but I've driven forest service roads in my monster and I'd love a better day to day drive! I also appreciated your front diff swap and all your custom fabricated equipment. Just great stuff all the way around

Sent from my SM-J320V using Tapatalk
 

Burb One

Adventurer
Well, getting back in action after my knee recovery is done!

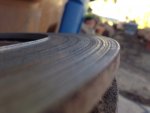
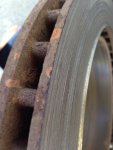
Had a rock jam my rear caliper on the last trip, and by the time I got home my pad and rotor were toast.

IMG_0288.jpg
Pretty Groovy!
528919775.jpg


Bought some new Raybestos calipers(250k on the originals), pads, and parking brake kit.

I noticed the parking brake shoes on the axle were the wrong size.... now it's all back together. For the first time in 100k+ miles the parking brake actually works! Should have opened up that can of worms much sooner!!!!

Thanks to Rayra for the link in another thread for the proper adjustment technique!


Gearing up for Yosemite/ area in a few weeks!
 
Last edited:

Forum statistics

Threads
188,334
Messages
2,905,617
Members
229,959
Latest member
bdpkauai
Top