Pshin
Member
Hi, I'm relatively new to Expedition Portal. I came across a few other OVRLND build threads on this site and thought this would be a good place to share/document my build. Other OVRLND owners have been super helpful in bouncing around ideas and sharing their experiences. Most of this has been through Instagram, but this seems like a better place to get into more detail.
We have had the camper since January so this has been a few months coming. *Warning* this first post will be lengthy...
Truck: 2019 Chevy Colorado, V6, Z71 trim, with a short bed.
Camper: OVRLND camper with: 2 side doors, front and rear windows, standard rear door, and added 2 inch height to stow bedding while traveling.
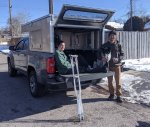
Install day!
Empty shell (except two small pieces of foam insulation on the sides)
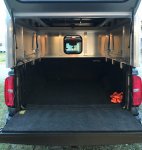
The first thing we did was insulate the walls and ceiling using 1 inch rigid foam insulation from Home Depot. We applied 3M spray adhesives to the backs and placed them into each spot. This process was fairly straightforward, though somewhat time consuming due to so many different pieces. Flat walls and 90 degree angles made this much easier.
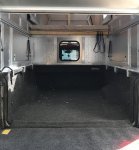
Then we added some white corrugated plastic as a finishing touch
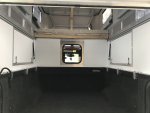
Next, we had to think of some storage options. Features we were looking for: access most storage from both inside and outside, maintain some interior living space, be easy/quick to remove for when we need the truck bed. With the short bed (5'2") we needed to utilize every inch, so I bought a few latching weatherproof containers from the Container Store and sized everything to fit them.
I should also mention, the OVRLND camper comes standard with an upper aluminum extrusion that the bed platform slides on. However, I needed to have a lower attachment point as well. I attached a strip of wood with rivnuts to the lower frame of the camper. This gave me a flexible lower attachment to work with. Another catch: we wanted to keep our Bedrug liner and not bolt anything to the actual bed of the truck.
After doing a lot of research, I was inspired by Goose Gear setups and particularly @crolison OVRLND camper builds. I looked into using aluminum extrusion, but frankly it was too expensive to get buyoff from my CFO. I decided to go with a lumber-based version of an "8020-like" frame design. The backbone of this was primarily 2x4's that I ripped with a table saw to create 8 foot length square dowels. These were notched on the ends to form rabbet joints that were screwed and glued together. I then cut some plywood for the shelves. The shelving unit is on the passenger side. For the driver side, I built a three sided box that sits over the wheel well and provides a bench/step for the interior space.
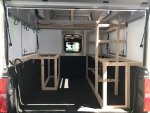
After some paint, lacquer, and final assembly. If I did this again, I would buy decent plywood and a polyurethane finish. I used rough plywood thinking the sanding and lacquer would smooth things out. It was still splintery after tons of sanding. It took really heavy coats of lacquer to finally get something that wouldn't snag.
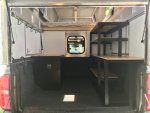
The two middle shelves are accessible through the side door and the bench/box is accessible through the other side door. The shelving unit is attached at both the upper and lower extrusions with the legs resting on the floor. The bench is attached to the lower extrusion and rests on the floor. Removal takes about 5 minutes and consists of removing 6 bolts. Re-installation takes a couple minutes longer just to line up the holes for the bolts.
Materials for insulation: 2 sheets one inch rigid foam, 1 sheet corrugated plastic (coroplast), spray adhesive, VHB tape
Materials for shelf and box: 7 2x4's, 2 sheets plywood, paint, lacquer
Other: We had a fair amount of tools already, but this project was my excuse for buying a table saw.
An aluminum extrusion build would certainly be stronger, lighter, and more awesome, but the extrusion alone would have cost more (2x or even more) than the entire build so far- even with a new (entry-level) table saw. I chose to go a more budget route and work with a medium that I'm a little more comfortable with. We'll see how it does over time, but so far it's holding up.
We have used this setup a few times now and it seems to work reasonably well. So far, there are a few small changes I want to make, but we'll see what happens.
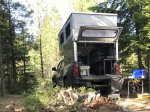
I need to take better photos of everything loaded. Here's one from a recent outing.
More updates and photos to come as I get time!...
We have had the camper since January so this has been a few months coming. *Warning* this first post will be lengthy...
Truck: 2019 Chevy Colorado, V6, Z71 trim, with a short bed.
Camper: OVRLND camper with: 2 side doors, front and rear windows, standard rear door, and added 2 inch height to stow bedding while traveling.
Install day!

Empty shell (except two small pieces of foam insulation on the sides)

The first thing we did was insulate the walls and ceiling using 1 inch rigid foam insulation from Home Depot. We applied 3M spray adhesives to the backs and placed them into each spot. This process was fairly straightforward, though somewhat time consuming due to so many different pieces. Flat walls and 90 degree angles made this much easier.

Then we added some white corrugated plastic as a finishing touch

Next, we had to think of some storage options. Features we were looking for: access most storage from both inside and outside, maintain some interior living space, be easy/quick to remove for when we need the truck bed. With the short bed (5'2") we needed to utilize every inch, so I bought a few latching weatherproof containers from the Container Store and sized everything to fit them.
I should also mention, the OVRLND camper comes standard with an upper aluminum extrusion that the bed platform slides on. However, I needed to have a lower attachment point as well. I attached a strip of wood with rivnuts to the lower frame of the camper. This gave me a flexible lower attachment to work with. Another catch: we wanted to keep our Bedrug liner and not bolt anything to the actual bed of the truck.
After doing a lot of research, I was inspired by Goose Gear setups and particularly @crolison OVRLND camper builds. I looked into using aluminum extrusion, but frankly it was too expensive to get buyoff from my CFO. I decided to go with a lumber-based version of an "8020-like" frame design. The backbone of this was primarily 2x4's that I ripped with a table saw to create 8 foot length square dowels. These were notched on the ends to form rabbet joints that were screwed and glued together. I then cut some plywood for the shelves. The shelving unit is on the passenger side. For the driver side, I built a three sided box that sits over the wheel well and provides a bench/step for the interior space.

After some paint, lacquer, and final assembly. If I did this again, I would buy decent plywood and a polyurethane finish. I used rough plywood thinking the sanding and lacquer would smooth things out. It was still splintery after tons of sanding. It took really heavy coats of lacquer to finally get something that wouldn't snag.

The two middle shelves are accessible through the side door and the bench/box is accessible through the other side door. The shelving unit is attached at both the upper and lower extrusions with the legs resting on the floor. The bench is attached to the lower extrusion and rests on the floor. Removal takes about 5 minutes and consists of removing 6 bolts. Re-installation takes a couple minutes longer just to line up the holes for the bolts.
Materials for insulation: 2 sheets one inch rigid foam, 1 sheet corrugated plastic (coroplast), spray adhesive, VHB tape
Materials for shelf and box: 7 2x4's, 2 sheets plywood, paint, lacquer
Other: We had a fair amount of tools already, but this project was my excuse for buying a table saw.
An aluminum extrusion build would certainly be stronger, lighter, and more awesome, but the extrusion alone would have cost more (2x or even more) than the entire build so far- even with a new (entry-level) table saw. I chose to go a more budget route and work with a medium that I'm a little more comfortable with. We'll see how it does over time, but so far it's holding up.
We have used this setup a few times now and it seems to work reasonably well. So far, there are a few small changes I want to make, but we'll see what happens.
I need to take better photos of everything loaded. Here's one from a recent outing.

More updates and photos to come as I get time!...
Last edited:
