Another Smittybilt Scout Trailer Build......or is it?

Grizzlys4Runner

New member
Spent a long time looking for an off-road trailer. As you all know the sticker price can range from $5k to $50k.

I really wanted the Turtleback. What I really liked about the turtleback was everything, the kitchen, power, water storage, hot water, storage....the list goes on and on. The downside, $35k price tag. So, the Turtleback trailer has been my build inspiration.

So, we ended up with the Smittybilt Scout trailer. What sold us was obviously the price but the compartment and modular storage options. Such a great foundation for a build and much potential.

Spent a lot of time planning out the trailer. So, let’s get started with this build.

Trailer arrived at 4wheelparts....funny thing they don’t have a fork lift. Good thing they have pallet jack.
IMG_9172.JPG

With a couple of straps, come a long, and three guys we get it on the trailer.
IMG_9175.JPG

With a help of a neighbor (a shout out to Chad) was able to roll off it off the trailer into the garage.

IMG_9176.JPGIMG_9177.JPG

Wife decided to visit family so now it’s just me and this trailer. The instructions says it takes 2-3 guys and 8 hours. We will see........

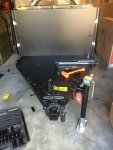
First thing first....let’s release this beast from it’s cage.

With a couple of 4x4s, 4 jack stands, 2 floor jacks, and some cutting. It stands on its own.
IMG_9182.JPGIMG_9183.JPGIMG_9184.JPG
 

Grizzlys4Runner

New member
Unpacked the trailer. There are parts in every compartment. I am really impressed with the quality of the packing of all of parts. Everything was wrapped very well and organized in all of the compartments. There is a part list for every compartment and a part list for every box. All of the parts are individually wrapped. Nuts and bolts bagged for each component of the trailer. Very well done!
IMG_9186.JPGIMG_9188.JPGIMG_9189.JPGIMG_9191.JPGIMG_9192.JPGIMG_9193.JPGIMG_9196.JPGIMG_9198.JPGIMG_9199.JPG
 

Grizzlys4Runner

New member
OK....lets tackle the tongue of the trailer. Unbolted the tongue from the crate and rigged a dolly to carry over to the trailer.
IMG_9201.JPG

Then noticed I put the the two front jack stands supporting the main trailer body was in conflict with the placement of the tongue. Re-arranged the jack stands and was back in business.
IMG_9202.JPGIMG_9204.JPG

With only guy, had to figure out how to connect to the trailer. Setup a couple of floor jacks with a 4x4 and laid the tongue on the 4x4. Then used one of the stabilizing jacks to lift the front of the tongue in place. Got it all lined up started plugging away with tightening the M16 bolts. Using the stabilizer jack, lifted the tongue in place to place the front bolts.
IMG_9207.JPG

Everything was going great until........got to the driver side front mount. The bolts didn't line up with the mount on the trailer. Spent some time with floor jacks and jack stands to align the bolts but didnt work. So....me any my new best friend.....the metal file.....spent some time making the holes bigger on the trailer bracket. Some time later and a few iterations of lifting the tongue in place with the stabilizer jack to check progress with the file....finally made it work. Tighten the bolt setup and torqued it down. Tongue in place....lets move onto the suspension.
IMG_9209.JPG
 

Attachments

  • IMG_9208.JPG
    IMG_9208.JPG
    1.6 MB · Views: 74

Grizzlys4Runner

New member
The hubs come pre-assembled and just need to be bolt to the trailing arms along with the limiting straps and shocks. The suspension on the trailer is beastly. Independent suspension with dual shocks. The trailer arms are heavily armored and ready to take on any trail. Excited to get this trailer out on the trailer and see how it performs.

The trailing arms are tied to the frame with wire when shipped. Used a floor jack to push the trailing arm up to release tension and snip. Kept the trailing arm elevated off the floor to install the hubs.

The hubs are labeled left and right. Be sure to install with the brake lever moving towards the front of the trailer. Torque to spec.
IMG_9212.JPGIMG_9213.JPG
.
Next installed the bump stops. Will need an alan sock with a long extension and torque to spec. Installed the springs and then limiting straps. Used red grease around all of the shock bushings and installed. Torqued everything to spec.
IMG_9214.JPGIMG_9215.JPG

Time to install the wheels and tires. And get this trailer standing on his own and rolling. The trailer is still standing on the floor jack stands and was too low to install the wheels and tires. On the tongue, raised the stabilizing jack. Used the floor jack to lift the trailer high enough to install the rear stabilizer jacks. Raised the trailer with the stabilizer jacks to get high enough to install the wheels and tires. Went with Pro Comp wheels and BF Goodrich ATs.
IMG_9218.JPGIMG_9217.JPG

With that said, we got a rolling trailer. Not bad for one guy and a few beers. Shared a little teaser for later....purchased a Rhino Rack Batwing. Was going to get the Oztent Foxwing, but found out the Foxwing was a collaboration between Rhino Rack and Oztent. Somehow, they separated and Rhino Rack improved the Foxwing design and developed the Batwing. Also, purchased the awning extension and taper extension to enclose the awning, as well as a Tagalong RV-5 tent to attach to the awning. Stay tuned!

Bribed my neighbor with a few beers to help install the fenders. Needed an extra hand to get inside the trailer to hold and tighten the bolts. One tip, when you are installing the fenders, I put some black sealant and silicon around all of the holes to seal from water and dirt. I also did that with all of the eye bolts around the trailer. The eye bolts came installed, so backed them off and put some silicon and re-torqued. I placed all the eye bolts in a vertical orientation.
IMG_9219.JPG
 

Grizzlys4Runner

New member
Next up the hand brake and electric brakes. The hand brake is pretty straightforward. Loop the cable around the lever on the hubs tighten with u-bolts. I tried to make sure the cable was center to the handbrake before tightening. The rubber sleeve that protects the cable slides and can be adjusted once tightened and fitted. A few iterations of adjusting and pulling on the handbrake, it was ready to go.

The electric brake system was a little tricking. I unwound the tape on the plug on the trailer to make sure I place the wires correctly in the plug. It is important to make the ring on the wires fits into the plug and then insert the wedge. Took a few tries to make sure it was correct because the wedge wants to push the wires back. I found it easier to remove the rubber seal from the bottom of the plugs and push back on the wires. Then make sure all wires are set and then push the rubber seal into place after the wires were set in the plug. Did the same thing on the two pin plug for the breakaway system. I re-wrapped the 7-pin plug with electrical tape for a finish. I didnt like the way the plug wrapped from Smittybilt. It appeared the plug could be pulled right out of the wire protection.

The breakaway plug was tricky. The directions say to use a self-drilling tapping sheet metal screw. I tried that and sheared the head right of the screw. You are trying drill and screw into appears to be 1/4" plate. So then decided to get fancy and tap for a screw. Sheared the tap....probably user error I wasnt being patient enough and backing off properly. So, ended up drilling the tap out and putting a nut and bolt.

Plugged in everything using dielectric grease, wrapped the plugs with electrical tape, and tucked away. Done!

IMG_9378.JPGIMG_9379.JPGIMG_9383.JPGIMG_9380.JPGIMG_9382.JPGIMG_9377.JPG
 

Grizzlys4Runner

New member
Now the customization and planning begins.....so the spare tire is supposed to go behind the tongue box, but thinking about using that for more storage. Five jerry cans and an 11# propone tank will fit perfectly. Just need to figure out how to fabricate an enclosure for the jerry cans and mounting of the propane tank. The goal of the enclosure is to create a shelf above the jerry cans and propane tank for additional storage. I am planning on mocking up with cardboard. Stay tuned. If you want to know, the spare tire carrier does hold jerry cans.

IMG_9244.JPGIMG_9246.JPGIMG_9293.JPGIMG_9294.JPG

The spare tire will mount to a hitch receive and have been trying to find a swing away. The challenge is the hitch receiver is just below the rear door and doesn't leave much clearance. Found the Wilco swing gate and it is on backorder. We will see how it fits. Purchased a spare tire receiver mount that will slide into the swing gate. For now, will have to man handle the spare tire on and off until the swing gate gets here.

IMG_9248.JPGIMG_9247.JPG
 

Ysk

Member
moveing the spare to the rear makes better use of the front for propane, fuel / water. did the same thing and very happy with the functionality, also put my BBQ in the generator compartment, makes for super easy meal prep on the trail

IMG_7417.JPGIMG_7417.JPGIMG_7432.JPGIMG_7673.JPG
 

Grizzlys4Runner

New member
moveing the spare to the rear makes better use of the front for propane, fuel / water. did the same thing and very happy with the functionality, also put my BBQ in the generator compartment, makes for super easy meal prep on the trail

View attachment 461776View attachment 461776View attachment 461777View attachment 461778

Nice setup. Did you fabricate the swing gate yourself? Like the shelf above the BBQ. Also, notice you forgoed the tongue box for some other storage boxes. How is that working?


Sent from my iPhone using Tapatalk
 

Ysk

Member
Nice setup. Did you fabricate the swing gate yourself? Like the shelf above the BBQ. Also, notice you forgoed the tongue box for some other storage boxes. How is that working?


Sent from my iPhone using Tapatalk


used the plastic storage boxes upfront to reduce weight and increase storage capacity, really happy with how its working out, no rain leaking in yet, but does get dusty. The shelf over the BBQ is real handy for cooking stuff


Made the rear bumper and tire carrier
IMG_7430.JPGIMG_7425.JPG
 

Plannerman

Wandering Explorer
Wow, that tire carrier is sweet. I’d like to do the same with my Scout. I’d prefer to put fuel and water where the spare currently sits.
 

RichardPT

Richard
Hi and congrats on a new trailer. Did you weigh the tongue before and after your jerry cans are full of fuel/water? My tongue weight (empty) was 375 lbs, had to install rear air bags on the jeep; either way it's pushing the factory recommendations. I've been trying to keep all my fluids closer to the trailer's axle for that reason. Best storage would be of course under the trailer but that would require a bit of custom fabricating and loosing the clearance.
Richard
 

Ysk

Member
230 lbs at the tongue with just the propane and the empty plastic storage boxes. adding 2 water (40L) brings it to 270 lbs, I expect 2 water and 2 gas would put me at about 310 lbs

I find having the spare tire on the rear transfers about 50lbs off the front

IMG_7709.JPG
 

Forum statistics

Threads
186,638
Messages
2,888,323
Members
226,767
Latest member
Alexk
Top