I don’t really care for the color of my XJ (white) and am going to paint it desert tan for its first mod into an expo vehicle. I know its cosmetic but I feel if I don’t do it first I never will. I was planning on using the tan camo spray paint sold everywhere. Does anyone have any tips or a link on how to do it, I am unsure on the preparation work. I know I need to sand it but I don’t know what grit to use, also I am unsure if I need to prime it. The paint and body are in good condition and original. Any help is appreciated, AZTACO
You are using an out of date browser. It may not display this or other websites correctly.
You should upgrade or use an alternative browser.
You should upgrade or use an alternative browser.
Anyone have tips for spray painting my XJ?
- Thread starter AZTACO
- Start date
Maximus Ram
Expedition Leader
I don’t really care for the color of my XJ (white) and am going to paint it desert tan for its first mod into an expo vehicle. I know its cosmetic but I feel if I don’t do it first I never will. I was planning on using the tan camo spray paint sold everywhere. Does anyone have any tips or a link on how to do it, I am unsure on the preparation work. I know I need to sand it but I don’t know what grit to use, also I am unsure if I need to prime it. The paint and body are in good condition and original. Any help is appreciated, AZTACO
White is an expo mod..:sombrero:
http://www.expeditionportal.com/forum/poll.php?do=showresults&pollid=148
polls don't lie...:elkgrin:
Black Dog
Makin' Beer.
http://www.ericsxj.com/paint/paint.htm
Here is a link to a guy who did exactly what you're doing. He also literally wrote the book on XJ's.
In any painting, preparation is crucial. If you do a crappy prep job, your final outcome will be junk. So be sure you get your body nice and smooth and well sanded, and anywhere where you have to use body filler go for as thin as possible because thicker spots of filler tend to crack and break. Once you are bondo'd and sanded, get yourself a good quality primer. It will take a couple layers to get full coverage, but if you skimp on this you'll never have a good color job. And then again, sand it down to smooth things out before you go on to paint. With the paint, light layers is ideal. You don't want to try and cover the whole thing in one coat. I wouldn't be surprised if it takes you 4 or 5 coats to get the whole thing.
I'm actually thinking about doing something similar to this but with an olive drab color because it matches my local scenery a little better.
BIGdaddy
Expedition Leader
Man that seems like too much work considering my paint in good conditon. I think I'll keep it as is, but thanks for talking me out of it even if you didn't mean to. AZTACO
yup, only reason I did mine was cuz my clearcoat was blown, and my sheetmetal was beginning to oxidize. I prepped like a ******** for like 3 or 4
weekends, sanding, removing grime and gunk, pinstriping, etc.
It was the key, IMO, to how well my satin-black paint job looks a year later.
if your's is solid, I'd say maybe change up your trim color, or something else small like that. White/tan? maybe all your bumpers/racks etc can go tan?
Black Dog
Makin' Beer.
Man that seems like too much work considering my paint in good conditon. I think I'll keep it as is, but thanks for talking me out of it even if you didn't mean to. AZTACO
Its definitely something you want to do right the first time, otherwise you have to do it twice. My dilemma is that I have future goals in mind and I can't decide if I want to do my paint sooner or later (thinking sooner). Right now I'm just shy of 150,000 miles and it has always been my goal to get to 250,000 and then do a stroker, so that would be the perfect time because I could get inside the engine compartment and everything but that is going to be several years down the road even if I still have the XJ by then. I just don't want to wait that long to do my paint! Decisions, decisions.....
flyingwil
Supporting Sponsor - Sierra Expeditions
Somewhere I saw people using boat paint to paint vehicles, and they were turning out awesome...
Found it... http://www.ttora.com/forum/showthread.php?t=57181
Found it... http://www.ttora.com/forum/showthread.php?t=57181
OverlandZJ
Expedition Leader
Any large dents and dings in your sheetmetal? If not you can get a decent paint job for a couple hundred if you dont mind the work.
I painted mine a few years ago, still holding up strong. Most of the work is in the prep, cheap DA sander and HVLP gun can get you nice results.
EDIT: my cleanup thread.
http://www.expeditionportal.com/forum/showthread.php?t=16529&highlight=cosmetic+cleanup
I painted mine a few years ago, still holding up strong. Most of the work is in the prep, cheap DA sander and HVLP gun can get you nice results.
EDIT: my cleanup thread.
http://www.expeditionportal.com/forum/showthread.php?t=16529&highlight=cosmetic+cleanup
jh504
Explorer
If you do the rattle can tan thing its a little different prep then if your using real auto paint and a clear coat. First off, buy a spray nozzle that fits over the can. I use one for everything I rattle can and it makes the job SOOO much easier. Then you dont want to sand all of the clear coat off. If you do sand through your clear coat and paint it will begin to rust underneath the porous spray paint. Rough it up with sandpaper, but leave the clear coat intact if you can. This will leave a layer of protection underneath the spray paint. Smooth even strokes and like its been said, dont try and do it all in one coat. Practice on something else first.
Black Dog
Makin' Beer.
Any large dents and dings in your sheetmetal? If not you can get a decent paint job for a couple hundred if you dont mind the work.
I painted mine a few years ago, still holding up strong. Most of the work is in the prep, cheap DA sander and HVLP gun can get you nice results.
EDIT: my cleanup thread.
http://www.expeditionportal.com/forum/showthread.php?t=16529&highlight=cosmetic+cleanup
Dude, so far this has to be one of the nicest threads I've seen here. Not quite step by step, but it fills in some of my gaps that I had in my mental process. And your jeep is pretty much exactly what I am planning on doing with mine too. Shoot, I might have to bite the bullet and think about doing this project this summer.....
BigAl
Expedition Leader
This is a Krylon Desert Tan rattle can job. It sees a lot of heavy brush and mud and has held up very well. It sleeps in the garage so I'm not sure how much weathering you'd see from sun and rain. I painted over a good, intact, factory paint.
one huge benefit is that if you scuff it on a tree, you just wash with soapy water, let it dry, rub with 4oo grit paper and re paint. the flat blends so well, you'll never know
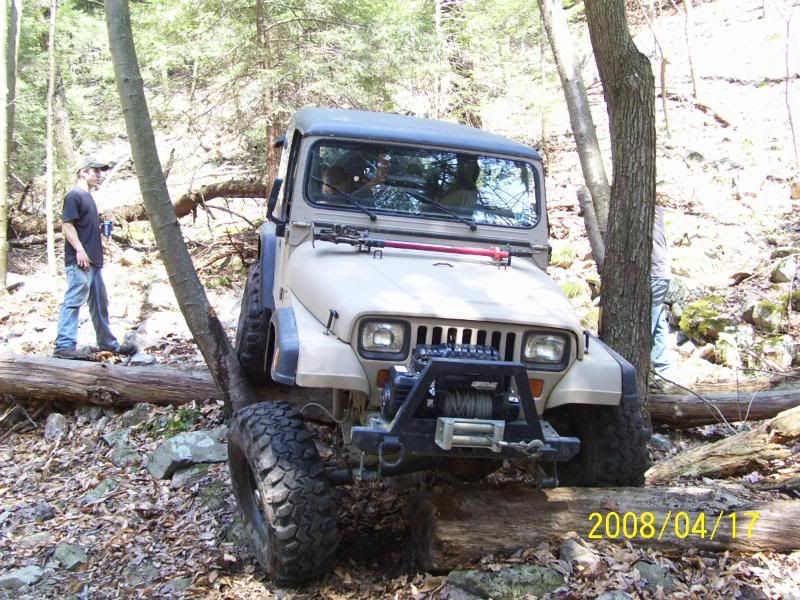
one huge benefit is that if you scuff it on a tree, you just wash with soapy water, let it dry, rub with 4oo grit paper and re paint. the flat blends so well, you'll never know

Okay, my friend told me I should throw in my 2 cents.
***DISCLAIMER**** I am NOT a paint professional, this is just my experience.
Last year we painted my 87 XJ. A caveat, to do it right takes A LOT of skill, or some supernatural good luck that I just don't have. How'd mine turn out? Acceptable for now, and if it weren't such a pita, I'd repaint it. Here's what I learned in the process.
Setup - Get a good mask. Get some old clothes. Get some cheap clear goggles. You'll need a 2 car garage to paint an XJ, diagonal parking works well. Make a pretty big area to mix your paint and chemicals. Acetone cleans stuff well. DON'T put your compressor around where your paint is (it'll inhale the paint and die).
Prep work is key, like they say. We were on the tail end of a complete overhaul, so I took everything off rather than messing with taping everything (which sucks and is really hard to do right - you'll miss part of something and paint what you didn't want to, or tape too much and leave your original color underneath). We took off everything, door handles, locks, windows, seals, rack, lights, bumpers, EVERYTHING.
Prep 2, from the paint store, get a big roll of clear plastic to cover your garage, tires, and ESPECIALLY, the inside of your Jeep. (with not windows, we had also taken out everything inside (headliner, carpet, seats, plastic trim, etc.), BUT, the paint mist drifts EVERYWHERE, and while you're painting you won't see where it goes. On that note, make sure you vent your garage, and wherever your vent goes, make sure nothing out there will get paint on it (like the windshield you took out - duh).
Painting:
There are different types of paint, but here's what WE did (remember, I kind of suck at this, so take it with a grain of salt).
1. Sand off all of your existing clearcoat. This can be with pretty rough sandpaper (a paint shop can tell you what grit, I can't remember, rough though).
2. Scuff your existing paint (again, fairly rough).
3. Primer it. Primer's cheaper than paint even if you get the good stuff, so definitely primer it. And primer it a lot. You don't want to put it on so thick that it runs, but it dries quick, so do lots of little coats. Some parts we did 4-5, others more. You'll sand it, so make sure you have enough to not sand through.
4. Then, you have to sand the primer. If you've never wet-sanded, read up on it. There are wet and dry sandpapers, get the wet stuff, like pretty high grit (500 - 1000 I THINK). *I* cut a block of wood down to about 1x1x1/2 inch to wrap the sandpaper around to make it easier to sand with. This is where your arm will fall off. Sanding a whole XJ with a tiny block takes forever, but you have to do it to make it look good. You want to get it rediculously smooth. *I* made the mistake of thinking the paint or clear layers on top would sort of gel over any texture in the primer and forgive imperfections, but they do the opposite. A bucket of water and a TON of sandpaper (way more than you think you'll need) and a stool get it done though. *I* went over curved parts without the wood block, just with my fingers behind the sandpaper and that worked pretty well. IF you sand too far and get down to your old paint, you have to reprimer it, and patching what you did and sanding it down is possible, but REALLY HARD. ***KEY POINT*** XJs are square, so you can do straight, whole panels, so do that, the folds in the metal are MUCH more forgiving than the middle of a panel.
5. Painting - the main event. This is where I had trouble. Some panels turned out just fine. I THINK those are the ones that I did like mentioned in a previous post, with really thin layers, and lots of them. Other panels I got drips. My paint was Bright Metallic Silver (chrysler 97+), and drips look bad. A FEW times, and I say only as emergency, I was able to use a lint-free cloth (like an old t-shirt), and wiped it off really quick before it had ANY chance to set, and could tap it to patch it. More often than not, I think I would have been better to redo that panel, which REALLY SUCKS.
Here's where I spent MONTHS AND MONTHS. One of the back pillars gave me trouble and I kept trying to patch it and fix it and redo it, etc. It was literally paint it in the morning, realize it didn't work right within about 10 minutes, come back at lunch break, sand down that part, wash it, let it dry, and then after work, try to paint it again. I'd get one part fixed, but another part would get f-ed up. I reprimed it, I repainted it, I did EVERYTHING to get it right, and in the end, I still don't like that panel very much. I *THINK* at some point you can sort of fatigue it too much and maybe I should have gone all the way down to bare metal, primed it from THERE, and then painted. I never went beyond down to the original coat of factory paint. Who knows. That one corner litlerally added on 5-6 months. OH, and temperature/humidity sucks. Part of my dilemma was that over winter, it peaked 50degrees at lunch, so only once a day could I do anything. So follow those directions on the paint can there.
The other thing, is I felt like I was really losing perspective on what looked good enough and what didn't. I definitely hit pefectionism there, combined with not having much experience. And paint's expensive, so having to buy more really hurt. But sadly, i can tell you, if it looks bad in some lighting, or some condition, or whatever, it WILL look bad outside. At about 20-30 feet it's probably good, but up close, it WILL look like that.
Lighting - Buy some garage flouresent lights, mount them on a cheap light stand or tipod or something vertically, and you can move them around to see better. Light is definitely your friend.
6. Clearcoat - You thought paint sounded hard? Clearcoat's worse. Why? It's sticky. From what I could gather, you want to do thin layers, and lots of them. It SEEMS like clearcoats sort of gels a bit as it dries, but I fell into using too much and got drips. DO NOT WIPE THE DRIPS. Anything and everything will stick to clearcoat. Even fingers or gloves will give it texture, which is what you're trying to avoid. The opposite of drips is what they call 'orange peel'. It looks like it sounds. Texture like little dips in the clearcoat. It's a sign there's not enough clearcoat on there apparently, BUT I think if your thin layers dry too much between them, they don't really...gel together. So it's like sprinkling mud onto concrete. if it's not solid and it dries, you get hard bumps. Then, if you sprinkle more on, it won't bond with the other clumps, and then it dries, and then you sprinkle on more, and eventually, you have a lot of it, but it's not the same as putting on a lot that's all wet. BUT, too much, too wet = drips. Also, you probably want your clearcoat to be pretty thick since it's your outside most layer. Someone who really knows paint would definitely be a better source on this, but this is my experience.
7. Color-sanding - IF you did your clearcoat right, and it looks good, don't do this. It REALLY sucks. You have to do it in some window I don't remember (LIKE more than -- hours, less than -- hours) so it's dry enough to sand, but not hard enough to be like stone. What you're doing is sanding similar to the primer sanding, but with some super super high grit wet sandparper, like 2000 grit, or a solid sanding block you can get from the paint store (kind of cool). What you do here as I understand it, is sand down the imperfections in the clearcoat. This is where you need to have a lot of layers of clearcoat. Sand really gently, and you'll be able to feel when you've got it. It's like it goes from being slick feeling and wet, to being SO smooth that your fingers stick (think boots on a gym floor vs skater shoes). Apparently, color-sanding is like what hot-rodders do to super-nice paint jobs (or what saps do when they're trying to fix a bad paint job and want to spend literally days wearing their arm down to a nub - we color-sanded for something like a total of 30+ hours spread over a week or so). Anyhow, this is where you get rid of the drips in clearcoat. You have to sand the drip, but not the paint around it, which is like, so fine you have to use a microscope to see it. Anyhow, once you start color-sanding, you pretty much have to do a lot of it. The whole panel if you can make it match the rest of the vehicle, and if it doesn't match, the whole vehicle.
8. Buffing and polishing - more equipment, more supplies. I don't remember at this point which is which, but one you have to do if you've color-sanded, because it's like super super fine sanding, and the other just makes it look better. This takes a while, but a buffer-polisher makes it go quicker than things like sanding. This stuff will sling all over the place and make a mess, and you have to be ready to rinse it off fairly soon.
9. Sweat bullets when someone parks their pos 71 honda next to it in a parking lot, or when you go through branches on the trail. Yell at people who put a drink on your hood. Constantly critique your work. Plan to repaint and swear you'll do it better.
After all's said and done, go to u-pull it and buy a hood and paint the heck out of the door before you mess with your ride. A hood is good because it's big, flat, and challenging. Then buy a door, and paint a door. Practice. Something I had to do ON my jeep. Big mistake. It's like anything that other people do professionally, they screwed up a lot before they got it right, but they had a mentor, or it was someone else's car, or they did 10 cheap pos cars where the owners didn't care, before anyone let them take the gun to a really nice car. It won't be perfect. Paint's expensive. Count on painting a car and a half, and waste part of it on the hood/door project. Suck it up. You can experiment with your XJ, or on parts.
Or rattle-can it.
Oh, and here are a few pics. Sorry no close ups.
getlost4x4
Expedition Leader
i just painted my roof on my 78 waggy last night. to me my jeep is an off-road vehicle. i'll be damned if its going to look like a street queen anyway. its going to get scratched up anyway.
i had a quart of black rustolium paint, some smooth foam rollers. i sanded the roof really quick with my electric DA sander. wiped it off with a clean rag and brake parts cleaner. then i rolled out 3 coats of paint about 30 minutes between each coat.
my paint job has some orange peal, but it looks really good. i'm going to wet sand it with 800 grit sand paper and then do a few more coats. i think it'll look really good. it looks good enough without wet sanding.
nice thing about it, no primer needed, rust proof, tough, durable, easy to touch up!