Autohome RTT hardware upgrade for safety - replace those scrawny u-bolts!

John E Davies

Adventurer
IMG_3496.jpeg


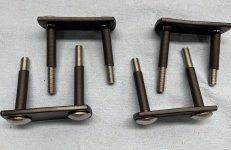
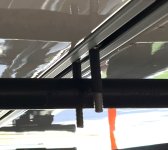
FYI I am using two old school round Yakima crossbars with Yakima Rail Grab LowRider towers. I fabricated two strips to act as spacers using 3/16” x 2” wide 6061T3 aluminum, this allows the fiberglass to clear the steel Yakima brackets!!! Without spacers the fiberglass would be badly damaged at those four locations..

I was very, VERY disappointed in the supplied hardware and the fact that the undersized u-bolts were too short.

IMG_3480.jpeg

The Autohome Anti-Theft kit is a farce and I canNOT believe that they expect you to replace two steel nuts with two aluminum ones. They do not even have steel inserts !!! That is insane, and the price is obscene! I returned the one I bought.

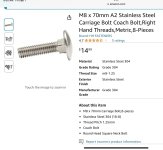
IMG_4296.jpeg

IMG_4293.jpeg

IMG_4294.jpeg


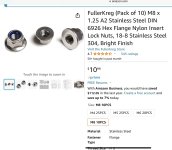
Order two sets of two security nuts, they are cheap and are polished stainless, add one lock to each inner bolt (the longest one) so that a thief has a harder time accessing them. These should be used in ADDITION TO the nylocks, not instead of. They are not strong enough nor do they have any kind of locking ability. They are a deterrent at best.
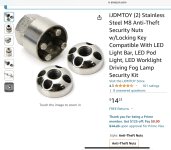
IMG_4295.jpeg


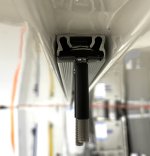
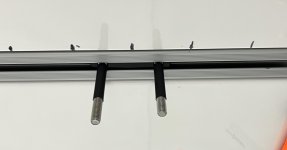
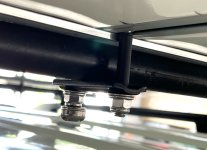
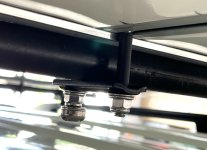
Drill out the plates to slightly over 5/16” and square the holes in the flat ones with a small flat file to accept 8 mm carriage bolts. The bolts fit ***perfectly*** into the RTT tracks with no rubbing.

Trim the bolts to the correct length for your bars. Add self adhesive thick-walled heat shrink tubing to cover and seal the exposed threads, to retain the bolts, and for better appearance. They blend in nicely with the black crossbars.

Repaint the parts and let them dry for a couple of days.

Add reference marks near the tracks with a Sharpie at 2” increments to help preposition the four bracket assemblies (measure your crossbar spread and match that.) This saves a lot of time and aggravation. Use stainless 5/16” flat washers between the nut and plates to preserve the newly painted finish.
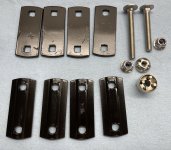
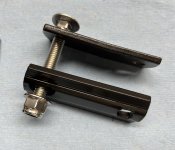
IMG_3478.jpeg

IMG_3479.jpeg

IMG_3481.jpeg

IMG_3484.jpeg


John Davies
Spokane WA
2013 Toyota Land Cruiser200
2023 Maggiolina Grand Tour 360 Carbon Medium
 
Last edited:

John E Davies

Adventurer
More pics.

IMG_3491.jpeg

IMG_3495.jpeg

IMG_3496.jpeg


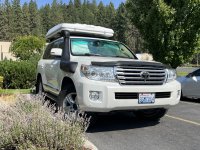
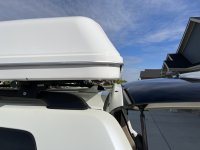
This shows the RTT as first installed by the dealer (who shall remain nameless).

IMG_3132.jpeg

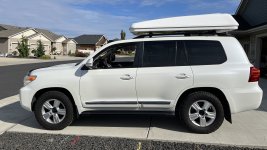
After modifying the hardware, I slid the RTT rearward 2” from where it was installed (see the small black mark near the rear crossbar) to reduce bug buildup under the front lip.

IMG_3498.jpeg

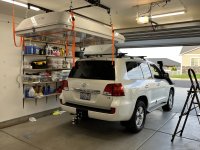
I removed the spoiler many years ago to carry a canoe, the Maggie clears the hatch with room to spare. Obviously, if you still have a stupid spoiler, you will have major issues with the RTT this far back.

IMG_3497.jpeg

Fuel economy with this tent went UP by about 1 mpg at 70 mph compared to bare round bars with no spoiler. And it is very quiet. Finally, this really helps! I found this new-in-box on Craigslist for $120.

IMG_3494.jpeg

IMG_3475.jpeg


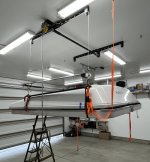
The RTT and crossbars will come off as a unit for winter storage and stay up against the 10 foot ceiling . Tape on the floor guides me when I want to get them remounted in the Spring. The top of the tent clears the garage door by an inch.

I love the tent, but hate the OEM mounting system!

John Davies
Spokane WA
 
Last edited:

Lemsteraak

Adventurer
Hi John,

What is now called the "universal" mounting system was developed by AutoHome when they were known as Zifer. Before then, you mounted your tent to your expedition basket. This innovation saved about 100 pounds on your roof, The other development was having the rails let into the tent floor so your weight was spread out on the bars. The bars and tent are an integrated system each adding strength to the other.

This may sound a bit odd but the hardware is "whimpy" by design. There has been millions of miles on the system. I had the same impression. When we did crash testing, the tent slid about two inches on the racks. We performed two "sled" tests at 45 mph, with Hummer on their H1's back in the day.

In the real world my good friend Frenchie was driving back back from Mexico at 55 mph when an idiot rear ended his trailer. The other car was doing well over 100 and totaled his trailer and Cherokee. Again, his Maggiolina slid back 2 inches and was about the only thing that wasn't damaged. Frenchie is an expert driver and was able to control his rig.

The only advice the factory has for the system is to tighten up the bolts after your first drive as the tent tends to settle.
 

John E Davies

Adventurer
Lemsteraak, That is very interesting, I was wondering if the small u-bolts were supposed to be the "fuse" or weak point in the mounting system. My Yakima cross bars have some plastic parts in the brackets and I have no doubt that they will separate off the factory Land Cruiser roof rails in a really bad crash. If I had a full expedition rack, I would have just added some extra factory u-bolts. But they were not usable in my situation anyway because they were too short.

The box and bars feel much more secure when you grab and rock them, with the bigger hardware.

John Davies
Spokane WA
 

Lemsteraak

Adventurer
Hi John,

Your analysis and upgrade of the hardware is excellent, I don't disagree at all. The square holes in the brackets are made so you can replace with carriage bolts. When you get into the larger heavier tents the OEM hardware does get a bit wimpy. Personally, I like the original "u" bolts for smaller cars and where you don't have much room like a Volvo XC70 or your Land Cruiser with the raised factory rails. Trying to thread nuts onto bolts is really difficult in the tight space, so beaten able to hold the opposite side of the 'u" bolt helps a lot. One trick that I've never seen discussed, is to slide the tent to one side of the bars so you have room to reach the bolts, keep the brackets loose and slide to the other, attach those brackets and then center and tighten. Speeds up the mounting process on tight installations and much less frustrating,

One place where switching to longer heavier duty bolts really helps is if you find your tent squeaking in off-road use. Using three bars helps in this case. We would add a center bar but since most roofs are curved we would add hard adhesive plastic strips on the top of the front and back bars to create more of a flat surface. Having the center bar slightly raised is good because when you tighten the tent down the tent would conform to the slight bend and the tent would be in tension, like a big spring. We would have to go to longer bolts in the front and rear to compensate for the added thickness. The tent being slightly stressed seemed to help in alleviating any noise as the tent flexes as the vehicle flexes. The extreme case was working with very old series Land Rovers. They used to add very strong expedition baskets up top. The chassis would flex but the body wouldn't because of the added stiffening from the basket and the bulkheads would break. This is another reason why I prefer fiberglass roof tents with flexible mounts as opposed to rigid expedition baskets, they flex with the vehicle.

Your lift system with the right angle drive is an excellent choice. The right angle drive acts like a brake so it is super safe.
 

Forum statistics

Threads
188,206
Messages
2,903,780
Members
229,665
Latest member
SANelson

Members online

Top