Battleship Jones: 2015 Tacoma DCLB Build Thread

Adventurous

Explorer
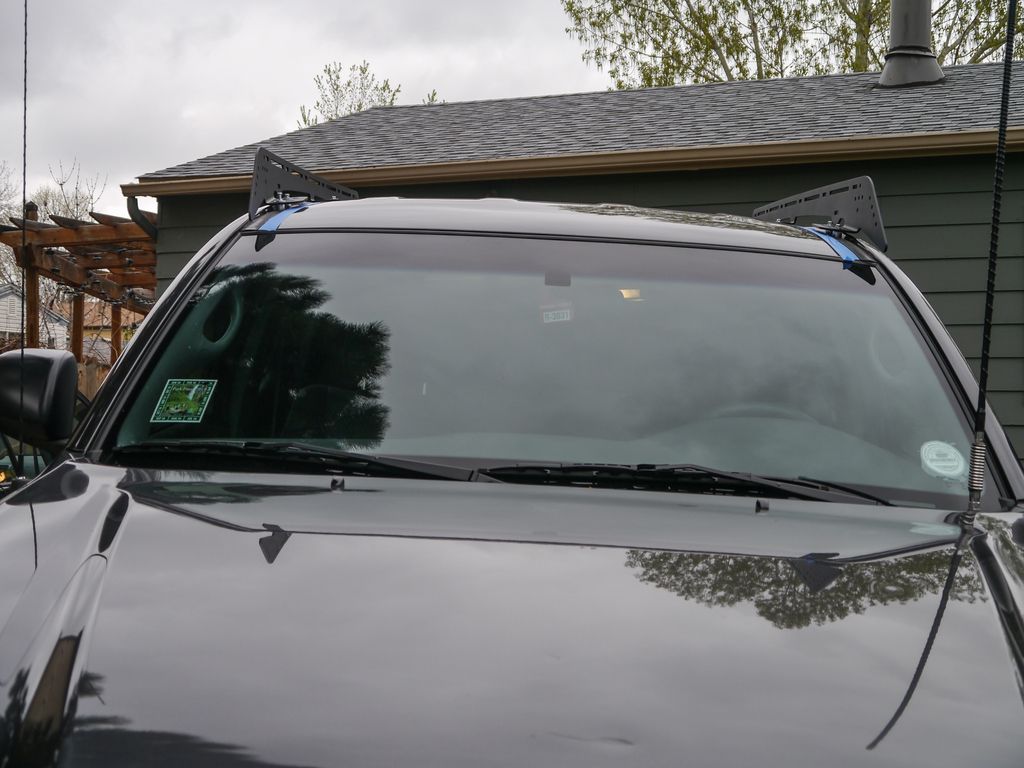
Tonight I did the topper mod. I have been perusing Craigslist for about 5.5 months now and have seen only 3 or 4 toppers for a 6' bed Tacoma. Unfortunately none have been color matched, and all of the sellers have been flaky or unresponsive. Not very encouraging. Earlier this week I had resigned myself to purchasing a brand new topper. I got a quote for a Leer 180 that came in a hair under $1700, which becomes $1800 something once taxes are factored in. Not really in the budget at the moment but the lady friend was spoiled camping in the back of the truck and didn't want to go back to tent camping.

Imagine my surprise then when I half-heartedly checked Craigslist this morning and saw a Leer topper for a second gen Tacoma up for sale. The guy was asking $500 and the almost immediately after inquiring he went down to $400 with his reasoning being that one pane of glass in the front window was broken, it had no mounting hardware and it came with no keys. I was perfectly fine with both though as the 14 Benjamins worth of savings kept rolling through my head. He then offered to source a new lock with keys and get the window fixed for $450. Hell. Yes.

I made a plan to head down after work and he was gracious enough to hold it for me with the assurance that as long as nothing was amiss I would 100% buy it from him. He turned out to be a stand up dude who just wanted it gone as he had no use for it and not only did he replace the lock and get some new keys, he also sourced some mounting hardware. The window the shop gave him didn't end up fitting but I was more than okay with that. Especially as he talked himself down to $400 again. He and his wife helped me get it on and I drove away one happy customer. Here are some pics...

20150318-P1010378 by Tim Souza, on Flickr

20150318-P1010379 by Tim Souza, on Flickr

20150318-P1010380 by Tim Souza, on Flickr

Impressions after it was installed are I can definitely notice its presence in the handling of the truck. I can feel the weight while driving/braking though the additional weight has helped to smooth out the Dakars out back. I guess you win some and you lose some.

I'm still up in the air on whether or not to paint it or Plastidip it. For some reason a matte black color would appeal much more to me over the silver tone. Given that long term I'd like to get a high topper to provide some additional space for sleeping in the back, the Plastidip is more the more appealing option to me as it's cheap and can be removed when its time to move on. Thoughts?

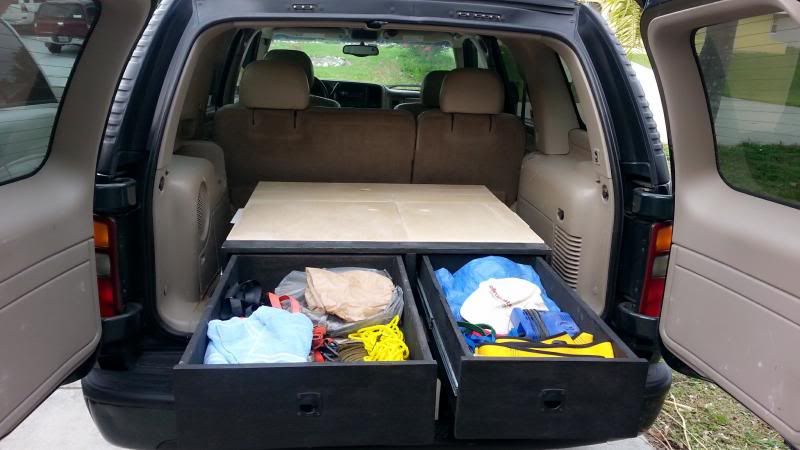
Lastly, topper = platform time. The current plan is to make a half-assed platform for this year to properly evaluate our needs. When said high topper comes along I'd like to raise it up a bit and make a drawer system. All in good time however.

I'm still pretty stoked about the great deal. Now I'm figuring out what to do with all the money I saved. :sombrero:
 
Last edited:

brianjwilson

Some sort of lost...
Good deal! I keep watching Craigslist but they are almost all for 5' beds here and sold within hours. Although I really just want a backflip cover or something to use when the camper is removed later, without taking up a bunch of space in the garage.

I bet it you offer to remove the windows and prep the top, you can find a shop to paint it to match for cheap. To me that is a way better option than plasti dip or something.
 

Adventurous

Explorer
Good deal! I keep watching Craigslist but they are almost all for 5' beds here and sold within hours. Although I really just want a backflip cover or something to use when the camper is removed later, without taking up a bunch of space in the garage.

I bet it you offer to remove the windows and prep the top, you can find a shop to paint it to match for cheap. To me that is a way better option than plasti dip or something.

That's kind of what I'm starting to lean towards. It can't be all that difficult to get things more or less prepped for paint, if I could get a new paint job for a couple hundred bucks from like Maaco it would sure beat plastidip.
 

Adventurous

Explorer
Anyone ever replaced a front topper window? It's one of the side ones that fixed and has a radius at the top at the bottom. I'm sure I could go to to the topper place but I'm afraid they'll ask for some absurd figure or say the whole window unit has to be replaced.
 

Adventurous

Explorer
Wouldn't you know it, after searching around for the past 5.5 months and barely seeing any toppers for a 6 foot bed up for sale on Craigslist I found two within a week. Both of which I bought. Guess I'm starting a topper collection.

This time around I found another Leer. Color matched, roof rack rails, carpet, power block, and sliding windows. Much like the first time around I jumped on it and went to pick it up that evening. After a quick walk around I had it up and on the truck and was on my way home. Guess I don't have to worry about drilling holes for roof racks rails or getting it color matched now do I?

20150328-P1010385 by Tim Souza, on Flickr

20150328-P1010386 by Tim Souza, on Flickr

I also got started with getting all of the wiring set up for the switches and power needs in the topper. First off was to get the 3rd brake light working. It is fairly simple, pull the tail light, tap into the green wire with the red stripe for your +, the white wire with the black stripe for your -, run some jumpers up to the LED 3rd brake light with a small in-line fuse (I went with a 2A fuse in there, Leer spec'd a 5A which IMO is way too high for what appears to be 18ga wire and 6 small LEDS).

20150324-P1010382 by Tim Souza, on Flickr

20150324-P1010383 by Tim Souza, on Flickr

Loom the wires for aestethics, drill a hole to feed the wire loom through, grommet said hole, and go on my merry way! Once again I was surprised to see the brake light go on when I hit the brake. Somehow I think I've got the hang of this electrical stuffs.

Anyway, next up on the list is building a switch box for the topper to activate some LEDs inside the topper as well as camp lights that should illuminate the area around the truck. It's a little bit of a tricky space to fit something into with some angles and the likes. Now, owing to a bit of insomnia, I'm going to head back out and finish re-doing the in-cab electrical to accommodate another switch for an LED light bar, tap into power to illuminate my switches, get some quick disconnects on the power leads for the CB so it is easily removed, and clean up all of the wires I ran into the cab. Short of re-routing the CB coax cable under the truck instead of through the main firewall grommet to cut down on the feedback I think I'm more or less done with in cab electrical until I decide to get a second battery in there.
 
Last edited:

Adventurous

Explorer
Anyone ever replaced a front topper window? It's one of the side ones that fixed and has a radius at the top at the bottom. I'm sure I could go to to the topper place but I'm afraid they'll ask for some absurd figure or say the whole window unit has to be replaced.

Just as a reference for anyone who runs into this situation in the future, the topper places will tell you that you can't remove the windows and that they have to sell you a full assembly for some ridiculous amount of money. That is false. With a minimum of time and money you can disassemble the window frame and pull the individual panels. That said, the only place I could find to replace it was a specialty auto glass shop who said they could cut a panel, send it off to temper, and 2 weeks and $80 dollars later I would have a replacement.
 

Adventurous

Explorer
Wow you really lucked out!

I know right? I'm quite pleased with how the whole situation turned out. I'm almost tempted to stop looking at Craigslist this week figuring a high topper in grey will show up and have to make the streak of buying toppers extend into it's third week. :sombrero:
 

Adventurous

Explorer
Does anyone have rocker switches mounted in their bed to control some outside and inside lights? I have a few Carling switches that I want to mount in a box by the tailgate but am at a loss as to how to do so. I'd appreciate seeing any solutions if you have them.
 

aero

Adventurer
Hey, just stumbled upon your build thread here.

If you have not started the platform build yet, I built one quickly a few days after I got the truck and I found a nice solid (but a little heavy) wood they sell at Home Depot. Its close to a 3/4" thick, grey in color and in tongue and groove plywood sheets. I had it cut nice and tight so I can lift the middle and lock the tongue and groove in and it'll stay where its supposed to be and wont warp, bend or slide without being fastened to the 2x6 cross bars that are in the stock notched locations. I never took pictures since I built it in the parking lot while it was snowing at night but one day we'll have to meet up!

And in my Tahoe I built a drawer setup that doubled as a sleeping platform and had a bit of luck with cheaper slides (100pound rated for like $20 each instead of the $100+ each ones) Two 30" drawers and a compartment at the front.

C360_2014-01-13-16-10-17-105_zpsb3dee1a0.jpg


C360_2014-01-16-15-46-55-675_zpsinnqz5al.jpg
 
Last edited:

Adventurous

Explorer
Hey, just stumbled upon your build thread here.

If you have not started the platform build yet, I built one quickly a few days after I got the truck and I found a nice solid (but a little heavy) wood they sell at Home Depot. Its close to a 3/4" thick, grey in color and in tongue and groove plywood sheets. I had it cut nice and tight so I can lift the middle and lock the tongue and groove in and it'll stay where its supposed to be and wont warp, bend or slide without being fastened to the 2x6 cross bars that are in the stock notched locations. I never took pictures since I built it in the parking lot while it was snowing at night but one day we'll have to meet up!

And in my Tahoe I built a drawer setup that doubled as a sleeping platform and had a bit of luck with cheaper slides (100pound rated for like $20 each instead of the $100+ each ones) Two 30" drawers and a compartment at the front.

C360_2014-01-13-16-10-17-105_zpsb3dee1a0.jpg


C360_2014-01-16-15-46-55-675_zpsinnqz5al.jpg

Cool! I think I have an idea what wood you are talking about. In fact I just used some to replace the subfloor in my bathroom. That fun little project has kept me away from the truck for too long. I wouldn't mind checking your platform out sometime, my timeline at this point has a platform being built before our Memorial Day trip.
 

Adventurous

Explorer
I know it's been a while since I last updated this but as I alluded to in the prior post, I have been busy playing home owner and renovating our upstairs bathroom. Total buzzkill I know but I have sneaked away to work on the truck a little bit.

At this point I am kind of running into a time crunch so I'm trying to get a bundle of stuff around the house and on the truck done. We are heading out Memorial Day for a little staycation to visit some ghost towns around the state and a few weeks later host all of my siblings where we will be spending some time in the San Juans.

First up was installing my roof rack. I know they tend to be a contentious mod but for me it is necessary. Being that the bed of the truck will be 1/2 occupied by the sleeping platform and mattress, I needed a place to relocate some of the recovery gear and bikes to. Although I have a nice Thule hitch mount bike rack, managing that with climbing in and out of the bed is a giant pain. The roof rack system on the topper is one that I made back at my old job. It was a quick way of getting some Thule bars on the roof so I could haul some stuff up there. The upside to my system is it is very low profile and doesn't sit 6" off the roof like the commercial solutions do. It is just some basic aluminum blocks hogged out to about the right direction. Nothing too fancy, it does the job but certainly doesn't look the prettiest. Oh well, it'll do for now.

20150329-P1010390 by Tim Souza, on Flickr

20150329-P1010391 by Tim Souza, on Flickr

20150329-P1010392 by Tim Souza, on Flickr

I got a bit better of a system for the cab of the truck. I was lucky enough to be in the market the same time a group buy popped up on Tacomaworld for the Prinsu Designs roof rack. Personally I think this is the coolest and most adaptable rack on the market and I was only too happy to fork over a few bucks for the system. After patiently waiting 2 months for the rack to arrive I came home yesterday to find a big box at my door step. I proceeded to drop the rest of my responsibilities and installed the rack right then and there. This is what I found when I opened the box.

20150427-P1010396 by Tim Souza, on Flickr

A couple of 1/4" aluminum side rails, a wind deflector, 6 standard duty bars, 2 heavy duty bars, and a hundred bazillion fasteners. There are two ways of installing the rack. The first involves removing the weather stripping entirely, the second involves punching holes for the spacers to fit through. Given that I am not a fan of water in the cab, I opted for the second method. After pulling up the weather stripping to mark the location of the mounting holes on a piece of painters tape, I transferred the hole pattern back to the weather stripping.

20150427-P1010397 by Tim Souza, on Flickr

Using a 19mm punch I knocked holes out of the weatherstripping to accept the 3/4" OD spacers.

20150427-P1010398 by Tim Souza, on Flickr

Once again, totally not a big fan of water in the cab, so I proceeded to go bonkers with a tube of silicone and pumped the bolt holes and the spacer holes full of clear silicone caulking.

20150427-P1010399 by Tim Souza, on Flickr

10 bolts later and I had the side rails on the truck.

20150427-P1010400 by Tim Souza, on Flickr

I installed a few of the crossbars to give the rack some support and shape, spaced it evenly from side to side, then snugged the mounting bolts down. I then proceeded to install the rest of the crossbars and the wind deflector. All in all it probably took 3 hours to get everything buttoned up including the time necessary to prep the charcoal grill and put some pork loins on there.

I am very, very pleased with the outcome. Given that the crossbars are 80-20 extrusions, there are a ton of mounting options for the accessories I intend to put up there. At this point, the pile in the garage that needs to go up there is a 4 gallon Rotopax gas can, Hi-Lift jack, shovel, and bike rack, but I will detail the install of the most interesting parts of those in a later post.

20150427-P1010402 by Tim Souza, on Flickr

20150427-P1010403 by Tim Souza, on Flickr

20150427-P1010404 by Tim Souza, on Flickr

You may notice a rectangular cutout in the wind deflector. That is for the seamless integration of an LED light bar. Once again, I'll detail that install in a later post.

At the same time I was installing the roof rack, I got busy replacing the window struts on the topper. Given that they were 6 years old at this point, they had lost a little steam. My poor window could only achieve half mast on a good day.

20150427-P1010394 by Tim Souza, on Flickr

Fresh SUSPA C16-14195 struts and I could once again get that puppy all the way up!

20150427-P1010395 by Tim Souza, on Flickr

More to come over the next few days as I get the roof rack dialed in to my preferences.
 
Last edited:

Forum statistics

Threads
188,464
Messages
2,905,348
Members
230,428
Latest member
jacob_lashell
Top