Black Series HQ Tips, Tricks, and Learning.....

Bikepals

Member
Ok, next super simple mod. By default your tow vehicle will not charge your Black Series trailer batteries, as the 12V line that would do that is disconnected. But that is really simple to fix. Just open the power distribution box next to the handbrake, and you'll see a spare black wire, with (hopefully!) black insulated rubber at the end. That wire goes to the 12V pin on the 7 pin trailer connector (see picture with red arrow). So all you need to do is to connect that black wire to the 12V red wire in the distribution box, and you're done! For me that was made even simpler, as it turns out that that black wire already has a connector attached. Just had to cut off the insulation, and connect it. See the pictures. This is way easier than figuring out how to connect the grey Anderson connector to your tow vehicle.

Now, whenever you plug in your trailer to your tow vehicle, it should charge your batteries while towing.

View attachment 563823View attachment 563824View attachment 563825
I saw that both cables went into this box and wondered if this could be done. So thanks again for a great post. I wonder why Black Series didn’t do this??
 

Matilda19

New member
I just looked at my new hitch and it is a 12K! So you all have me there :) 
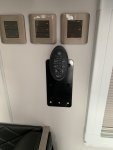
Yes on the MPPT. For one it was kinda hard to tell what state the batteries where in just based on the volt meter our trailers comes with. With the Victron you can see your total collection stats accurately in addition to what stages the battery hit through the daily charge cycle. Because it's using a three stage charge cycle it's also supposed to increase battery life.

Another great upgrade was one of these mattress toppers : https://www.amazon.com/gp/product/B00UYGA49M/ref=ppx_yo_dt_b_asin_title_o07_s00?ie=UTF8&psc=1
Still the best thing we've done so far!

RoA also shared a cool tip with me a few weeks ago in Moab. They added removable pins to the steps so that it's easy to remove them before hitting the trails. I know personally there's been a few times where I almost smoked those guys :)

Ok one more tip... I got this from another customer Dave... Zip tie the bolts of your suspension limiting shackles. I lost both of mine in the first month of use and ended replacing them with pinned link type shackles.
Hey, just got my hq19. Can you explain the zip tie for bolts of suspension shackles? I am not sure what i am looking for.....Thanks!
 

Bikepals

Member
Hey, just got my hq19. Can you explain the zip tie for bolts of suspension shackles? I am not sure what i am looking for.....Thanks!
Before I took home my HQ15 I had them check the shackles. One of them was missing already. They vibrate and come loose. The shackles are on the chain that goes in the middle of the suspension springs. I had them loctite both shackles. If you have your trailer home, just remove the bolt on the shackles and loctite them and you shouldn’t have any problems.
 

elindley01

New member
Hey guys,

Just wanted to introduce myself as a new Black Series owner! This forum has been very helpful for me in deciding the HQ12 was the camper for me and my family. I'm especially thankful for the tricks and tips from HQ15fan and feel like I know him after watching all the YouTube videos on the RVoA channel, lol. I'm a big contributor to other forums and hope to add some value to this one also. Thanks to all of you!
 

Attachments

  • IMG_20200130_103012_MP.jpg
    IMG_20200130_103012_MP.jpg
    2 MB · Views: 143
  • IMG_20200201_124729.jpg
    IMG_20200201_124729.jpg
    2.1 MB · Views: 143
  • IMG_20200201_163846.jpg
    IMG_20200201_163846.jpg
    1.6 MB · Views: 135

HQ15fan

Member
Hey guys,

Just wanted to introduce myself as a new Black Series owner! This forum has been very helpful for me in deciding the HQ12 was the camper for me and my family. I'm especially thankful for the tricks and tips from HQ15fan and feel like I know him after watching all the YouTube videos on the RVoA channel, lol. I'm a big contributor to other forums and hope to add some value to this one also. Thanks to all of you!

Your setup looks great! Where were those pictures of you camping taken? I see you got the high quality Harbor Freight bucket to go with the HQ12 :) Now, let the modding begin.... Post your experiences here, that'll be cool.
 

elindley01

New member
Your setup looks great! Where were those pictures of you camping taken? I see you got the high quality Harbor Freight bucket to go with the HQ12 :) Now, let the modding begin.... Post your experiences here, that'll be cool.

Thanks for the kind words! Yes, the free Harbor Freight bucket doubles as an outdoor sink drain and a stool for me to latch the top down when we're heading home, lol. Those pictures are from our first trip in the HQ12 last weekend at the Three Rivers Campground in Mescalero, NM. We live in El Paso now and this site is 2 hours away. Plus, we got to check out the Three Rivers Petroglyph site too. It's astounding how many incredible places there are to visit within a short drive from El Paso. That was one of the main contributing factors that led to us buying an HQ. I just did your 7 way trailer plug mod today and can't wait to see even more!
 

Bikepals

Member
Today I completed all my planned modifications. Two weeks ago I installed a Fantastic Fan. It took 3 hours because I took my time and was very careful. The old fan came off much easier than I anticipated. Since this is a new trailer the Dicor was soft and peeled up in one piece. Then I took my 5 way tool and worked it under the lip of the fan all the way around to take it off. The fan was connected with pin connectors so you can unplug it. I cut the cord from the old fan and used butt connectors to put it on the Fantastic fan. I cleaned the area with Mineral Spirits, soap and water, and Rubbing Alcohol before installing the fan. I installed the fan using Dicor Butyl Tape (under the lip of the fan) and Dicor self leveling lap sealant around the outer edge and over the screws. You cannot use the same holes as the old fan so I had to drill new holes. I made sure the fan worked before screwing it down. The remote holder has the same hole pattern as 2 screws on the TV wall brace (I have removed the TV). The remote works from the bed so this is a great place and no need to drill more holes. I used the same installation method as the Youtube video RV with Tito - How to Install A Fan-Tastic vent.

Today I installed 2 -110 watt SunPower flexible solar panels for a total of 520 watts of solar on the roof. My goal is not to drill anymore holes in my roof. One panel was installed on the front of the roof on the passenger side and the other was installed on the driver side between the fan and the middle solar panel. The passenger side solar panel had to have the header of the panel partially under the existing 150 watt panel. The SunPower panel has a large header so none of the cells are covered by the 150w panel. I used BougeRV Y Branch 1 to 4 Paralled Adaper Cables to connect all the panels together. Do not forget to trip the “Solar breaker" in the trailer. I didn’t do this and I had no power reading on my Victron app for my solar panels (panic). My Victron 100/50 controller (first thing I installed when I got the trailer) had cut out. I had to trip the breaker off and on to reset it. Again I used the same method that RV with Tito used in the video “Better Way to Mount Flexible Solar Panels on RV”. I fired up the microwave for 2 minutes and I got 420 watts from this setup and it is a partially cloudy day here in Arizona. I will take pictures later if anyone is interested in doing this.

I also checked the electrical box in the front of the trailer to see if I could hookup the 12 volt terminal so the car would charge the batteries (thanks HA15 Fan). To my surprise it was already hooked up. I double checked the 7 pin connector with my volt meter to be sure. So 2020 HQ15 trailers may all have this connected. My dealer must not know because they offered to wire up my car with an Anderson cable. Glad I didn’t take them up on it.
 

Attachments

  • IMG_0239.JPG
    IMG_0239.JPG
    1.2 MB · Views: 60
  • IMG_0237.JPG
    IMG_0237.JPG
    830.2 KB · Views: 62
Last edited:

HQ15fan

Member
Today I completed all my planned modifications. Two weeks ago I installed a Fantastic Fan. It took 3 hours because I took my time and was very careful. The old fan came off much easier than I anticipated. Since this is a new trailer the Decor was soft and peeled up in one piece. Then I took my 5 way tool and worked it under the lip of the fan all the way around to take it off. The fan was connected with pin connectors so you can unplug it. I cut the cord from the old fan and used butt connectors to put it on the Fantastic fan. I cleaned the area with Mineral Spirits, soap and water, and Rubbing Alcohol before installing the fan. I installed the fan using Dicor Butyl Tape (under the lip of the fan) and Dicor self leveling lap sealant around the outer edge and over the screws. You cannot use the same holes as the old fan so I had to drill new holes. I made sure the fan worked before screwing it down. The remote holder has the same hole pattern as 2 screws on the TV wall brace (I have removed the TV). The remote works from the bed so this is a great place and no need to drill more holes. I used the same installation method as the Youtube video RV with Tito - How to Install A Fan-Tastic vent.

Today I installed 2 -110 watt SunPower flexible solar panels for a total of 520 watts of solar on the roof. My goal is not to drill anymore holes in my roof. One panel was installed on the front of the roof on the passenger side and the other was installed on the driver side between the fan and the middle solar panel. The passenger side solar panel had to have the header of the panel partially under the existing 150 watt panel. The SunPower panel has a large header so none of the cells are covered by the 150w panel. I used BougeRV Y Branch 1 to 4 Paralled Adaper Cables to connect all the panels together. Do not forget to trip the “Solar breaker" in the trailer. I didn’t do this and I had no power reading on my Victron app for my solar panels (panic). My Victron 100/50 controller (first thing I installed when I got the trailer) had cut out. I had to trip the breaker off and on to reset it. Again I used the same method that RV with Tito used in the video “Better Way to Mount Flexible Solar Panels on RV”. I fired up the microwave for 2 minutes and I got 420 watts from this setup and it is a partially cloudy day here in Arizona. I will take pictures later if anyone is interested in doing this.

I also checked the electrical box in the front of the trailer to see if I could hookup the 12 volt terminal so the car would charge the batteries (thanks HA15 Fan). To my surprise it was already hooked up. I double checked the 7 pin connector with my volt meter to be sure. So 2020 HQ15 trailers may all have this connected. My dealer must not know because they offered to wire up my car with an Anderson cable. Glad I didn’t take them up on it.

Nice, well done! Please share pictures of your solar panel setup. Like to see that. Also, what trailer is this? A HQ15?

Thanks!
 

Bikepals

Member
Some pictures from our first camping trip at Bartlett Lake about an hour from our house. I’m pulling my HQ15 with a GMC Canyon AT Diesel. Wanted a midsized truck that would fit in my garage. Pulls great, got around 15 mpg on this trip.
 

Attachments

  • 2E5DF681-8759-4C25-918F-EC374244146C.jpeg
    2E5DF681-8759-4C25-918F-EC374244146C.jpeg
    163.4 KB · Views: 80
  • 6CCAF294-F6B1-409F-8A17-09CB1314105E.jpeg
    6CCAF294-F6B1-409F-8A17-09CB1314105E.jpeg
    143.6 KB · Views: 91
  • 4D137F4F-DD63-4F89-85CB-04BEF4921797.jpeg
    4D137F4F-DD63-4F89-85CB-04BEF4921797.jpeg
    148.2 KB · Views: 95

Bikepals

Member
Nice, well done! Please share pictures of your solar panel setup. Like to see that. Also, what trailer is this? A HQ15?

Thanks!
Would have taken pictures yesterday but when I got no reading of solar output it put a wrench in it. I will take some pictures later in the week and post. Yes I have a HQ15.
 

mvbeggs

Adventurer
... I also checked the electrical box in the front of the trailer to see if I could hookup the 12 volt terminal so the car would charge the batteries (thanks HA15 Fan). To my surprise it was already hooked up. I double checked the 7 pin connector with my volt meter to be sure. So 2020 HQ15 trailers may all have this connected. My dealer must not know because they offered to wire up my car with an Anderson cable. Glad I didn’t take them up on it.

In the next few days, I'll be flying to Bozeman to inspect and pay for my new HQ-19. (I'll be driving back up in March/April to pick it up.)

Do the 2020's still have the Anderson connector? I heard rumors they were deleting the Anderson plug. I'd prefer to use the Anderson connector, over the 7 pin connector, due to the larger amperage carrying capacity of the Anderson plug. Does the Black Series have a DC to DC charger included?
 

Bikepals

Member
In the next few days, I'll be flying to Bozeman to inspect and pay for my new HQ-19. (I'll be driving back up in March/April to pick it up.)

Do the 2020's still have the Anderson connector? I heard rumors they were deleting the Anderson plug. I'd prefer to use the Anderson connector, over the 7 pin connector, due to the larger amperage carrying capacity of the Anderson plug. Does the Black Series have a DC to DC charger included?
I can only speak to the 2020 HQ15. It does have the Anderson plug. No there is no DC to DC Charger and not sure why you would need one? There are 4 AGM batteries in the 2020 so your car can directly charge the batterie, but they also have 300 watts of solar panels that will also charge the batteries. You only need a DC to DC Charger for lithium batteries for the car to properly charge them at the correct voltage. It also has a Aims 2000 watt inverter charger that charges the batteries when hooked up to shore power.
 

Bikepals

Member
Here are pictures of the solar panel setup I have on the HQ15. As I said in a previous post you can see a video of how I mounted the panels on a YouTube video by RV with Tito. In short the SunPower flexible panels are on a sheet of Coroplast cut to the same size. You use aluminum floor transition pieces cut to 2" with holes drilled through the Coroplast and aluminum for the bolt. I used elevator bolts because they have a flat head. The panels are then mount to the top of the trailer with VHB tape under the bolts and 2" aluminum strips then covered with EternaBond Tape. The panel is bolted on to the Coroplast with wing nuts and Loctite. Then a strip of the aluminum is put across the front end to deflect air when you drive. This solar panel setup gives me 520 watts of power plus I have a 160 watt panel for ground solar incase I am in the shade.
 

Attachments

  • _8504456.jpeg
    _8504456.jpeg
    967.8 KB · Views: 85
  • _8504458.jpeg
    _8504458.jpeg
    2.4 MB · Views: 81
  • _8504459.jpeg
    _8504459.jpeg
    957.9 KB · Views: 77
  • _8504457.jpeg
    _8504457.jpeg
    1 MB · Views: 73

mvbeggs

Adventurer
I can only speak to the 2020 HQ15. It does have the Anderson plug. ....

Thanks for the reply. Glad to hear they did not delete the Anderson plug. That will save me the time of having to install one on the trailer.

....No there is no DC to DC Charger and not sure why you would need one? There are 4 AGM batteries in the 2020 so your car can directly charge the batterie, but they also have 300 watts of solar panels that will also charge the batteries. You only need a DC to DC Charger for lithium batteries for the car to properly charge them at the correct voltage. It also has a Aims 2000 watt inverter charger that charges the batteries when hooked up to shore power.

You might want to check out the advantages to running a DC-DC charger, as well as the limitations you may run into charging from the small wire in the vehicle's 7 pin connector.

The main benefit I see with the DC-DC charger is DC-DC charger's ability to control the input voltage from the alternator to charge the auxiliary batteries to 100%. The DC-DC charger also uses software to apply the correct charging profile for the battery type and the battery's current state of charge.

"You only need a DC to DC Charger for lithium batteries for the car to properly charge them at the correct voltage."...

In my opinion, there are numerous advantages to running a DC-DC charger whether you run AGM, lead acid, or Lithium Ion. I don't believe DC-DC chargers are only needed for Lithium Ion batteries.


Here's a couple links that have some relevant information regarding DC-Dc chargers:

REDARC BCDC and SBI Explained

There is a lot of "Talk" about DC to DC chargers and "Do i really need it" questions about this subject.

What is a REDARC BCDC and what does it do?
(although this is a manufacture's video, it goes into how DC-DC chargers work and why they may be advantageous.)

Again, thanks for the information.
 
Last edited:

Forum statistics

Threads
186,582
Messages
2,887,697
Members
226,608
Latest member
DQblues
Top