You are using an out of date browser. It may not display this or other websites correctly.
You should upgrade or use an alternative browser.
You should upgrade or use an alternative browser.
Bruiser the Adventure Cargo Trailer
- Thread starter Adventurous
- Start date
ronaldohid
New member
How far off the beaten path are you planning on taking this? I was looking at the same trailer but not sure if the 6x12 would be too big, we like to camp in the boonies outside of campgrounds but wife wants creature comforts.
Adventurous
Explorer
How far off the beaten path are you planning on taking this? I was looking at the same trailer but not sure if the 6x12 would be too big, we like to camp in the boonies outside of campgrounds but wife wants creature comforts.
Won't get too wild, but I wanted something that would be able to run down mild forest service roads so we could get to dispersed camping that was too much for the RV crown to get to. Pretty much your desires as well, the wife wanted an enclosed indoor space to live in and it was up to me to figure out how small of a box I could fit all of the must haves in. 6x10 could have worked, but with 3 dogs there was little extra space to move around.
Thats a beautiful trailer. Can't wait to see the inside when it's done. I've been working on a 5x8 conversion myself, getting near completion. I did insulate it and went with 3500lb timbren suspension
Thanks! I've been following your build as well on Tacomaworld and hope I have the time to make fenders like yours. So much more functional...
Adventurous
Explorer
Progress has been slower than I hoped for. Who would have thought building a trailer in the middle of winter might pose some challenges.
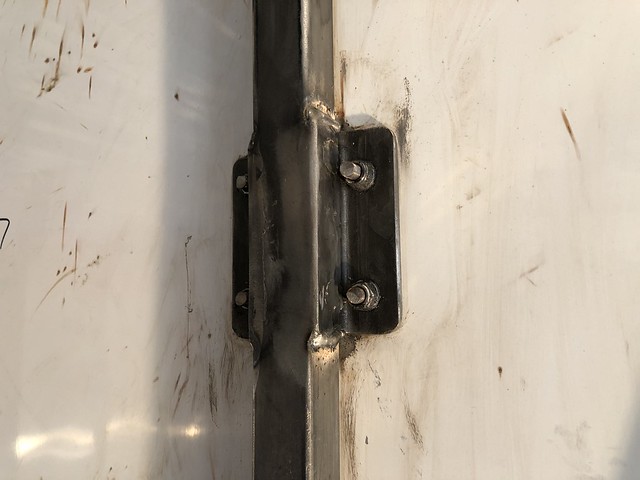
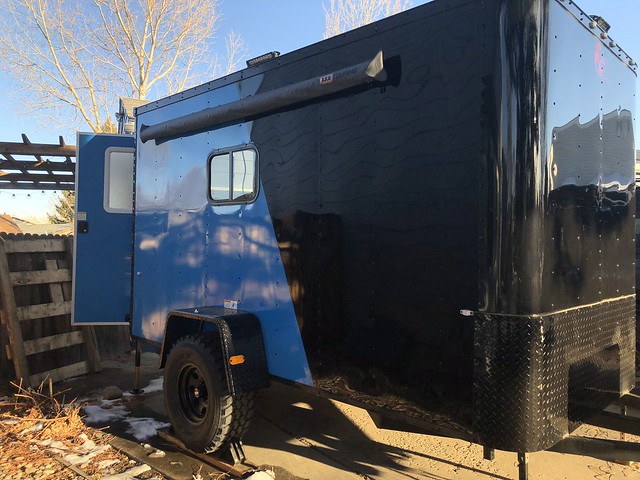
Awning is on and it's going nowhere! Given that I'm a stubborn SOB, I managed to install it by myself (just had to prove my wife wrong) using a couple of ratchet straps looped over the trailer and secured so I could lift it into place. Originally I had bolts that were just about spot on the right length, but it proved too difficult trying to line up 16 bolts along an 8' span and get them all through their respective holes. So I switched gears and bought longer bolts that allowed me to get the top row through and with a nut on the back side, but still have enough slack to get some slightly shorter bolts into the track and in the right spot. Afterwards I coated the bolt hole area on the back side of the awning with non-self leveling lap joint sealant, put blue loctite on the nuts, and snugged everything up. Bolts were cut to length afterwards.
 Untitled by Tim Souza, on Flickr
Like it was meant to be that way.
 Untitled by Tim Souza, on Flickr
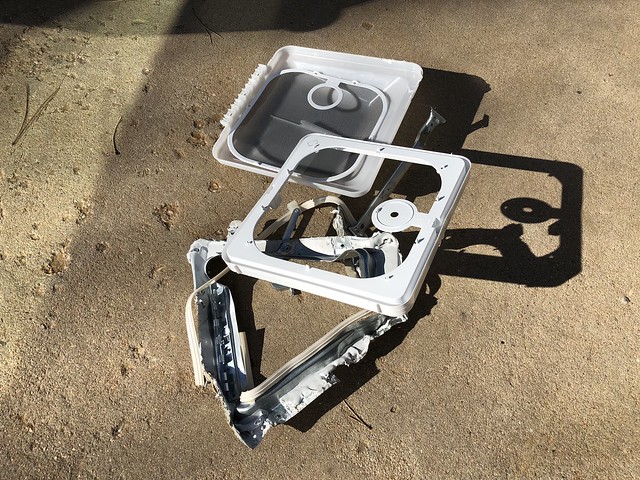
Also got into the ceiling vent. That's probably fine for a cargo trailer, but since we'll be living in there, I wanted a multi-speed vent fan. I tried to be nice when removing it, I swear, but there were enough screws hidden under the lap sealant that I got frustrated. And then it was hammer time.
 Untitled by Tim Souza, on Flickr
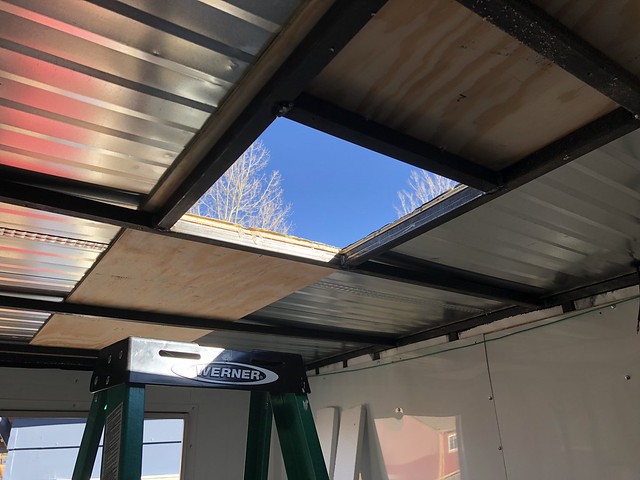
Would you look at that, I can see sky now!
 Untitled by Tim Souza, on Flickr
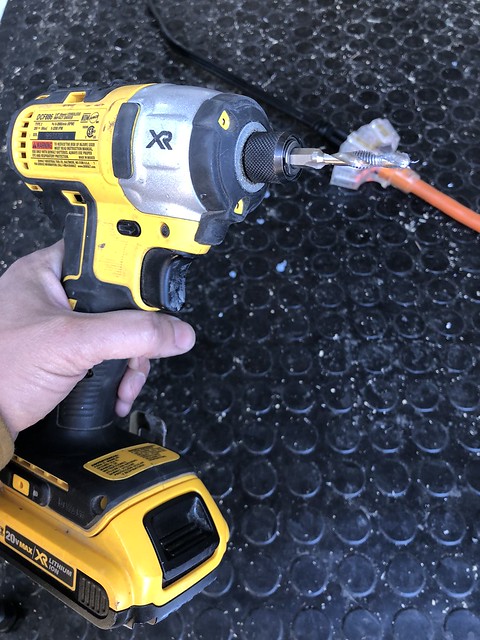
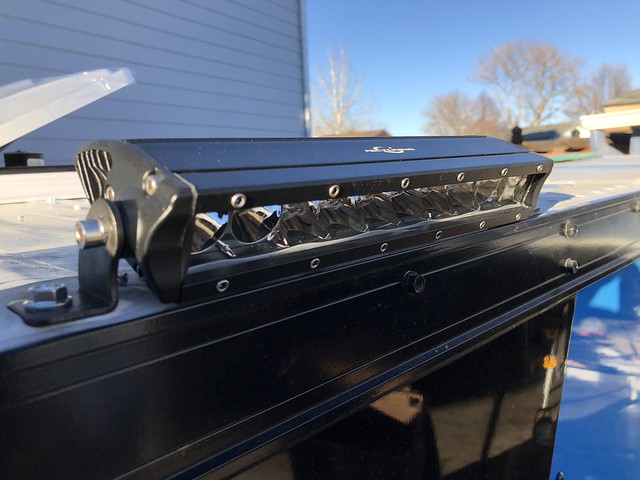
The other thing I've been working on is installing some small, single row LED light bars along the roof of the trailer. They'll all be independently wired and switched, but having exterior lights will be awfully nice. Now when it came to mounting them, it was either use self tapping screws or bolts. I opted for bolts to ensure that the threads made it into the steel tubing instead of having them grab primarily on the exterior skin. Rather than drill and tap each hole, I grabbed some DeWalt impact driver drill taps that made quick work of it.
 Untitled by Tim Souza, on Flickr
Highly recommended, they made quick work of it. Lights tuck up nicely!
 Untitled by Tim Souza, on Flickr
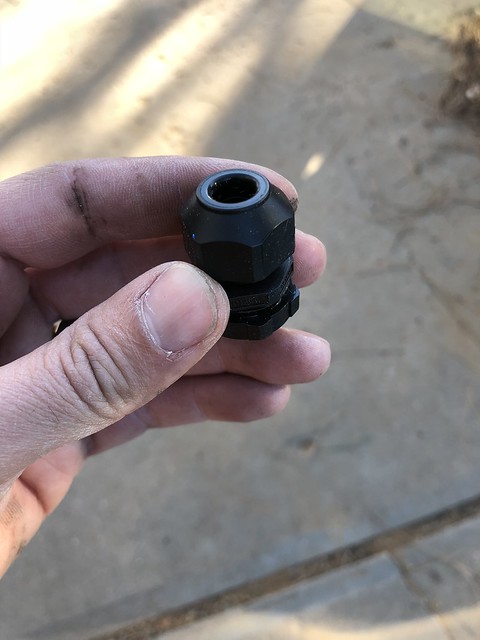
From there I had to get the cables into the interior of the trailer. I was hoping for a cleaner solution than a grommet and lap sealant, and purchased some Heyco cord grips, which I must say are slick little pieces. They use a buna-N washer to provide a seal against the roof, and have a segmented seal that snugs against the cable as the nut is tightened. Several snow storms so far and the subsequent melting has demonstrated that these things are indeed water tight and I have nothing to worry about.
 Untitled by Tim Souza, on Flickr
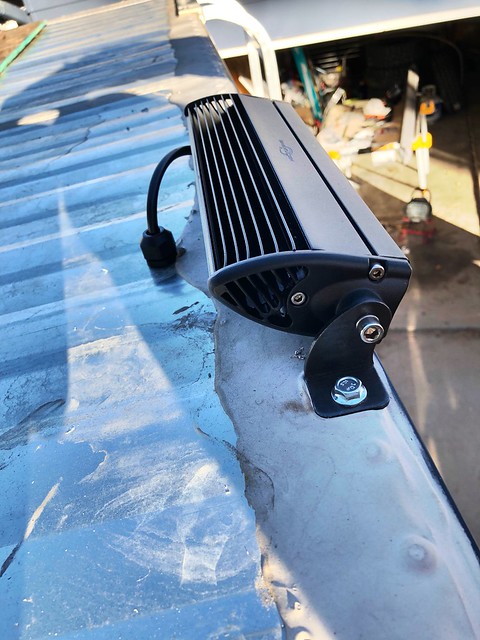
It was a little bit nerve wracking popping 5/8" holes in the roof of my brand new trailer, but I'll have to look at it as good practice for when I have to start making really big holes. This is what it looks like all put together.
 Untitled by Tim Souza, on Flickr
I have 11" light bars along each side and 6" bars along the front and back. Now to dive into wiring everything...
Awning is on and it's going nowhere! Given that I'm a stubborn SOB, I managed to install it by myself (just had to prove my wife wrong) using a couple of ratchet straps looped over the trailer and secured so I could lift it into place. Originally I had bolts that were just about spot on the right length, but it proved too difficult trying to line up 16 bolts along an 8' span and get them all through their respective holes. So I switched gears and bought longer bolts that allowed me to get the top row through and with a nut on the back side, but still have enough slack to get some slightly shorter bolts into the track and in the right spot. Afterwards I coated the bolt hole area on the back side of the awning with non-self leveling lap joint sealant, put blue loctite on the nuts, and snugged everything up. Bolts were cut to length afterwards.
 Untitled by Tim Souza, on Flickr
Like it was meant to be that way.
 Untitled by Tim Souza, on Flickr
Also got into the ceiling vent. That's probably fine for a cargo trailer, but since we'll be living in there, I wanted a multi-speed vent fan. I tried to be nice when removing it, I swear, but there were enough screws hidden under the lap sealant that I got frustrated. And then it was hammer time.
 Untitled by Tim Souza, on Flickr
Would you look at that, I can see sky now!
 Untitled by Tim Souza, on Flickr
The other thing I've been working on is installing some small, single row LED light bars along the roof of the trailer. They'll all be independently wired and switched, but having exterior lights will be awfully nice. Now when it came to mounting them, it was either use self tapping screws or bolts. I opted for bolts to ensure that the threads made it into the steel tubing instead of having them grab primarily on the exterior skin. Rather than drill and tap each hole, I grabbed some DeWalt impact driver drill taps that made quick work of it.
 Untitled by Tim Souza, on Flickr
Highly recommended, they made quick work of it. Lights tuck up nicely!
 Untitled by Tim Souza, on Flickr
From there I had to get the cables into the interior of the trailer. I was hoping for a cleaner solution than a grommet and lap sealant, and purchased some Heyco cord grips, which I must say are slick little pieces. They use a buna-N washer to provide a seal against the roof, and have a segmented seal that snugs against the cable as the nut is tightened. Several snow storms so far and the subsequent melting has demonstrated that these things are indeed water tight and I have nothing to worry about.
 Untitled by Tim Souza, on Flickr
It was a little bit nerve wracking popping 5/8" holes in the roof of my brand new trailer, but I'll have to look at it as good practice for when I have to start making really big holes. This is what it looks like all put together.
 Untitled by Tim Souza, on Flickr
I have 11" light bars along each side and 6" bars along the front and back. Now to dive into wiring everything...
Adventurous
Explorer
following. Just curious...on the awning why not just get longer M6 bolts and bolt right through the square tube and forgo all the fabrication and welding?
Where's the fun in that?
In all seriousness, the inside face of the tube has the plywood wall flush against it, though I suppose I could have cut reliefs in the plywood for the hex nuts to sit in. No real reason I had to go down the path I chose though, just made the most sense in my mind at the time.
Adventurous
Explorer
The highlight of this trailer was always going to be the skylight above the bed. One of the best parts of camping to me is getting out far enough away from light pollution that you can see the countless number of stars and the Milky Way overhead. The prospect of falling asleep to that sounds quite nice.
When the trailer was built, they put a 1.5' wide strip of plywood down the center of the trailer, presumably to add camber to the roof for drainage. Given that this wouldn't provide support around the entire perimeter of our 14" x 30" (inner dimension) skylight, I had to remove the wood and put a wider piece in. Busted out the track saw for its maiden voyage and had myself a 36" piece that tucked up there nicely.
 Untitled by Tim Souza, on Flickr
With that in place I set about reinforcing the structure to handle the skylight. My worry was that flexing of the structure would transfer some load to the skylight and either break it, or the repeated cycling would create weak points that would leak. Additionally, with only a few cross members supporting the roof, I didn't have a whole lot of confidence in its strength.
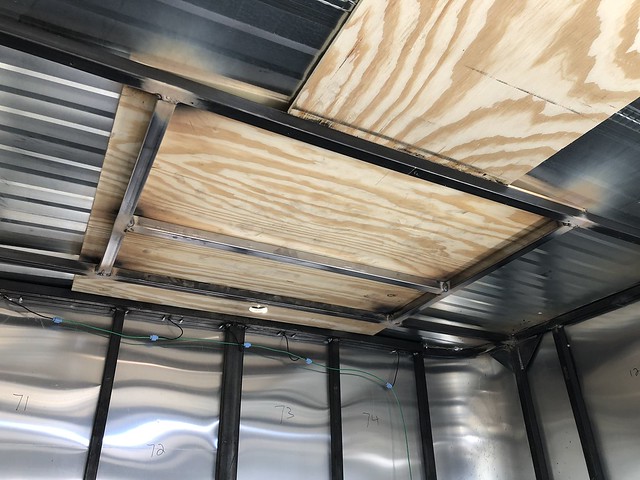 Untitled by Tim Souza, on Flickr
Then came the big moment, time to cut a hole in the roof. I drilled the perimeter of the opening with a 3/8" bit to give myself a guide, hopped up on the roof with my jig saw and metal cutting blade, and made a big hole.
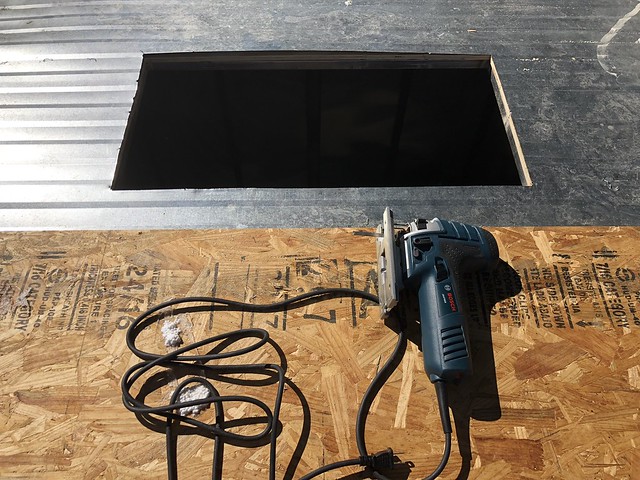 Untitled by Tim Souza, on Flickr
The steel frame did a good job at keeping the jig saw blade on track, but I cut it a smidge smaller than the final dimension. This was followed up with a flap disk in the angle grinder to bring things to the final dimension and make the edges smooth and burr free. Daylight!
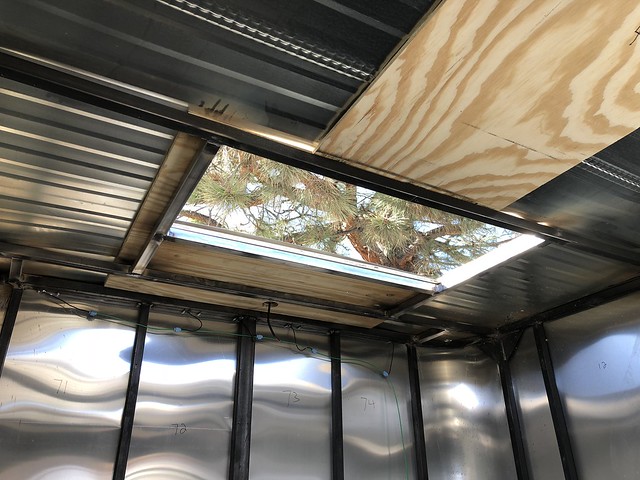 Untitled by Tim Souza, on Flickr
Then came time to mount it for good. I'm a bit averse to water leaks, so I went 110% when it came to getting the butyl tape on there. I put a 2" wide strip along the entire flange and followed this up with another 1" strip underneath the screw holes. Once the skylight was in place, I took some more of the butyl tape, folded it to make a rope, and crammed this under the perimeter so I could have a protruding bead. Screws were snugged down, I was happy to see the butyl squeeze out uniformly, then I took a heat gun and softened it up a little so I could cram it under the perimeter again. This will at some point be covered in self-leveling lap sealant, but the temperature and wind picked up yesterday afternoon and I didn't have a chance to do pt. 2 of the waterproofing.
 Untitled by Tim Souza, on Flickr

When the trailer was built, they put a 1.5' wide strip of plywood down the center of the trailer, presumably to add camber to the roof for drainage. Given that this wouldn't provide support around the entire perimeter of our 14" x 30" (inner dimension) skylight, I had to remove the wood and put a wider piece in. Busted out the track saw for its maiden voyage and had myself a 36" piece that tucked up there nicely.

With that in place I set about reinforcing the structure to handle the skylight. My worry was that flexing of the structure would transfer some load to the skylight and either break it, or the repeated cycling would create weak points that would leak. Additionally, with only a few cross members supporting the roof, I didn't have a whole lot of confidence in its strength.

Then came the big moment, time to cut a hole in the roof. I drilled the perimeter of the opening with a 3/8" bit to give myself a guide, hopped up on the roof with my jig saw and metal cutting blade, and made a big hole.

The steel frame did a good job at keeping the jig saw blade on track, but I cut it a smidge smaller than the final dimension. This was followed up with a flap disk in the angle grinder to bring things to the final dimension and make the edges smooth and burr free. Daylight!

Then came time to mount it for good. I'm a bit averse to water leaks, so I went 110% when it came to getting the butyl tape on there. I put a 2" wide strip along the entire flange and followed this up with another 1" strip underneath the screw holes. Once the skylight was in place, I took some more of the butyl tape, folded it to make a rope, and crammed this under the perimeter so I could have a protruding bead. Screws were snugged down, I was happy to see the butyl squeeze out uniformly, then I took a heat gun and softened it up a little so I could cram it under the perimeter again. This will at some point be covered in self-leveling lap sealant, but the temperature and wind picked up yesterday afternoon and I didn't have a chance to do pt. 2 of the waterproofing.

Adventurous
Explorer
Sadly no updates on this one for a little bit. Next step is mounting the solar panels, but the first kit I got from Amazon was missing the solar charge controller, the second kit was a wheelbarrow. Yes, a literal wheelbarrow. Let's hope try #3 works out better.
since you mentioned being highly motivated to not have leaks you might consider some alternatives to lap sealant. There are options from Sika that actually cure and are far more long lasting, and there is also Eternabond tape. I just used 4 ince Eternabond to put in my max fan last year and quite liked it. I've also used Sika products for sealing other entries and much prefer it over dicor etc.
2180miles
Endurance Adventuring
Looking great. Thanks for the Heyco cord grip name, a buddy and I were just talking about that kind of thing last night but I couldn't come up with an actual title for them. He's looking to put solar on his JKU hard top and wire it down through there... those should work perfectly for his needs.
Sub'd for more!
Sub'd for more!
Adventurous
Explorer
After much thought and consideration, I will be putting this trailer up for sale with a for sale link to follow. As much as I'd love to continue to get it built out, life has a different plan for me at this point and I hope someone else can turn this into the killer, off-road RV that it is meant to be. Keep an eye out for the for sale ad or PM me if you are interested.
For reference, the trailer is located in the Denver, CO area.
For reference, the trailer is located in the Denver, CO area.
Adventurous
Explorer
https://www.expeditionportal.com/fo...froad-6x12-cargo-trailer.192376/#post-2464004
Grab a super solid platform at a great price!
Grab a super solid platform at a great price!
L3TT3RS
@pooping_outside
Bummer man. I was reading like a mad man, excited to see it completed as my wife and I just purchased the little brother to yours. 5x8 with 4ft ceiling height. Good luck with your sale.https://www.expeditionportal.com/fo...froad-6x12-cargo-trailer.192376/#post-2464004
Grab a super solid platform at a great price!
Sent from my SM-G955U using Tapatalk
Similar threads
- Replies
- 32
- Views
- 6K
- Replies
- 2
- Views
- 631
- Replies
- 2
- Views
- 1K
