You are using an out of date browser. It may not display this or other websites correctly.
You should upgrade or use an alternative browser.
You should upgrade or use an alternative browser.
Budget Skamper Fix/Build
- Thread starter SLO_F-250
- Start date
SLO_F-250
Explorer
Dan, Thanks for the "Bump"! Ive have been totally slacking on updates and trip reports! My Bad! haha :elkgrin:
It was a busy year, so I didnt get to camp as much as I would like, but in a bit less than 2 years, Im on 29 trips in the ole skamper. Here's a shot from Zion from the big trip in May. Lots more photos in my trip report mentions on previous posts, but I wanted to show you guys the bus dept waning in action. It works great and I added mounts on either side of the camper. This adds verstility to the way I position myself depending on camp.

Camping at Faria Campground in Ventura. Pretty much RV city, but was fun for the weekend for a boyz escape. This was August.

Also made it down to El Capitan St. Beach Campground in October. The campsite was nothing to write home about, but I dusted off my ole' Hawaiian Sling and went out about 30yds off shore to see what I could get. :snorkel: Here was the result! Fish Tacos anyone! haha

Lastly, my girl and I decided to a little December night out at Morro Strand St. Beach. The fall/winter is the nice time of year on the central coast and we scored a beautiful night and morning in a empty campground. The waves unfortunately were not that great. The swell hadn't hit yet, but you bet I was back the next day to catch it.
Last bit of the sunset.

Great sunrise over Morro Bay.

Always gotta get a shot of the rig.

As far as work goes, the skamper has been pretty much fix/restored. Im in maintenance mode on it now. Most recently I resealed it and added one last LED light to the exterior. Its nice to just leave it on when you need some light and not worry about the battery. Planned upgrades for 2012 are going to be fix the dang heater! Yes Dan, its going to happen! haha I would also like to get a battery isolator setup to charge my battery so I can run the fridge while driving. The girl and I plan on doing an eastern sierra week road trip or heading back to utah, so that needs to happen before then. Ill keep ya'll posted on my little mod's and fixes with as many picts as possible! :bike_rider:
Hope all is well with everyone and I wish you all the best in 2012! Happy Camping! :ylsmoke:
Paul
It was a busy year, so I didnt get to camp as much as I would like, but in a bit less than 2 years, Im on 29 trips in the ole skamper. Here's a shot from Zion from the big trip in May. Lots more photos in my trip report mentions on previous posts, but I wanted to show you guys the bus dept waning in action. It works great and I added mounts on either side of the camper. This adds verstility to the way I position myself depending on camp.

Camping at Faria Campground in Ventura. Pretty much RV city, but was fun for the weekend for a boyz escape. This was August.

Also made it down to El Capitan St. Beach Campground in October. The campsite was nothing to write home about, but I dusted off my ole' Hawaiian Sling and went out about 30yds off shore to see what I could get. :snorkel: Here was the result! Fish Tacos anyone! haha

Lastly, my girl and I decided to a little December night out at Morro Strand St. Beach. The fall/winter is the nice time of year on the central coast and we scored a beautiful night and morning in a empty campground. The waves unfortunately were not that great. The swell hadn't hit yet, but you bet I was back the next day to catch it.
Last bit of the sunset.

Great sunrise over Morro Bay.

Always gotta get a shot of the rig.

As far as work goes, the skamper has been pretty much fix/restored. Im in maintenance mode on it now. Most recently I resealed it and added one last LED light to the exterior. Its nice to just leave it on when you need some light and not worry about the battery. Planned upgrades for 2012 are going to be fix the dang heater! Yes Dan, its going to happen! haha I would also like to get a battery isolator setup to charge my battery so I can run the fridge while driving. The girl and I plan on doing an eastern sierra week road trip or heading back to utah, so that needs to happen before then. Ill keep ya'll posted on my little mod's and fixes with as many picts as possible! :bike_rider:
Hope all is well with everyone and I wish you all the best in 2012! Happy Camping! :ylsmoke:
Paul
SLO_F-250
Explorer
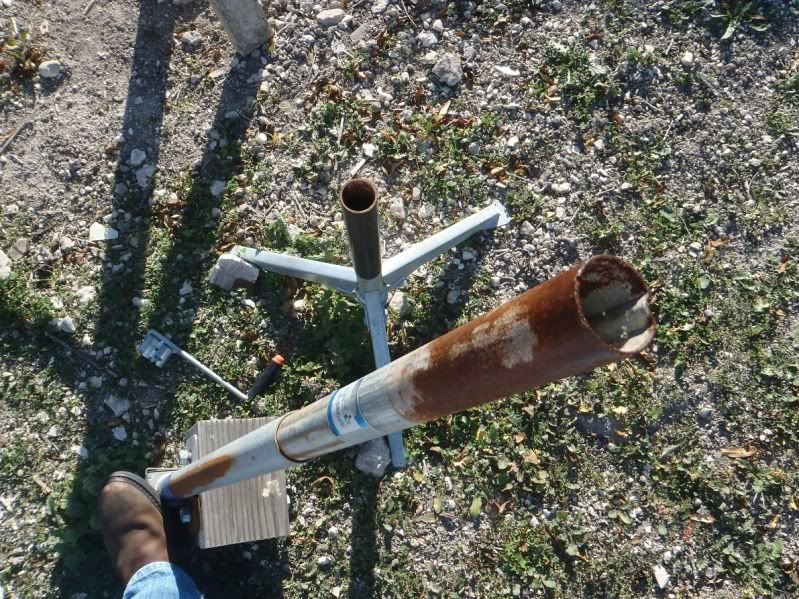
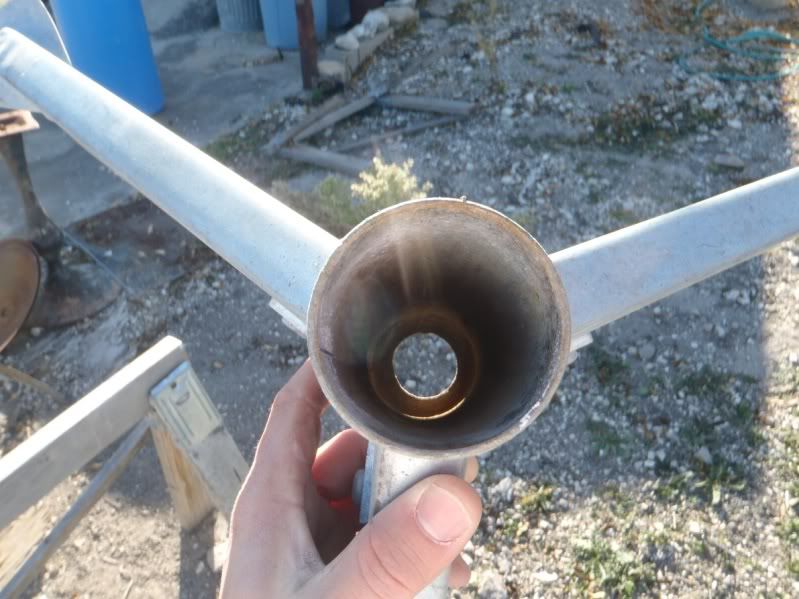
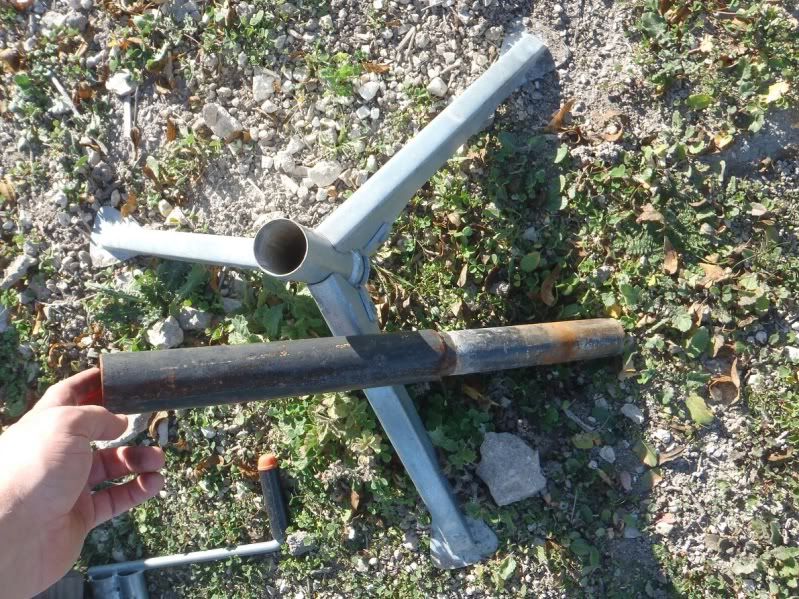
Alright Dan,
Per your request, here are some pictures of the jack tri-pods. I also took some picts of the extensions I made in order to lift the little guy high enough to get on my truck. Everything is pretty thin wall. Around 1/16" thick.
Extension:
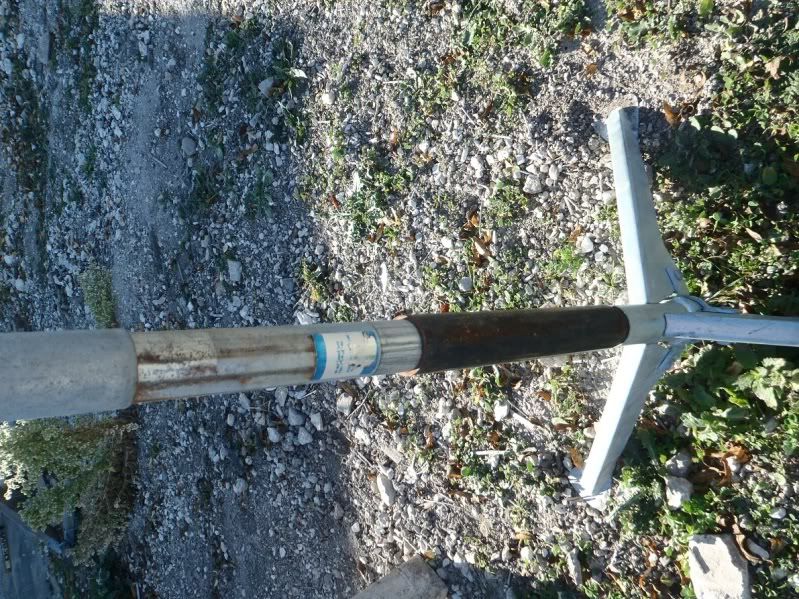
Let me know if you need some more picts...
Per your request, here are some pictures of the jack tri-pods. I also took some picts of the extensions I made in order to lift the little guy high enough to get on my truck. Everything is pretty thin wall. Around 1/16" thick.


Extension:


Let me know if you need some more picts...
SLO_F-250
Explorer
HEATER TIME!!!
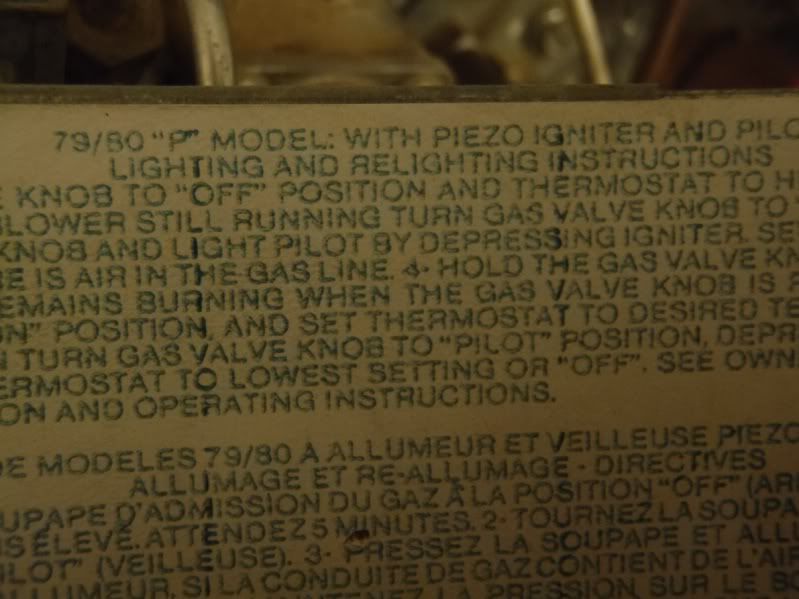
Alright, so after 2 years the last thing to do what get the ole heater running. I was able to carve some time out yesterday to take it out of the camper. Below are some pictures of the process. There were wasp nests in the intake tube! Yikes! I checked all the valves, no leaks. All the safety breaks have continuity so nothing was blown. So after a good cleaning it should work. I have it back together on my bench and will be "hotwiring" the fan today to see if I can get everything working. Well see. Thanks to Dan (xdbx) for all the advice! Oh yea, my heater model is: 79/80 "P" Model with Peizo Ignitor & Pilot.
Here are some picts of the process.
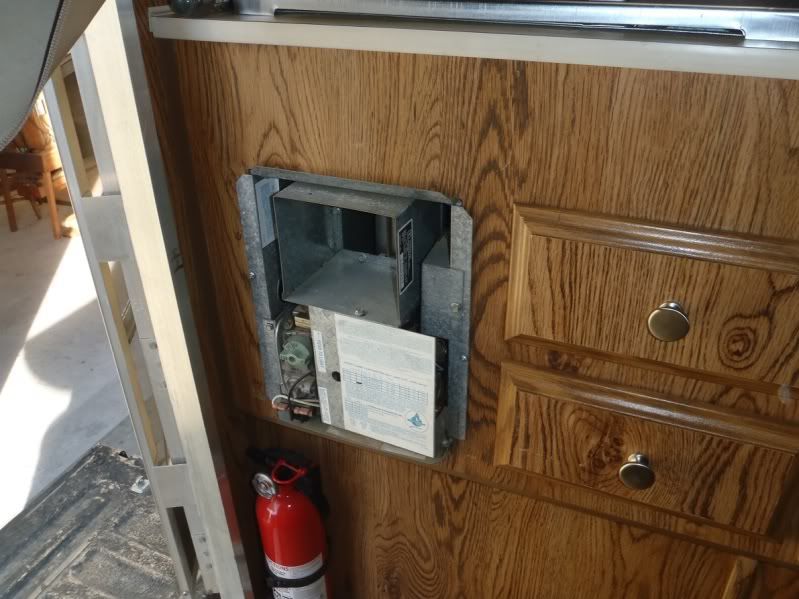
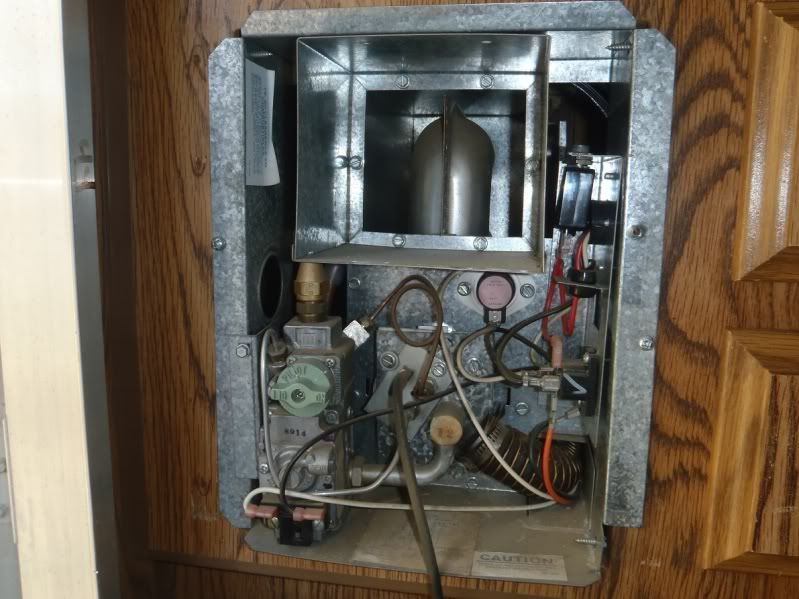
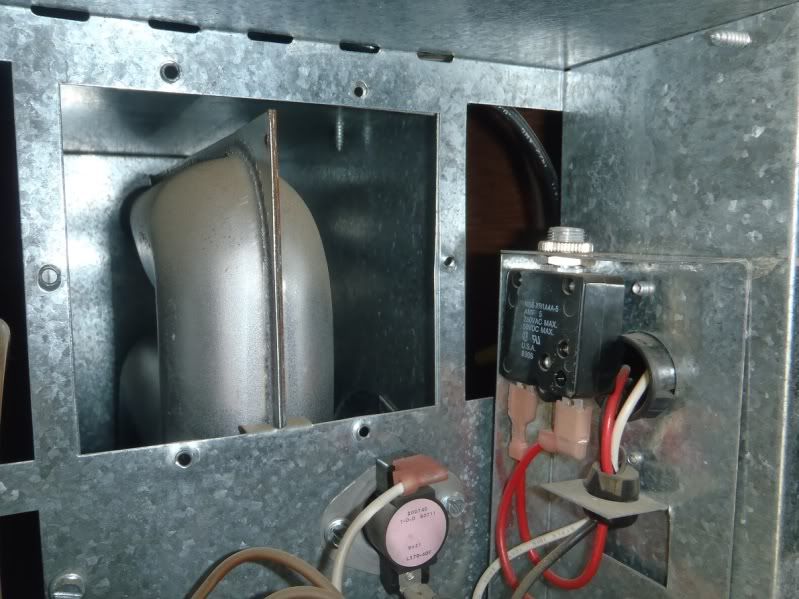
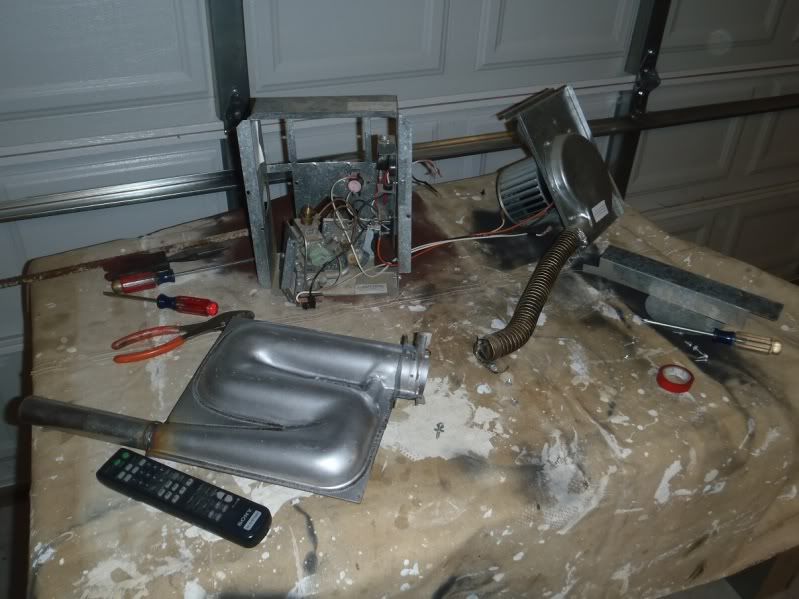
This picture shows where the pilot light is. The whole assembly sticks in the intake pipe and then the fan sucks hot air out. Unfortunatly, there is no way to see the pilot when the heater is in the camper. Kind of lame.
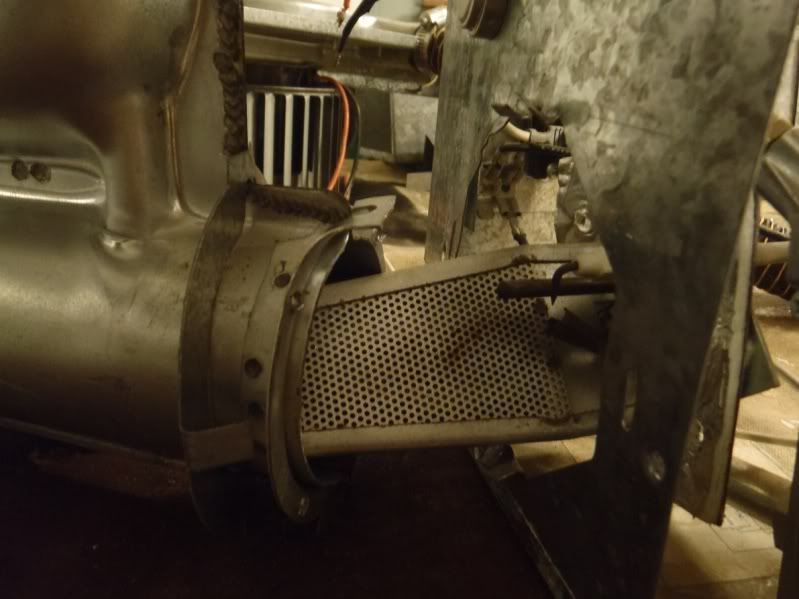
Pict. of the pilot and heat coil I guess.
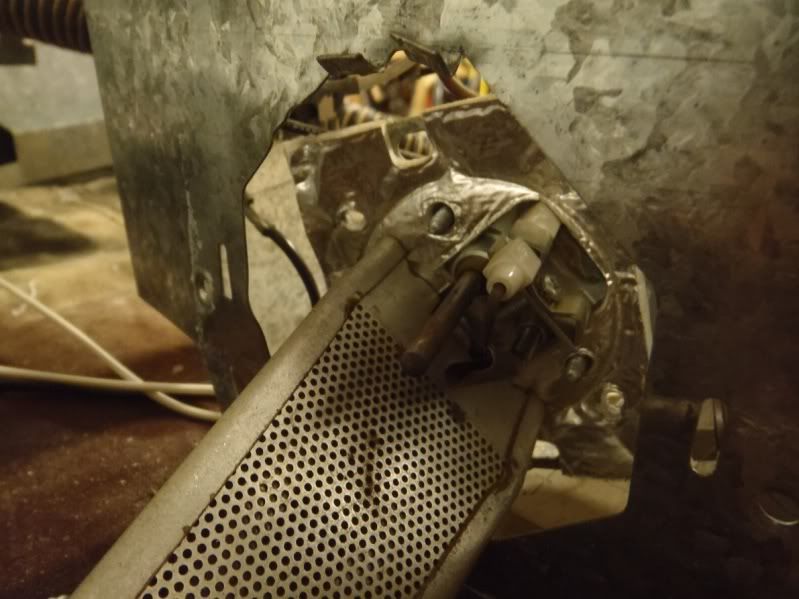
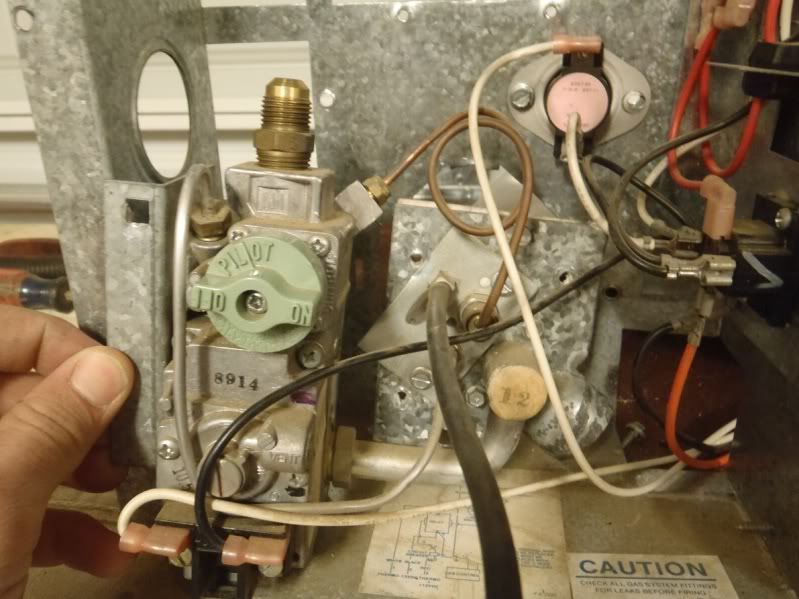
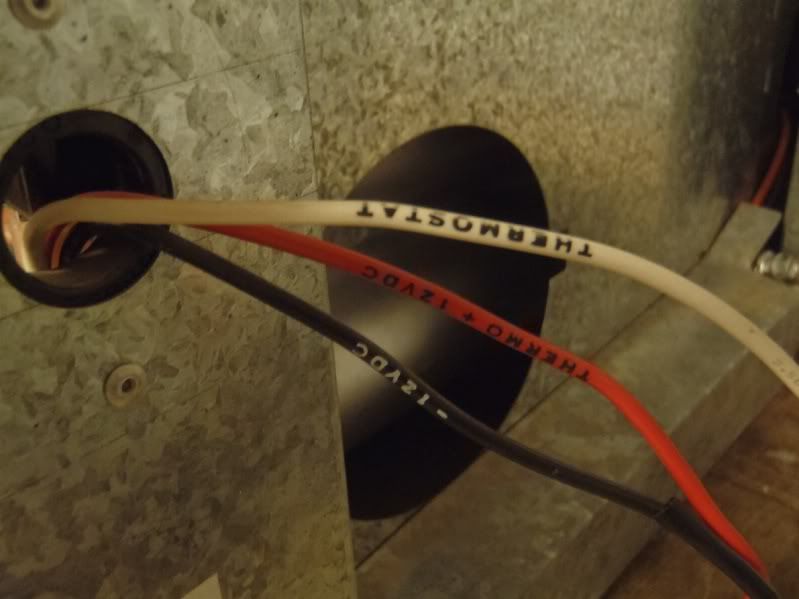
Wires that run out to the thermostat/battery.
Aright, back into the garage to see if I can get this baby working! :victory:
Cheers,
Paul
Alright, so after 2 years the last thing to do what get the ole heater running. I was able to carve some time out yesterday to take it out of the camper. Below are some pictures of the process. There were wasp nests in the intake tube! Yikes! I checked all the valves, no leaks. All the safety breaks have continuity so nothing was blown. So after a good cleaning it should work. I have it back together on my bench and will be "hotwiring" the fan today to see if I can get everything working. Well see. Thanks to Dan (xdbx) for all the advice! Oh yea, my heater model is: 79/80 "P" Model with Peizo Ignitor & Pilot.
Here are some picts of the process.


This picture shows where the pilot light is. The whole assembly sticks in the intake pipe and then the fan sucks hot air out. Unfortunatly, there is no way to see the pilot when the heater is in the camper. Kind of lame.

Pict. of the pilot and heat coil I guess.


Wires that run out to the thermostat/battery.

Aright, back into the garage to see if I can get this baby working! :victory:
Cheers,
Paul
Just bought a 1993 Skamper 065S last weekend down in LA for $1k and found your thread which is packed full of great info. Just a couple of questions.
1. Did you replace the light cover on the handle just to the right of the rear door? If so, where did you find it?
2. My roof isn't leaking yet but I'm thinking about re-sealing the seem with eternabond tape. Is that what you used?
3. My sink has the hand pump faucet but no water pump. Do you have the original faucet as well? Do you have to switch the pump on when you want to use the faucet?
4. What did you use to reinstall the roof corners after you glassed them?
My camper's furnace and icebox have already been removed. I just built some new cabinet doors and turned the space into storage. Bought a 9k BTU Mr Heater Buddy indoor portable propane heater new for a hundred bucks which should work fine and will just use coolers for now. I live just up the road from you in Hanford. 5. What's the name of the place where you found your refrigerator?
Once again. Fantastic thread!
I'll help where I can:
1) The replacement cover is an easily sourceable generic cover. I found some at all 3 local RV supply stores I frequented. If you're unable to source one, I can go and purchase one and mail it to you.
3) The water pump is an in-line 12v water pump that should be located very close to the water tank. On my 072S, that's underneath the "front" bench. The original pump was dead, and I found a replacement easily. All the pump needs is 12v. Its usually switched by a large brown rocker switch just underneath the sink where your thigh would be labeled "on/off" You do not need to do anything to the hand pump to allow the 12v pump to work. You just switch it on, and it flows. On the other hand, when you connect your city water, no water should flow from the faucet. Instead of pulling up on the pump handle, youshould be able to push it down slightly, and water should come out. The hand pumps are also easily sourceable.
4) I am working on similar rebuilt corner brackets. I intend to use clear silicone sealing epoxy and wood screws in a simlar fashion to the way they were originally attached.
SLO_F-250
Explorer
Just bought a 1993 Skamper 065S last weekend down in LA for $1k and found your thread which is packed full of great info. Just a couple of questions.
1. Did you replace the light cover on the handle just to the right of the rear door? If so, where did you find it?
2. My roof isn't leaking yet but I'm thinking about re-sealing the seem with eternabond tape. Is that what you used?
3. My sink has the hand pump faucet but no water pump. Do you have the original faucet as well? Do you have to switch the pump on when you want to use the faucet?
4. What did you use to reinstall the roof corners after you glassed them?
My camper's furnace and icebox have already been removed. I just built some new cabinet doors and turned the space into storage. Bought a 9k BTU Mr Heater Buddy indoor portable propane heater new for a hundred bucks which should work fine and will just use coolers for now. I live just up the road from you in Hanford. 5. What's the name of the place where you found your refrigerator?
Once again. Fantastic thread!
Hey Bender!
Congrats on your purchase! Hope you have some good trips ahead of you.
Regarding your questions Ill add to what Dan (xdbx) said:
1) Any RV store should have it. Standard cover. Delta RV is the local place I found mine.
2) After replacing some dryrot, Im sure you saw the pictures of that mess, I used this "ProRV" Caulk to seal the roof. I got it at the same RV store I mentioned. About 8$ a tube. They said that was the tough stuff. Came in Clear and White. When you use it, you can defiantly tell its heavy duty. I have sense then sealed all the corners, joints, etc with the same stuff and is holding up GREAT! Worth the $$ IMO.
3) My hand pump faucet was broken when I originally picked it up, but the camper had an old electric pump in it with a switch wired in. I ended up going with a hand pump/electric all in one option. If you pull the handle all the way up the electric motor comes on. Great part about this is if you are out of juice in your battery or you pump goes out, you can still manually pump water.
4) When re-installing the roof corners, I just stainless steel #10 wood screws and some smaller stainless bolts to lower aluminum trip part. Sealed it with that putty stuff, and then caulk over.
5) I bought my fridge off Ebay and then spent WAY too much time messing with it, and it still doesn't work consistently. Varies greatly with temperature. Im going to replace a few burner parts to see if that does the trick. If I were to do it over again, I would seriously consider an Engel fridge and just modify the opening to fit it. They are pricey, but from what I read worth it.
Sorry about no links to specific products. I linked them off the Delta RV website only to realize it just sends you back to the homepage. If you need some specifics I can help you out.
GOOD LUCK and thank you for the compliments! :victory:
Paul
SLO_F-250
Explorer
Well guys, I just wanted to give a quick heater update. I was able to get everything back together, check all the fuses/breakers, and get it working on my bench. Threw it back in the camper, and what do you know? IT WORKS! Im looking forward to using it now!
Not exactly sure what I did, but taking it apart got me familiar with the heater and now I know how it works. This specific model is a bit weird because you cannot see the pilot light. I have to listen for the flame and feel the metal above it to know if its on. Kind of a bummer.
And since we all like pictures, why not another shot of the rig! :elkgrin:
I called it the spot... Nowhere Northern Arizona....

Cheers,
Paul
Not exactly sure what I did, but taking it apart got me familiar with the heater and now I know how it works. This specific model is a bit weird because you cannot see the pilot light. I have to listen for the flame and feel the metal above it to know if its on. Kind of a bummer.
And since we all like pictures, why not another shot of the rig! :elkgrin:
I called it the spot... Nowhere Northern Arizona....

Cheers,
Paul
Excellent! I suggest anyone else working on a furnace remove it and tinker with it. Its relatively straightforward how it works, and you'll gain a great understanding of what could go awry when in use.
Paul, since we're both using shorter campers than our beds, I had spent many nights thinking about how I could use the space better. I find I dont exactly need the larger "porch" to enter the camper, and I end up lounging on the ground level anyway. I'm thinking of setting up an in-bed toolbox like the tradesmen around here use infront of the camper to take up the ~14" of slack I've got, and push the camper to the rear to butt up against the tailgate. Had you thought about this at all?
Paul, since we're both using shorter campers than our beds, I had spent many nights thinking about how I could use the space better. I find I dont exactly need the larger "porch" to enter the camper, and I end up lounging on the ground level anyway. I'm thinking of setting up an in-bed toolbox like the tradesmen around here use infront of the camper to take up the ~14" of slack I've got, and push the camper to the rear to butt up against the tailgate. Had you thought about this at all?
SLO_F-250
Explorer
Excellent! I suggest anyone else working on a furnace remove it and tinker with it. Its relatively straightforward how it works, and you'll gain a great understanding of what could go awry when in use.
Paul, since we're both using shorter campers than our beds, I had spent many nights thinking about how I could use the space better. I find I dont exactly need the larger "porch" to enter the camper, and I end up lounging on the ground level anyway. I'm thinking of setting up an in-bed toolbox like the tradesmen around here use infront of the camper to take up the ~14" of slack I've got, and push the camper to the rear to butt up against the tailgate. Had you thought about this at all?
Hey Dan,
Yes, I did think about it, but I only have about 6-7" of slack. Thus, not enough room for a toolbox so I didn't really think about it much more. In your case, it might look a bit funky, but would add some valuable storage area. Keep me posted.
Paul
Agree, it'd look funky, but also looks not quite right with the short camper either. I struggle finding storage for my moto riding gear when taking trips. I have trays on a front and rear receivers, with the ability to carry 3 bikes. I end up filling the. Ack seat and part of the camper with bulky gear that could go in this space. Things like boots and helmets simply don't pack well.
ToolBox Guy
Adventurer
Agree, it'd look funky, but also looks not quite right with the short camper either. I struggle finding storage for my moto riding gear when taking trips. I have trays on a front and rear receivers, with the ability to carry 3 bikes. I end up filling the. Ack seat and part of the camper with bulky gear that could go in this space. Things like boots and helmets simply don't pack well.
You need a basket like I built for the back of mine.
ToolBox Guy
Adventurer
SLO_F-250
Explorer
View attachment 81520
Buy one. Then you could build cool stuff like this, and keep all you gear out of your camper.
Man I like that Utility Bed Setup Toolbox!! Nice work!
A little heater update = FAIL! After running that thing at home for 30 min, I went to fire it up camping this weekend and it let out a terrible shreeekk! Urgh! Dang bearings in the fan must be going out. Ill be taking the bad boy apart this weekend and will take a look. Maybe a little grease will solve the problem and I can throw it back in... I HOPE!
Other than that, great short trip to Morro Strand Beach again. Surf was up, and my buddy (and his wife) who I talked into getting a pop-up last year joined us. He just picked up a nice new Dodge to carry is 4WC!
Shots of Camp:


Sorry Dan, No sunset picts, but how about a pre-surf sunrise.... :sombrero:

Similar threads
- Replies
- 41
- Views
- 2K
- Replies
- 3
- Views
- 466
- Replies
- 0
- Views
- 556

