SBSYNCRO
Well-known member
I posted this in the Wrangler forums because I received a lot of questions from folks on how I put this together. In case there are some folks here that don't frequent the JK section in Wranglerforum.com I figured I'd post it here too.
-------------------------
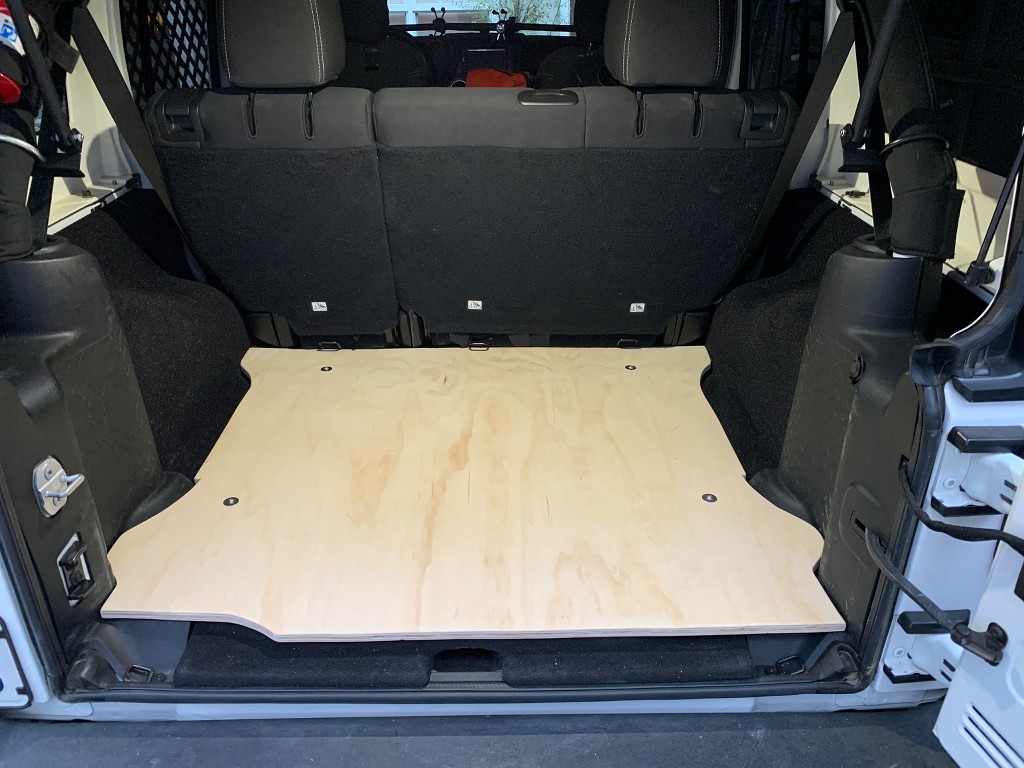
If you're looking for a way to clean up the rear cargo deck of your JKU a plywood deck is a great way to do it. For about $50 in materials you can build one yourself that won't look quite as good as a Goose Gear system, but will be 100% useful and will save you about $500.

(pictures taken before painting to show it better)
This first phase addresses the area BEHIND the rear seats. I plan a Phase II that will delete the rear seats and replace them with another deck that is flush with this section, creating a continuous flat cargo deck much like the Goose Gear system.
Design considerations:
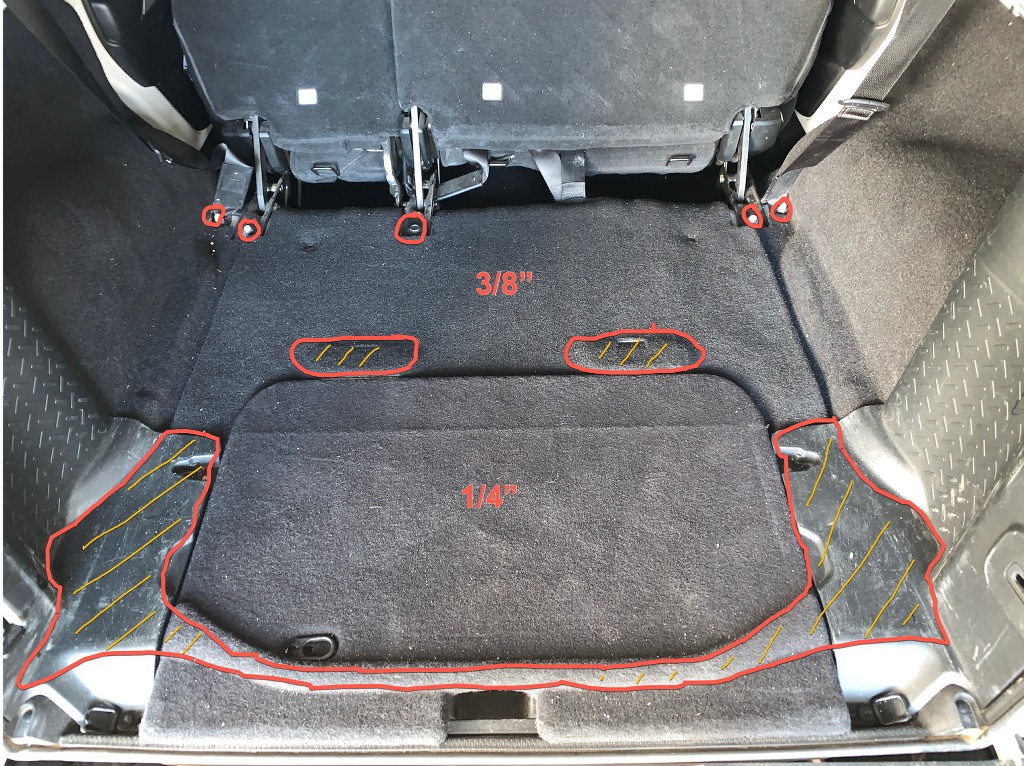
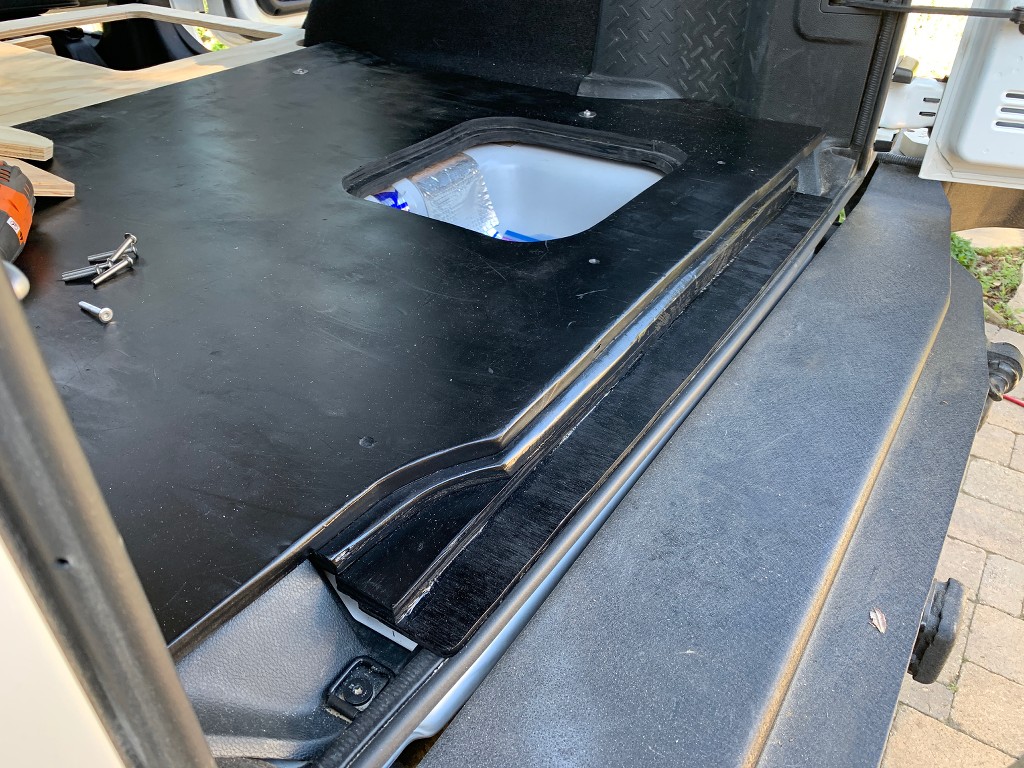
Its a bit tricky to figure out exactly how you want to design the system and you have a couple of options (I spent an entire weekend pulling apart the interior, measuring things, mocking up drawings, and just staring at the space). The rear floor of the Jeep is NOT even - there are two "humps" that stand about 1/2" to 5/8" proud of the main cargo deck. These are the "slots" that the rear bin lid slide into. Unless you want to take a sledge hammer to these and knock them down, you have to build off this height.
There are a lot of "layers" to contend with:
1. Jeep Logo mat
2. Carpeted Storage bin lid (or subwoofer cover) and its hinge slots
3. Carpeting
4. Plastic trim on both sides that also comes down to the horizontal plane and extends into the floor area
OPTION 1: Remove everything
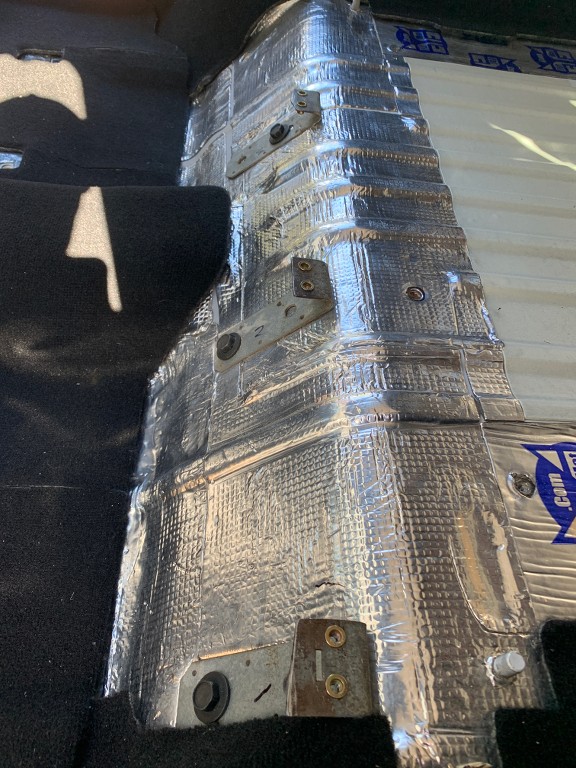
With this option, you remove the black plastic trim pieces on both sides of the rear cargo area, and then also remove the carpeting for the rear area. At first I considered doing this, but once I had removed everything I just couldn't get comfortable with the exposed wiring looms on both sides of the body tub. I also didn't like the way the roll bar just jutted up out of the wheel wells.
OPTION 2:Remove only the Jeep logo cargo mat
This is the way I decided to go, though it does end up a bit uneven (I'll address that below). Using some rough measurements off the carpeted "floor" I determined that the horizontal portions of the two plastic trim pieces are roughly the same height as the two "humps" that the storage bin/subwoofer cover fit into.
Materials Required:
Tools Required:
Method:
-------------------------
If you're looking for a way to clean up the rear cargo deck of your JKU a plywood deck is a great way to do it. For about $50 in materials you can build one yourself that won't look quite as good as a Goose Gear system, but will be 100% useful and will save you about $500.
(pictures taken before painting to show it better)
This first phase addresses the area BEHIND the rear seats. I plan a Phase II that will delete the rear seats and replace them with another deck that is flush with this section, creating a continuous flat cargo deck much like the Goose Gear system.
Design considerations:
Its a bit tricky to figure out exactly how you want to design the system and you have a couple of options (I spent an entire weekend pulling apart the interior, measuring things, mocking up drawings, and just staring at the space). The rear floor of the Jeep is NOT even - there are two "humps" that stand about 1/2" to 5/8" proud of the main cargo deck. These are the "slots" that the rear bin lid slide into. Unless you want to take a sledge hammer to these and knock them down, you have to build off this height.
There are a lot of "layers" to contend with:
1. Jeep Logo mat
2. Carpeted Storage bin lid (or subwoofer cover) and its hinge slots
3. Carpeting
4. Plastic trim on both sides that also comes down to the horizontal plane and extends into the floor area
OPTION 1: Remove everything
With this option, you remove the black plastic trim pieces on both sides of the rear cargo area, and then also remove the carpeting for the rear area. At first I considered doing this, but once I had removed everything I just couldn't get comfortable with the exposed wiring looms on both sides of the body tub. I also didn't like the way the roll bar just jutted up out of the wheel wells.
OPTION 2:Remove only the Jeep logo cargo mat
This is the way I decided to go, though it does end up a bit uneven (I'll address that below). Using some rough measurements off the carpeted "floor" I determined that the horizontal portions of the two plastic trim pieces are roughly the same height as the two "humps" that the storage bin/subwoofer cover fit into.
Materials Required:
- Large sheets of cardboard - enough to create a 44" x 37" piece (if not use duct tape to create a large enough piece)
- 1/2 Sheet (4x4) of desired grade of plywood in either 1/2" or 5/8" thickness (I used 5/8" ACX which uses a waterproof glue). If you want to go "all out" and have a really good lumber yard nearby, you might be able to find Baltic Birch plywood in 5/8" thickness, but it will be expensive. It holds screws REALLY well, and is perhaps a bit more stiff than ACX.
- (4) M6 x 60mm button head screws, stainless or black oxide finish
- (4) 1" x 1/4" fender washers in the same finish as the screws
- (4) M6 x 40 studs (optional)
Tools Required:
- measuring tape
- Torx T30 bit and driver (for removing 4 cargo tie-downs)
- Large size contour gauge that will extend at least 4.5" and is as long as possible (min 10"). https://smile.amazon.com/AlexBasic-E.../dp/B07R6692TT
- Box knife with sharp blade(s)
- Large carpenter's square
- Sharpie pen
- 4mm allen wrench (for installing the new screws)
- Skilsaw or table saw (optional)
- Jig saw
- Palm sander with 80 and 150 grit paper
- Drill and 1/4" bit
- small piece of scrap of the plywood you're using, or something else that is about 3" x 3" of the same thickness
Method:
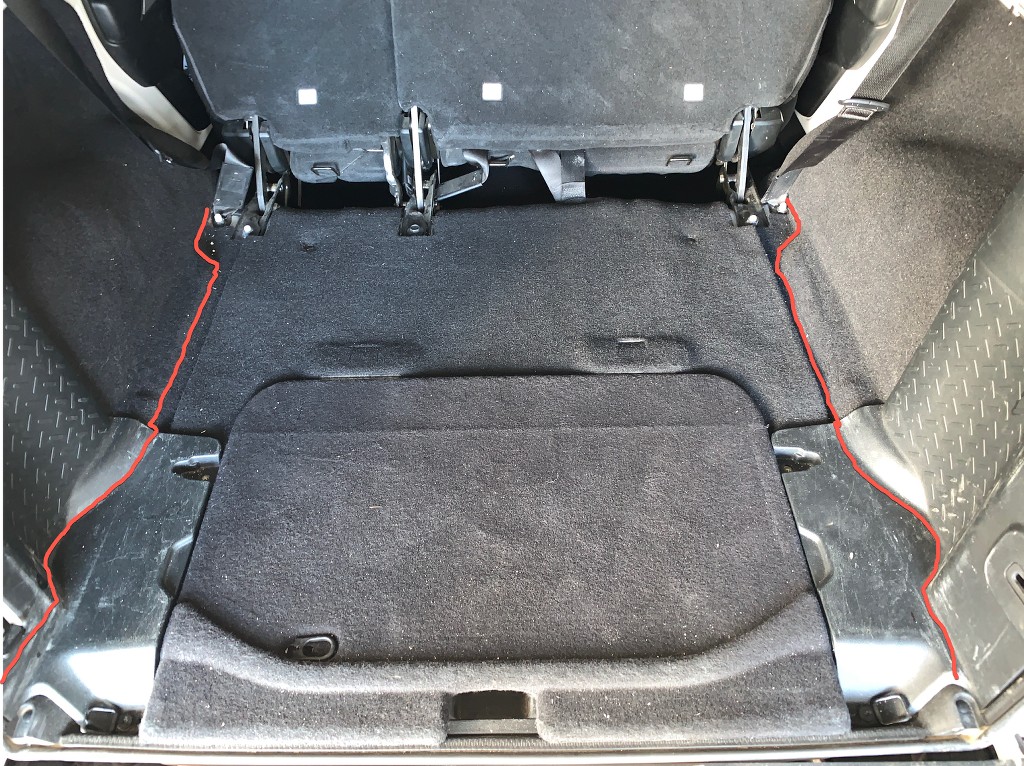
- Remove Jeep Logo cargo mat (if you have one)
- There are 3 cargo tie-downs on each side. Using Torx T30 bit, remove the 2 on each side closest to the front of the Jeep, leaving the rear two in place (the ones that are closest to the tailgate.
- Take your piece of cardboard and make sure it is square with measurements of 43-5/8" x 36-7/8". Measure the 1/2 way point and fold it exactly in half along the center (approx 22"). Unfold
- Using your contour gauge, measure the contour immediately behind the rear seats where it "necks in" toward the center. Transfer the contour to the cardboard template, then measure the distance down (or push the cardboard into place and mark it) and measure the contour of the second indent, which is a bit more complex because the plastic juts out a bit.
- When you are done transferring the contours from one side of the Jeep to your sheet of cardboard with the Sharpie, cut and test fit that side.
- Adjust as necessary. If you mess up, you can just cut away a patch and then replace with a larger patch using duct tape, then try again. SPEND AS MUCH TIME AS NECESSARY TO GET THIS RIGHT! (I spent two hours on this stage and 30 minutes on the rest of the project!).
- Once you have one side fitting well, fold your cardboard in half and transfer your markings to the other side and trim to your lines. Unfold and test fit, making adjustments as necessary. It will take a bit of tweaking to get it right.
- Now check the fit against the rear door using the 3 x 3 piece of scrap - you'll notice that because of the thickness, it may have more or less interference - trim away the area on the driver's side where the tailgate door bulges out, using your piece of scrap as a guide.
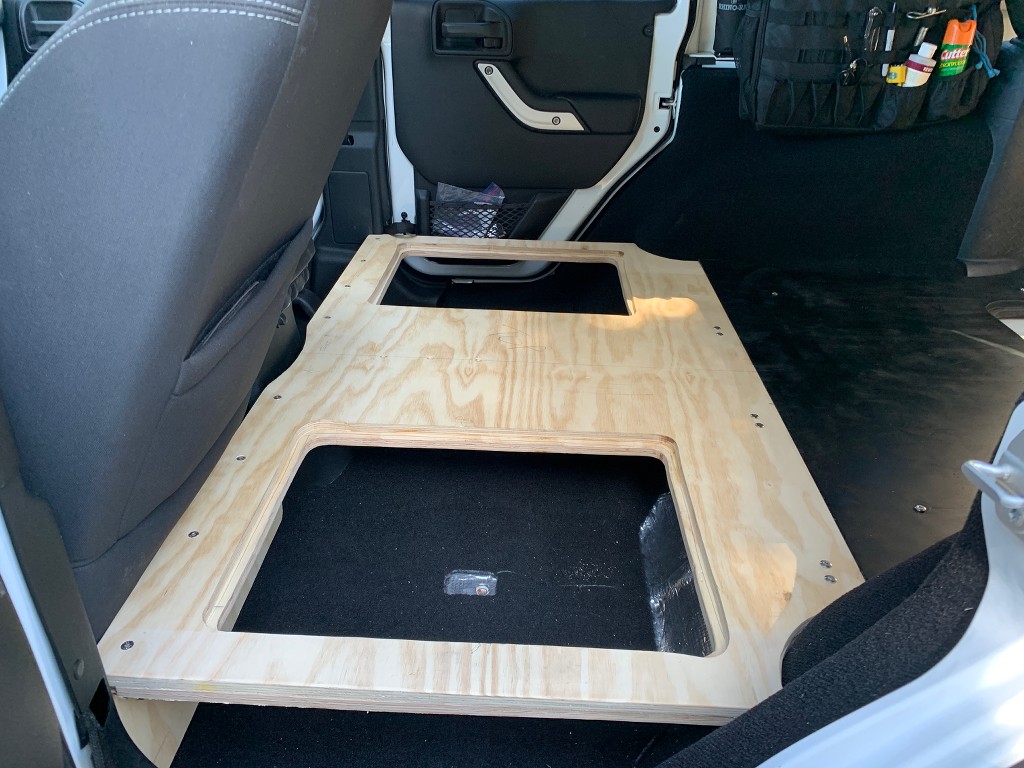
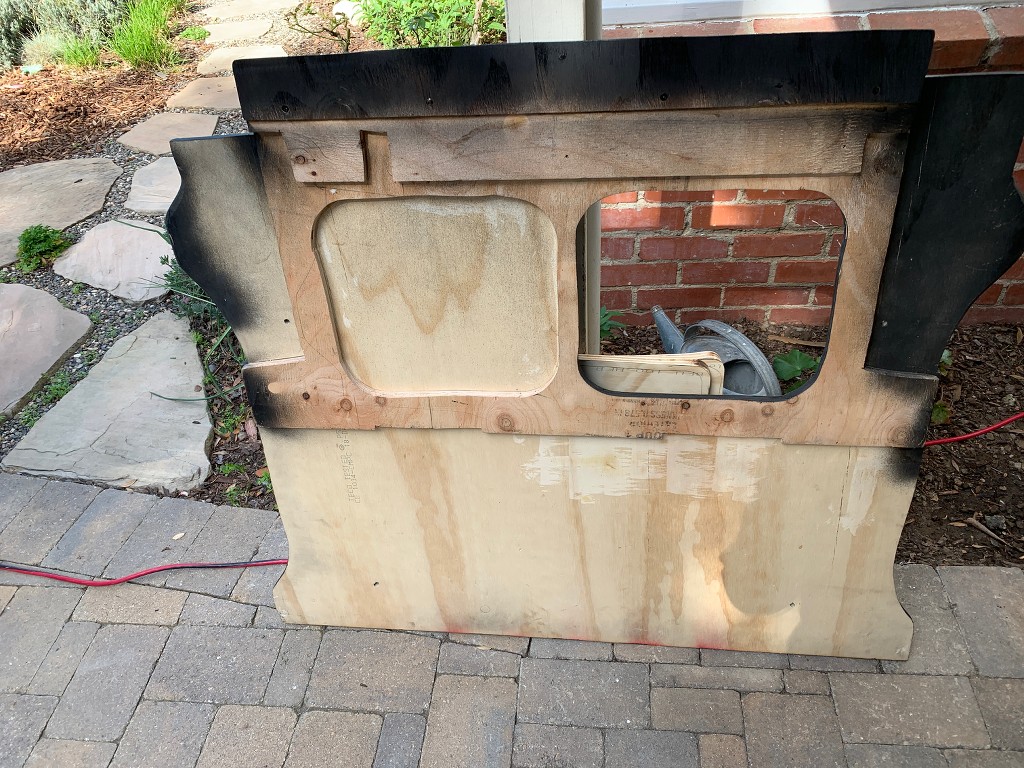
- Once you have your template to your satisfaction, lay out your plywood and draw your cut line.
- Use the skilsaw (or table saw) to cut off the two obvious areas of excess so that you end up with two large scrap pieces
- Now use the jig saw to follow your cut lines, remembering to account for the thickness of your lines, and the thickness that gets added by transferring from a pattern.
- Test fit the piece and make adjustments if necessary, making sure the back door clears the rear of the deck with enough space to allow for flex of the Jeep and any possible expansion of the deck.
- If you have M6 studs, thread them into the four holes in the tub of the jeep from where the cargo tie-downs were so that they stand up about 1/2" above the floor of the Jeep. If you don't have studs, just thread your button head screws into the holes.
- Lay the plywood deck over the studs or screws, making sure it is lined up the way it will be when installed. Tap the four places above the screws hard enough to transfer an imprint from the studs/screws to the wood.
- Remove the deck and using the 1/4" drill bit, drill four holes where you transferred the imprints.
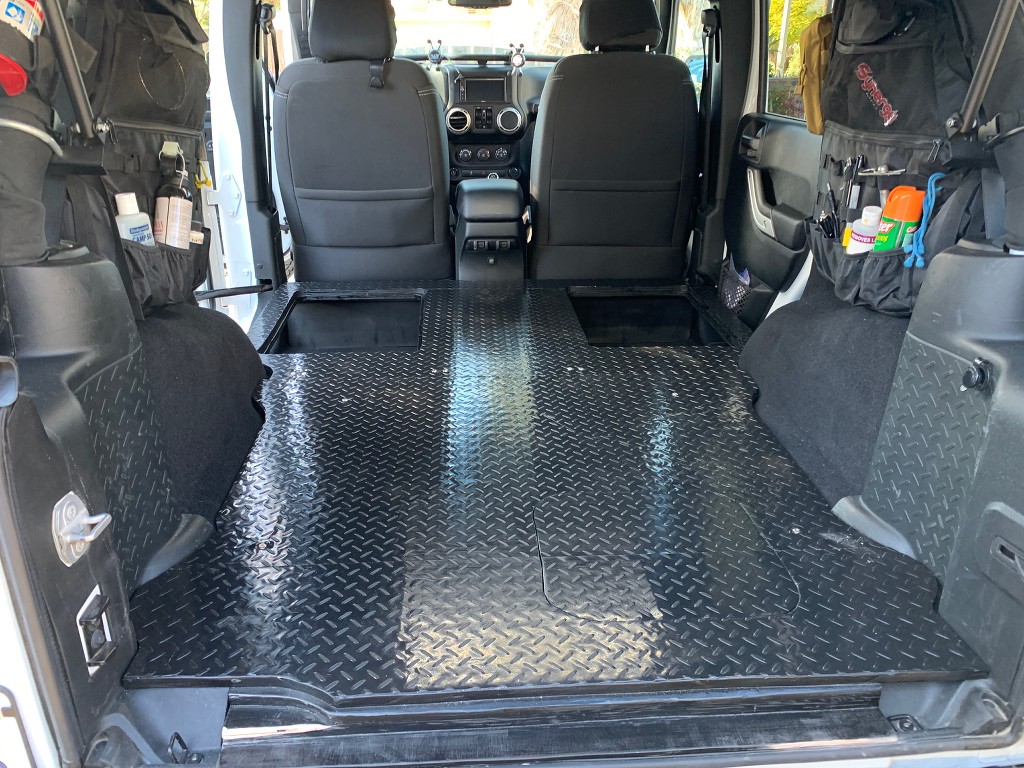
- Paint/prep the deck as you see fit. I just hit it quickly with some 80 grit to round the edges and smooth the contours a bit, then went over everything with 150 grit. Then I hit it with a coat of satin black Krylon Fusion paint. I may hit it with Herculiner one of these days, or I might cover it with a rubber mat - haven't decided yet.
Last edited: