Building a Plywood Deck Plate in the Back of your JKU

SBSYNCRO

Well-known member
Nice job,clean and functional
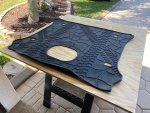
What is your diamond style black on the floor?
Did the same diy platform 2 years ago on my jku 07 and i put some anti-slippery carpet but i hate it,mud and dust are hard to clean.I need to find something else.

Envoyé de mon Pixel 2 en utilisant Tapatalk

Thanks! Its actually a roll of vinyl that I purchased from Home Depot for about $15. It was *just* enough to cover the entire area. I used double-sided carpet tape around all the perimeter and then sprayed 3M spray-on adhesive generously on both surfaces before rolling out each section. It was tricky to do without creating bubbles, but a couple times I made a mistake I was able to peel it back, hit it with a bit more spray and lay it back down while smoothing out the bubbles. After a couple of trips it seems to be holding up well.

I considered boat carpeting but decided against it for exactly the reason you pointed out - mud and dust accumulation.
 

gatorgrizz27

Well-known member
Nice job. It absolutely blows my mind that Goose Gear gets away with charging what they do for base plates cut out of 3/4” birch plywood. I had assumed they were made from something like UHMW plastic or starboard with rivnuts, or even aluminum with tapped holes.

I understand the costs associated with running a business, but that’s almost criminal, especially considering that people buying them are doing so solely for the purpose of having something to attach the other products they’re buying from you to.

I suppose if people are paying it, more power to them, but it would be cool to see something like “buy $500 worth of products, get a base plate for $50.”

If you’ve got the extra time, it’s nice to use something like 1/4” luan to work with and make router templates. Easy to make changes or build a new one quickly when you drill too many holes in yours and want to change the layout, build one for a buddy, etc.
 

SBSYNCRO

Well-known member
Nice job. It absolutely blows my mind that Goose Gear gets away with charging what they do for base plates cut out of 3/4” birch plywood. I had assumed they were made from something like UHMW plastic or starboard with rivnuts, or even aluminum with tapped holes.

I understand the costs associated with running a business, but that’s almost criminal, especially considering that people buying them are doing so solely for the purpose of having something to attach the other products they’re buying from you to.

I suppose if people are paying it, more power to them, but it would be cool to see something like “buy $500 worth of products, get a base plate for $50.”

If you’ve got the extra time, it’s nice to use something like 1/4” luan to work with and make router templates. Easy to make changes or build a new one quickly when you drill too many holes in yours and want to change the layout, build one for a buddy, etc.

Here's how I look at the Goose Gear stuff (and a lot of niche market, USA made products like Rigid lights, etc) - these companies pour a lot of effort and time into engineering and have a different mindset when it comes to economies of scale and time efficiency. In other words, they use sourcing and manufacturing methods that are inefficient and just pass the costs of these inefficiencies to the consumer who will pay because (1) its the only option and (2) 'Murica!

I will tell you from first hand experience that it took a lot of time and effort to design and test fit everything, so I have a great appreciation for the investment that GooseGear made in their designs. That being said, honestly if I could have made it with industrial equipment (like CAD/CAM milling equipment and metal bending/fabrication) I have absolutely no doubt that my deck would be superior in design and finished quality to the one from Goose Gear (for my purposes). I believe my design is more secure to the body of the Jeep (a major concern for me), it fits the contours of the interior better, and offers better storage access and utility. That Rhino lining on the Goose Gear stuff is nice though... (that would probably have added $200 to my project cost). Maybe I'll do that with version 2.0..
 

zimm17

Observer
I'm about to tackle this project. I'm thinking of using the Mopar rear cargo mat as the template. Now to decide if I really need an ARB fridge slide or not. I've had no issues with it cargo strapped into the back. Not sure if a little more access is worth $350. I would like to put a slide next to the fridge and having some kind of cargo box full of tools and gear that can slide out.
 

zimm17

Observer
It worked! The cargo mat made a perfect template. I drilled a series of holes for the subwoofer to breathe. I got Acra tie downs through bolted with T-nuts for the ARB fridge tie down. I ordered aircraft style "L" track for the left size for cargo control. I'm also waiting on longer M6 bolts to screw it to the floor. Lowe's only had 50mm and they're too short.
 

Attachments

  • IMG_1363.jpeg
    IMG_1363.jpeg
    460.3 KB · Views: 267
  • IMG_1365.jpeg
    IMG_1365.jpeg
    310.5 KB · Views: 277
  • IMG_1370.jpeg
    IMG_1370.jpeg
    326.3 KB · Views: 275

rustypayne

Active member
It worked! The cargo mat made a perfect template. I drilled a series of holes for the subwoofer to breathe. I got Acra tie downs through bolted with T-nuts for the ARB fridge tie down. I ordered aircraft style "L" track for the left size for cargo control. I'm also waiting on longer M6 bolts to screw it to the floor. Lowe's only had 50mm and they're too short.

Nice! I just took the kitchen out of the back of mine today with the intention of tackling the base plate project so that would make templating easier. I'll have to give it a try on mine.
 

SBSYNCRO

Well-known member
One thing I’ve noticed (but haven’t tested yet) is that with my fridge & slide there is exactly enough space for 2 Frontrunner wolf packs next to the fridge and between my cargo rails. 20.1” wide x 15.8” deep (stacked up to 3 high to make a total of 6)

I plan to buy 4 of them soon to test things out. Haven’t found any other containers that are 20” on their longest dimension and <16” wide.

871f39f63399c68ce2971d96cec40cf0.jpg
 
Last edited:

Herbie

Rendezvous Conspirator
That Rhino lining on the Goose Gear stuff is nice though... (that would probably have added $200 to my project cost). Maybe I'll do that with version 2.0..

You really should take a look at the roll-on bedliner you can get at most auto parts stores. It is a bit messy to apply, and goopy to work with, but you do get a very nice hard finish. I used a foam brush to do the inside of my first battery/tool box where I thought I might be storing fluids, etc. and got decent results, but next time I'd do a short-nap roller for more even texture.

I've long-since dismantled that battery box, but occasionally a few of the pieces come out of my scrap pile and get recycled into other things and that brush-on finish is still going strong. A 1-quart can of the stuff I used will do ~40sqft and was less than $20.
 

SBSYNCRO

Well-known member
One thing I’ve noticed (but haven’t tested yet) is that with my fridge & slide there is exactly enough space for 2 Frontrunner wolf packs next to the fridge and between my cargo rails. 20.1” wide x 15.8” deep (stacked up to 3 high to make a total of 6)

I plan to buy 4 of them soon to test things out. Haven’t found any other containers that are 20” on their longest dimension and <16” wide.

871f39f63399c68ce2971d96cec40cf0.jpg

Purchased and tested the Frontrunner WolfPacks. They are a perfect fit:
 

JK_TrailRider

New member
It worked! The cargo mat made a perfect template. I drilled a series of holes for the subwoofer to breathe. I got Acra tie downs through bolted with T-nuts for the ARB fridge tie down. I ordered aircraft style "L" track for the left size for cargo control. I'm also waiting on longer M6 bolts to screw it to the floor. Lowe's only had 50mm and they're too short.
What did you use to fill in the gaps to keep the platform level?
 

Jamespurcell

New member
I’m always interested in other people’s plate designs. I went through a few designs on my JKU before deciding imitation is the greatest form of flattery and that poverty is often the mother of invention. With the help of skilled carpenter and enough cardboard boxes to pack my house into, I set out to see how close to a Goose Gear design I could get. It took about 80 hours over a lot of late nights and weekends, but in the end I came out with a pretty close fake. In the end, after totaling all the parts and pieces and do overs and it came out about a wash. If I had to pay my carpenter friend for his time, it would have been a financial looser. However, in the end, I can say I built that myself and I can fix that myself. Something I’ve always held to on my Overland build.
You can’t fault Goose Gear for their prices though. Really sit down and do the math on the relatively low volume manufacturing that they do and the wide range of products for different vehicles that they offer. Sure they make some money, but I think you would find it less than most would think.

606c959a2efd7d0f493424b981a19383.jpg

778f1634ac5b2353f271c22791f1bc38.jpg


Sent from my iPhone using Tapatalk
 

msk21

New member
Awesome job! Found this forum in perfect time as I have been sketching out a mock up of how I would do it myself!
 

Forum statistics

Threads
186,649
Messages
2,888,455
Members
226,767
Latest member
Alexk
Top