Betarocker
Adventurer
So I finally replaced the Cab Mounts on my 2016 F350. While I won't go into detail of the process because there are a bunch of How-to videos on Youtube, I will offer some advice to hopefully make the job easier.
My truck has lived through 6 winters of heavily salted roads of Southwest British Columbia; rusty fasteners were the real concern. The other concern was freeing the Loctite used during assembly.
The one thing that all the videos showed was to be extra cautious removing the bolts and not to use an impact gun to rattle them out. The risk of spinning the captured nuts in their cage would exponentially increase the work load.
One night I was watching Youtube and a Short vid came out with a Ford Mechanic using an induction heater and then zipping the bolt out. While not an advert for the tool, the brand could be seen. Hemming and Hawing, and being annoyed by the clunking of my cab every little ripple in the road, I opened the wallet and bought the Bolt Buster 1800 watt heater kit that I seen being used.
I had bought a Cab Mount kit last year, but was dreading the bolt removal. The Bolt Buster was delivered last week and, the weather was nice, there was no longer a reason to procrastinate any longer. Pulled on my big boy (work) pants and got to it. Laid out some moving blankets on the floor of my carport where I would be laying down, got the heat tool and installed a 25mm coil and got to it.
First was heat the driver side most forward bolt head to red hot and then keep it on for another minute or so, then move to the passenger side one, as both of these see the worst abuse of the de-icer. I alternated back and forth between these two bolts for 3 heat cycles before using a long handle ratchet with a 15mm socket and (after some inner morale boost) began the removal of the driver side bolt. After an initial worry that things might not go right, the bolt creaked and broke free. Steady even force and the bolt came out. Next was the passenger side one after a 3rd heating and it too came out without much drama.
I figured, in for a penny in for a pound, so continue with the rest. I decided that the easiest order of the rest of the 6 bolts was do one side and the other. So starting on the drivers side, heated the #2 bolt (behind the front wheel) to red hot plus a minute, then #3, and finally #4. Continued with a second full pass, and then after the 3rd began the bolt removal in the same order. Switch to the passenger side and did the same order and process. Zero issues and dramas, so big win.
Next was removing the lower mount bushings. #1, #2, and #4 on both sides popped right out of the upper bushing. Both sides #3 were seized in which was weird because that bolt looked almost new. Tried prying without luck, so I decided to use a step drill. Passenger side freed out when the bit caught and gave a little twist. Win. The driver side remained stubborn and required drilling the cap off completely.
The hardest part done, now time to reassemble.
I bought the S & B Silicone Cab mount Kit. Everything I had researched with these came out positive other than price, but it came with new OEM bolts. Also, there wasn't any need to reuse any part of the old mounts other than the captive nuts still inside the body. I took 2 lower bushings and 2 bolts and loosely threaded into #1 and #4 location on the passenger side to keep the cab from sliding off. Then used my floor jack and a chunk of 3.5"x18"x18" Paralam beam scrap on it, and raised the cab on the drivers side with the wood on the pinch weld just high enough to remove the upper bushings. Put the new S & B bushings in place as per instructions. All the bushings are identical for all locations, as opposed to the OEM and most Polyurethane replacements that have a specific bushing for each location. Lowered the cab, put the new bolts in each location loosely, and then did the other side. A little fine tuning to reposition the cab as it had shifted during the lifting of one side, and then used a hand powered ratchet to tighten the bolts to 79ft-lbs.
Immediately noticed an improvement within the first few 100 meters of a test drive around the block. So glad to finally not have annoying rattles and clunking due to the garbage OEM foam-ish mounts that were replaced. It's been a week now and I am still elated by how smooth and quiet it is now.
Working time was just shy of 4 hours including clean-up of tools. Without the heater I think I'd still be cursing and screaming a week later. If I never have another use for the Bolt Buster it was still money well spent, but now that I have it I will use it wherever I need to free a rusted bolt. I didn't document any of the process because I just wanted to get the job done without slowing momentum. Other than a few nature calls and some water, I didn't stop working until I was done.
2008 to 2016 are the same , with the bolts installed from below into Captured nuts in concealed voids of the cab.
 sbfilters.com
I'm not associated with either of the products, but would recommend them 100%
My truck has lived through 6 winters of heavily salted roads of Southwest British Columbia; rusty fasteners were the real concern. The other concern was freeing the Loctite used during assembly.
The one thing that all the videos showed was to be extra cautious removing the bolts and not to use an impact gun to rattle them out. The risk of spinning the captured nuts in their cage would exponentially increase the work load.
One night I was watching Youtube and a Short vid came out with a Ford Mechanic using an induction heater and then zipping the bolt out. While not an advert for the tool, the brand could be seen. Hemming and Hawing, and being annoyed by the clunking of my cab every little ripple in the road, I opened the wallet and bought the Bolt Buster 1800 watt heater kit that I seen being used.
I had bought a Cab Mount kit last year, but was dreading the bolt removal. The Bolt Buster was delivered last week and, the weather was nice, there was no longer a reason to procrastinate any longer. Pulled on my big boy (work) pants and got to it. Laid out some moving blankets on the floor of my carport where I would be laying down, got the heat tool and installed a 25mm coil and got to it.
First was heat the driver side most forward bolt head to red hot and then keep it on for another minute or so, then move to the passenger side one, as both of these see the worst abuse of the de-icer. I alternated back and forth between these two bolts for 3 heat cycles before using a long handle ratchet with a 15mm socket and (after some inner morale boost) began the removal of the driver side bolt. After an initial worry that things might not go right, the bolt creaked and broke free. Steady even force and the bolt came out. Next was the passenger side one after a 3rd heating and it too came out without much drama.
I figured, in for a penny in for a pound, so continue with the rest. I decided that the easiest order of the rest of the 6 bolts was do one side and the other. So starting on the drivers side, heated the #2 bolt (behind the front wheel) to red hot plus a minute, then #3, and finally #4. Continued with a second full pass, and then after the 3rd began the bolt removal in the same order. Switch to the passenger side and did the same order and process. Zero issues and dramas, so big win.
Next was removing the lower mount bushings. #1, #2, and #4 on both sides popped right out of the upper bushing. Both sides #3 were seized in which was weird because that bolt looked almost new. Tried prying without luck, so I decided to use a step drill. Passenger side freed out when the bit caught and gave a little twist. Win. The driver side remained stubborn and required drilling the cap off completely.
The hardest part done, now time to reassemble.
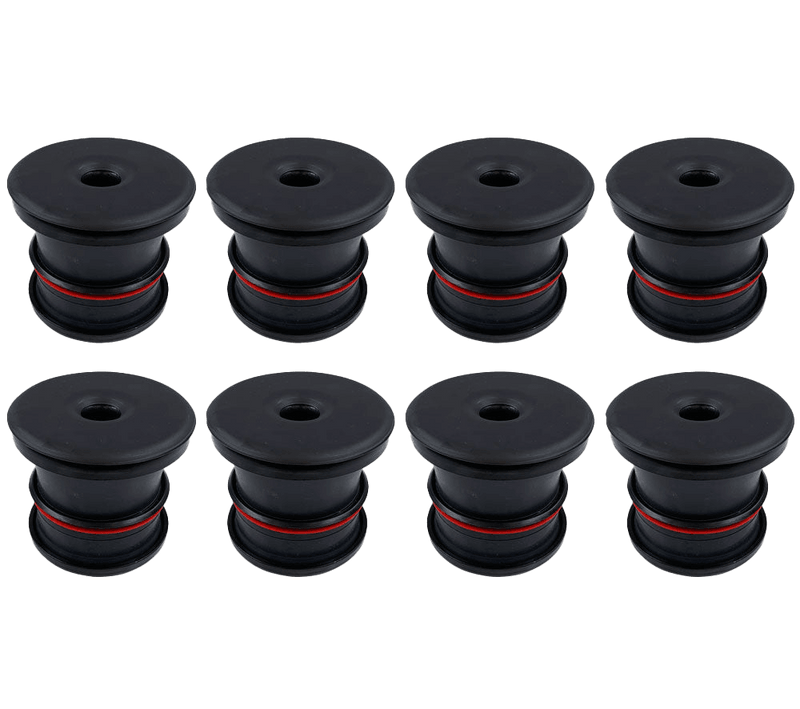
I bought the S & B Silicone Cab mount Kit. Everything I had researched with these came out positive other than price, but it came with new OEM bolts. Also, there wasn't any need to reuse any part of the old mounts other than the captive nuts still inside the body. I took 2 lower bushings and 2 bolts and loosely threaded into #1 and #4 location on the passenger side to keep the cab from sliding off. Then used my floor jack and a chunk of 3.5"x18"x18" Paralam beam scrap on it, and raised the cab on the drivers side with the wood on the pinch weld just high enough to remove the upper bushings. Put the new S & B bushings in place as per instructions. All the bushings are identical for all locations, as opposed to the OEM and most Polyurethane replacements that have a specific bushing for each location. Lowered the cab, put the new bolts in each location loosely, and then did the other side. A little fine tuning to reposition the cab as it had shifted during the lifting of one side, and then used a hand powered ratchet to tighten the bolts to 79ft-lbs.
Immediately noticed an improvement within the first few 100 meters of a test drive around the block. So glad to finally not have annoying rattles and clunking due to the garbage OEM foam-ish mounts that were replaced. It's been a week now and I am still elated by how smooth and quiet it is now.
Working time was just shy of 4 hours including clean-up of tools. Without the heater I think I'd still be cursing and screaming a week later. If I never have another use for the Bolt Buster it was still money well spent, but now that I have it I will use it wherever I need to free a rusted bolt. I didn't document any of the process because I just wanted to get the job done without slowing momentum. Other than a few nature calls and some water, I didn't stop working until I was done.
2008 to 2016 are the same , with the bolts installed from below into Captured nuts in concealed voids of the cab.
Body Mount Kit for 2008-2016 Ford Super Duty Crew Cab 5.4L, 6.2L, 6.4L, 6.7L, 6.8L
Ford Replacement Body Mount Bushings for 2008-2016 Ford F-250 & F-350 that give you a smooth ride and will last the life of your truck. Crew Cab.
I'm not associated with either of the products, but would recommend them 100%