Canter FG649 SWB Camper Truck Build

Bris31

Adventurer
I have worked on a 2010 NPR and there is not much difference in getting the dash panels off, compared to a Fuso. It's just a whole lot of push clips and self tapping screws. You should not need any special tools.
Just be mindful when reassembling the parts that you do not use too much force doing up the screws. If you do it is pretty easy to strip the threads in the plastic lugs.

All done but ... with couple of broken screw housings which I noticed after breaking them :mad:
 

Bris31

Adventurer
Flexible Solar panles

Mounting Solar panel question:

How would you guys attach couple of flexible solar panels (weigh about 2kg each) on the roof? If they are directly attach to the surface of roof panel (composite 23mm FB foam sandwich), will the roof panel underneath will get too hot/deform under the bright Aussie blazing sun overhead? Or attach to some thin aluminum sheet perhaps?

Ideally I want to keep the weight down if possible with ease of replacement if/when required.

Cheers
 

dlh62c

Explorer
Technomadia did a solar write-up on their Blog when they tested flexible solar panels.

From their Blog;
The most serious problem we noticed was during a spell of 90 to 95 degree temperatures last summer. The thin covering over the cells (3mm thick) was not sufficient to keep the cells from “cupping”. This, in essence, caused each cell to form a shallow bowl which collects dust that any moisture will push to the middle of the cell. When the water evaporates, there is a small circle of dried debris that blocks enough sun to cause a power loss.
 

Bris31

Adventurer
Check out this review too
https://nebula.wsimg.com/7f04fc03a9...C3057D53E066A8205&disposition=0&alloworigin=1

I think having an air gap is a good idea. I'm mounting mine on thin aluminium composite raised up a couple of inches above the roof

Hi Maninga, I was also thinking of mounting solar panel on the alu composite panel (like aluca bond). Then fixing them between 2x 50mmx50mm aluminum angles running E-W or across the roof from one side to other. I am worried about that sandwiched plastic honeycomb mesh may be affected or deformed with the heat from under the solar panel on very hot days? Also how to lift these alu angles to create air gap?
 

Maninga

Adventurer
Here's one install I've come across that shows base structure for panels. He didn't have much luck with his panels and ended up replacing them, but the roof theory looks sound.
http://nortybits.me/2014/07/22/euro-line-solar-inflexible-apoloflex-mono-terminals/

I'm making a curved support structure using fibreglass & aluminium, gluing 4mm fire rated panels to them. Only expect minimal flex from it but there's quite a bit of support under it. Only just started, still a while before I see if ideas work or not.
 

westyss

Explorer
Mounting Solar panel question:

How would you guys attach couple of flexible solar panels (weigh about 2kg each) on the roof? If they are directly attach to the surface of roof panel (composite 23mm FB foam sandwich), will the roof panel underneath will get too hot/deform under the bright Aussie blazing sun overhead? Or attach to some thin aluminum sheet perhaps?

Ideally I want to keep the weight down if possible with ease of replacement if/when required.

Cheers

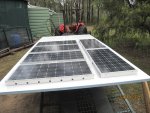
I did something in between, both directly on it and on a sheet of ally, weird I know but I had my reasons! one of the best things about having them mounted to a sheet of some sort is that it becomes a tropical roof, also it gives me the ability to get under them if needed. The tropical roof is a really nice way of keeping the heat away from the solid roof allowing some air flow between roof and panels. I tapered the panels down and stuck the leading edge of them directly onto the roof to prevent something getting under them and ripping them off and for a smoother airflow (to get those high speeds off the fuso!) My main concern was branches getting underneath really, but having the ability to remove them has a benefit too.


DSCF3874.JPG


DSCF3877.JPG


DSCF3886.JPG
 
Hmmm a mounting method to consider for my solar panel install.

But I was going to go with solid panels as they say the flexi ones are not as efficient??
 

Alastair D(Aus)

aging but active
I used mono panels which look rather like the Al framed ones in Westsys picture. I glued 50 x 50 Al angle to the roof with Sikaflex and then bolted the panels to them using M5 SS bolts into matching SS nutserts in the panel frames. I did this because I wanted it to be solid, considered the shop bought brackets overpriced and allowed me to have the panels so there is a well ventilated gap between the panel back and roof. As well as performing well the panels act like a dbl roof. True there must be heat reradiated from the solar panel back onto the poly composite roof but inside the roof does not feel hot on a sunny day.

I went for rigid mono panels because of performance and price. True they may be broken more easily than the flexi ones but they are readily available. I have 6 x 100w panels and can live with a broken one if necessary.
 

Bris31

Adventurer
Thanks Alastair. I looked in to your website but couldn't find the photo of your solar setup. Can you post a photo so I can understand better.
Thanks in advance.
Cheers
 

Alastair D(Aus)

aging but active
Thanks Alastair. I looked in to your website but couldn't find the photo of your solar setup. Can you post a photo so I can understand better.
Thanks in advance.
Cheers
Bris,
Will do but it will take a bit of time. The removalists arrived at 7am this morning and we have very little left for the few days whilst we clean the house . We are also b... exhausted.

We are due to live in the truck for some weeks even though it is not finished. No cupboard doors etc but functional enough. The new house is delayed and will not be finished until May/June so we are hoping to use a friends holiday house starting in a few weeks.

My panels are basically 1.1m x 0.7m. Four panels are mounted in line astern, down one side with the long dimension pointing across the roof. The other two are in line down the other side at right angles to the others. I have enough room for two more panels if I ever need them, I don't think I will. I drilled the sides of the panel frames and installed three M5 SS nutserts on the long side and two on the short. I then bolted on sections of 50 x 50 Al angle with one side flat against the frame and the other side under the panel parallel to the roof/panel. I did not use continuous pieces of angle everywhere for two reasons. First I wanted plenty of ventilation so the panel heat could escape and also so that the slight variation in roof surface could be accommodated. I used poly composite panels and although they are pretty good they are not perfectly flat. I applied a liberal amount of Sikaflex 252 to the lower angle surface and positioned the panels on the roof before it was hoisted up and actually became a roof. I left the proof to cure for some days and then loosened the bracket bolts so the panels could move a bit as the roof flexed whilst being raised and positioned. In the photo the front of the roof is nearest the camera and so I have a fairly solid front surface to minimise rubbish ingress underneath when travelling. I also have continuous down the sides so braches are less likely to catch. Famous last words.

This is an old picture but should do.

IMG_2353a.jpg

This approach did make the roof heavy but worked for me. The brackets seem solid and do allow the panels to be removed and replaced easily.

My six panels are electrically organised as 3 series pairs connected in parallel. Having two panels in series gives better performance in low light because the controller will get a higher voltage and therefore the MPPT can optimise better. Having 3 pairs give better performance in principle because it copes with differential shading better. If one was in high light all the time it would be better to have the six panels in parallel, but that is rarely the case. So far the array has performed well.

must return to the chaos.
 

Bris31

Adventurer
2nd Fuse box?

I misplaced the service manual somewhere and going to order online. But in the meant time I have this question.
I have blown fuse for the rear right blinker. Lamp is ok. The front right light blinking ok (obviously bit quicker).
There is no separate fuse for blinkers in the fuse box under the middle of the dash board - just one for the blinkers. Next to blinker relays there is no other fuse going separate ways for left and right side. Just wondering if there is any other fuse box somewhere? (this is Canter FG649 year 2003).
 

SkiFreak

Crazy Person
To me it sounds like your blinker circuit is working as designed.
If the right front blinker is flashing faster then the system is not "seeing" the rear blinker bulb, or the bulb is blown. First thing that I'd be checking are the connectors. Use a multimeter to find out where you stop getting voltage.

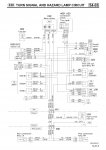
I have a FG84, so the wiring diagram may be different from your model, but here it is.

TURN SIGNAL AND HAZARD LAMP CIRCUIT.jpg
 

Forum statistics

Threads
188,307
Messages
2,905,257
Members
229,959
Latest member
bdpkauai
Top