Capture Colorado 01 TRD Taco - GOAE build

tacoma_AL

Adventurer
You're going to be more intimate and know more about you're truck than most of us know about our own. That being said, don't be shocked when we start calling on you for questions regarding the 1st Gen hahaha! Anyways, also excited to see the progress! You're doing good, thumbs up
 

johnboytrd

New member
I bow to you. Not sure I could or would have taken this project on. You are a beast!


Sent from my iPhone using Tapatalk
 

capturecolorado

Hooray bikes!
I sure didn't feel beastly for most of today... I was extremely grumpy for a while. Then I had some food, didn't go into the garage for like an hour, and the mood improved.

Today's progress:

With exception of some confusion, and about an hour and a half of me being extremely.... well, this sums it up: :frusty: Today went well, I could have gotten more done had things come apart the way they should have, when they should have... but hey - that's what I get for taking this on.

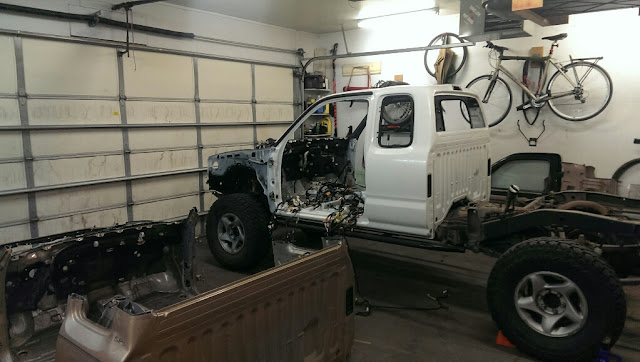
I started out by turning the truck around, so that the front end was facing outward... In doing so, I decided to brap around the block really quick for giggles. It felt like I was driving my buddy's caged and linked Samurai without the windshield (or anything very substantial feeling above the dash).

IMG_20141210_100117.jpg


Then more of this.
IMG_20141210_133552.jpg


Stupid thing FINALLY came out, didn't seem like it would. It didn't help that the non-factory cruise control was really, really poorly installed (no logic). Once I figured out what went where, I just labeled the bits and yanked 'er out.

This is what makes your truck work:
IMG_20141210_160440.jpg


IMG_20141210_160634.jpg


Still need to:
- drain the radiator so I can pull the heater core out, hopefully draining the radiator empties that a bit...
- disconnect the AC lines - depressurized them tonight
- figure out where/how to disconnect the parking brake and pull that through
- figure out what the best way to access the coupler for the steering dingus
^ that's all that I need to do for the passenger compartment.

For the engine bay:
- remove radiator
- disconnect fuel line (trying to figure out the best way to catch the spillage)
- move the brake booster and clutch out of the way - not sure what the best way to do this will be. Might just open up the bleed valve on the back and let the system drain itself out.
- make sure all the hard lines and important **** is safely out of the way for the new cab to be lowered over it.
- cut old cab into bite-size pieces and remove

Then:
- weld some relay bracket into the passenger side of donor cab - it doesn't have one for some reason...
- drill holes for clutch master cylinder on new cab, prime.
- enlarge / make the hole for the shifters work, drill mounting holes for the boot bezel
- drill 2 holes in floorboard for the rearmost center console bracket
- begin reassembly (hoping I get to do some of the wiring reassembly prior to putting the new cab in place)

That's about it...

Also I noticed the VIN tags were held into place with your standard aluminum pop-rivets, so that issue has been resolved. Even gave the thing a fresh coat of factory-finish flat black to cover up the scratches from rocks and broken windshield.
 

capturecolorado

Hooray bikes!
Selling the rear bumper eh? Thought I recognized the truck when I saw the ad. :D

Yep! :) Gonna go in an... interesting direction for the back end, both bumper and bed will be radically different. (just wait till you see the new bumper design! :) )

Wow. Excellent work.

Thanks!

_____


Today, I started out with the goal of making these two switch places.
IMG_20141211_090427.jpg


I succeeded.

Started out with just a small handful of things to remove, but a seemingly laaarge list of crap to take care of today...

Got the radiator out, that took a good while to drain - good news is that it looked pretty clean in there. While that was draining, I also got to work on draining the brake MC and shortly after the clutch so I could disconnect those.
IMG_20141211_101549.jpg


Once I was able to walk away from the old cab, knowing everything was disconnected that needed to be, double and triple checked (I even found a pair of cables going to the back bumper that served no purpose! got rid of those...) I moved on to the new cab, I had to transfer measurements for the tranny and t-case holes over to it - I'd have pictures of these except they're on my actual camera, not my phone, and I don't feel like getting up. That process went smooth, yada yada, cut some here, welded in a filler plate there, drilled some holes (total of 8 needed to be created), welded in the little tab dingus on the passenger side and boom. Ready. While it was sitting waiting for the transfer, I picked up some epoxy paint and shot the wheel wells with a few good coats of shiny black goodness. Looks good.

At 5:30 I had a handful of folks come by to lend a hand for a quick second, we had 6 total which worked out perfectly. The old cab came off easy as could be, the new cab with more height and sheetmetal was a little more difficult, but we got it done.
IMG_20141211_182844.jpg


After that, I sat for a bit in the garage feeling kind of surreal, and then got to work.

IMG_20141211_215830.jpg


IMG_20141211_215847.jpg


All in all it was an incredibly productive day, worked from 9-10 almost nonstop... I don't remember having lunch, either. But I managed to get the wiring harnesses both back in, the passenger side of the interior is all connected, it's ready for the cross brace to go in so I can move on to the center console and driver's side. The passenger side of the engine bay is 100% complete minus my aftermarket switch panel. The radiator is in now, as is the main fuse panel.

Tomorrow morning I need to get the holes for the clutch MC drilled and ready before I move on to anything else on that side, once that's done I can reconnect all of that, bolt the brake system in and reconnect it, then the evap dingus, once those three items in the bay are complete, all I'll need to do is route throttle cable and that'll be it for the engine compartment.

As soon as the clutch MC is able to be installed, I'll begin reconnecting the cabin fuse panel and all that stuff, and should be able to get the dash reassembled, etc. shortly after. I fully expect to have the thing running by the end of the day, possibly earlier, and pending the replacement of a particular body bolt and bushing (it was seized), it should be drivable soon.

I've also decided to stick to the white. It's in really good shape, with no rust - just needs a few small spots of touch up, which might entail me giving the roof a quick scuff and spray down of paint to keep it smooth, or....not. I need to figure out the best paint to use to match the OE color so I can do the doors, I'd like to keep it cheap and rattle can, rather than buying expensive automotive paint...
 

seanpistol

Explorer
I have had the best luck with rattle cans of 056 Toyota white and clearcoat from Automotivetouchup.com

Matches well, is cheap, and the clearcoat doesn't eventually turn yellow like I have experienced with more expensive local sources
 

TwoTrack

Buy Once, Cry Once
I have had the best luck with rattle cans of 056 Toyota white and clearcoat from Automotivetouchup.com

Matches well, is cheap, and the clearcoat doesn't eventually turn yellow like I have experienced with more expensive local sources

I've used the same company to touch up my Tundra. The match was perfect.
 

capturecolorado

Hooray bikes!
I have had the best luck with rattle cans of 056 Toyota white and clearcoat from Automotivetouchup.com

Matches well, is cheap, and the clearcoat doesn't eventually turn yellow like I have experienced with more expensive local sources

I've used the same company to touch up my Tundra. The match was perfect.

Sweet, thanks for the tip! I think I'm going to give the Duplicolor a try here as a test, simply because the autozone down the street has it in stock, and it's $7/can, if that doesn't seem to quite match up I'll give automotive touch up a try. If nothing else, I could use the Duplicolor as the base coat to cover up the dark blue of the new doors, then top coat with the proper paint.

The real question.... is what color would look good on the custom M416-style bed I'm thinking about building?
ISE07advntr01.jpg


White could be cool, but could be overkill... But with black fenders/bumper/rack
 

capturecolorado

Hooray bikes!
I've got some ideas rolling around for a color scheme that'll tie it together nicely without being overbearingly white.

In the meantime, my replica CARC Desert Storm tan paint came, and now that I'm not using that, it doesn't make sense to return it (between shipping lost here, shipping lost there, I'd get like $15 back), so if anyone wants a can of paint, let me know - let's work out a deal.

Yesterday (I didn't get any pictures) I got the engine bay 100% back to factory spec, I didn't put my relay panel back in yet, but I did take a minute to drill a nice big hole for the cabling to pass through the firewall, and used one of the old drain plugs from the tan body to keep it mostly sealed. I'll get around to that later. I also got the dash entirely back together, carpet in, and will start on the headliner and remaining trim this morning.

I believe the only things remaining to do that aren't interior prettyfying things, are bleed brakes/clutch, and connect fuel lines, then battery. One thing I overlooked, is the original fuel line on the original body used a flex line that slid over the end and secured with a little clip dingus... the donor cab had fuel lines already on it - which I left - and the main line uses a nut and flared end.. not sure what to do on that. There's also one line on the old cab that was 10" longer, this isn't the case on the donor cab, I'm sure I can just get a longer flex line and call it a day as far as that goes.

And finally: I'm going to see if I can get some 045 paint mixed up for me locally to spray the doors, fenders, and hood. If possible I want to paint on Monday.
 

capturecolorado

Hooray bikes!
Got 'er started today!

I spent the first fair amount of the day trying to figure out the best way to deal with the fuel lines, there's one on the donor cab that's shorter than the original, and then the main line had a flare and nutted fitting... after trying to track down a few different options, I just took a tiny pipe cutter and lopped the end off, then put a flex line on it with a hose clamp. Most of today was trying to get the logistics sorted out for little reassembly problems like that, misaligned holes for the headliner and visors (had to buy a 5/8" hole saw to move the mount over 1" inward), excessive mounting bits in the way of the fenders/headlights, etc. I ended up cutting off a bunch of BS on the front end that didn't need to be there for the 01-04 fenders. Learning a lot about the little details between a 98 and 01 as far as fit goes.

Battery went in, got antifreeze ready to go in, cleared out the engine bay and double and triple checked that everything was clear of the fan and belts - then went to start it.

It didn't start... ******. Kept trying, thinking maybe gas wasn't getting to the engine, or something was amiss. After a couple minutes, I went and checked for a missed connection in the engine bay... found it - I forgot to plug a small connector into the bottom of the fuse box.

IMG_20141213_130818.jpg


Windshield guy came out - he was impressed that I pulled it off.

IMG_20141213_204222.jpg


Dash is in & complete.

IMG_20141213_204207.jpg


IMG_20141213_204153.jpg


1/4 and rear window, I used the string install method with some dish soap to help it slide into place, it worked like a charm!

IMG_20141213_204236.jpg


And I wanna show off the neat little additions I had *just* wrapped up before the roll.

Revamped switch panel, I had completely rewired it, I should have taken pictures during the wiring process, but it was too intricate - it's wired into the dash circuit, everything except for the alley lights are controlled by the high beams, so I can't have anything on unless the highs are on. The lower (red) LED comes on with the dash lights, the upper (green) comes on when the switch is triggered, and both are dimmable. The back side is ultra-organized and well thought out, and all the wires that go into the engine bay are bundled together for anti-clusterf*ckedness.

IMG_20141213_204410%257E2.jpg


Threw in a slick voltmeter, it's not shabby, I tried to get it to dim today, but that messes with its reading. While I was putting the dash back together, I switched the clutch and diff lock locations.

IMG_20141213_204531%257E2.jpg


And what I was REALLY hoping to put to use in Moab a week after the roll - my new RAM mount (it was in use during the roll, proved handy to not lose the phone). I downloaded Backcountry Navigator pro, which allows you to navigate GPS files like those on TrailDamage.com with a smartphone, and has proper topo maps.

IMG_20141213_205239.jpg


Back to work tomorrow, paint etc. on Monday-Tuesday. Happy this is about to come to a finale. I spoke with my dad about the M416 bed idea tonight, he's already brainstorming on materials and how to plan cuts - we're thinking about reinforcing the edges with a steel framework, likely going over it with some stainless hardware to accent, and paint the framework black, with the wood white.

That is all.
 

Forum statistics

Threads
188,367
Messages
2,906,112
Members
230,117
Latest member
greatwhite24
Top