Cheap bastards attempt at DIY fiberglass structural panels .One person in tool shed

opp1

Member
How difficult was it to get the glass off? How did you get the glass off?


The foam broke so it didn't come loose from the skins. his is a monocoque build so by bounding around the perimeter the door jam any shelving . and the resin the drizzling bound between the skins make very rigid.
Although if I was building a trailer to bounce off boulders. I would go with the flexible fiberglass trailtop style skeleton frame. Used a 6 ' pry bar to break the foam a part.
 

Attachments

  • trailer 002.jpg
    trailer 002.jpg
    116.3 KB · Views: 52

opp1

Member
Ah... just forget that fairing bit... it's purely cosmetic. IMO the ideal look is nice enough to not attract cops and ugly enough to not attract thieves. :p

Turbothrush built a very nice looking camper with pink XPS foam and hand lay up. Some photos here: https://expeditionportal.com/forum/...r-hard-side-camper.58561/page-38#post-2814627

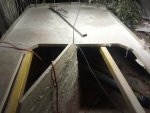
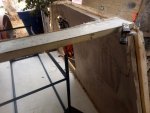
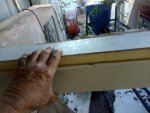
He used a dog brush to score the foam. I had the idea to use a spiked wallpaper roller to make many small indentations, fill them well with epoxy, then lay on the cloth before the epoxy fully cures. Should improve the bond and crushing strength of XPS a good amount.

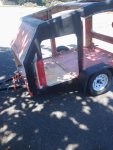
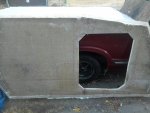
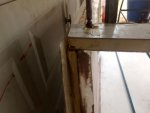
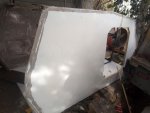
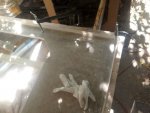
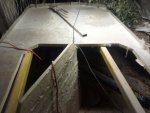
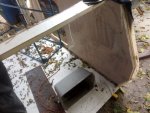
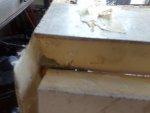
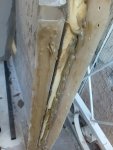
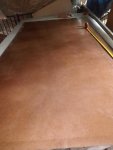
I switched to 1.5" PVC foam, plus I have much more robust skins (>30oz cloth on each side, epoxy). Still plenty light in the grand scheme... ~1.5 lb/sq ft. Not that cheap... but at least I got most of the epoxy from Ebond before they raised their prices from ~$28/gal to $48/gal.


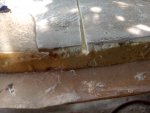
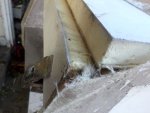
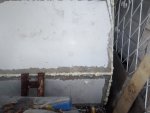
That might be a better way to go... but the issue I had with that was bubbles in the holes. I was doing hand layup with XPS and epoxy at the time...

Isn't polyiso even weaker than XPS foam typically? How good is your bond between the panel and the resin?
If you don't add thickener to epoxy it is quite running.
most time when people have trouble with air bubbles is because they're not using enough resin
DOG brush . I love ##### build but those those tiny scratches I don't see where they really do any good because the foam will be extremely thin between between the scratches.
resin drizzle in the holes locking the inner and outer skin together
On some of are carbon Kevlar panels that we build that use foam has holes in it but price about $ 350 to $400 US a sheet for 1 '' on 36 ea. per skid has pedigree documentation of every stage of manufacturing this foam $22 a sheet and ploy resin
this a low cost build trying to avoid the five gallon bucket to fill up a tea cup
$48 is a great price we pay $75 a gal buying by the drum 2 drums part to A. 1 drum part B .Most of the time we use prepreg
THE way of this build many things add to the strength
trying to avoid the five gallon bucket to fill up a tea cup
 
Last edited:

opp1

Member
Spent a few hours to day .If you finished up the skins on both sides and cure. You will notice you now have a bow in the panel. polyester shrink you have a real good bond to the foam because of the holes . I levee them in the floor and roof preload. I cut the doors out of the sides. at the door opening closest to the center I will cut slots on top and bottom. Not through outer skin . You won't lose any strength because this is where the door jamb will go and also you will have a interior and exterior Bond beam top and bottom. you will pull panel flat and back fill gap
 

Attachments

  • IMG_20211004_133001.jpg
    IMG_20211004_133001.jpg
    3.4 MB · Views: 70
  • IMG_20211008_193040.jpg
    IMG_20211008_193040.jpg
    3.9 MB · Views: 73
  • IMG_20211008_183755.jpg
    IMG_20211008_183755.jpg
    3.4 MB · Views: 72
Last edited:

opp1

Member
as this is supposed to be a one-man build . I've done it much work as I can on the table.
On glass found the lip that is formed with an angle hole works the best to lock the glass skin in. straight holes seam to let the fiberglass lift when placed in torque . So drilled holes for inter and exterior bond beam. making this somewhat a fiberglass skeleton frame.
as to make life easer and not having to do fiberglass work over head. I bounded part of inter beam on the table with fiberglass using self tapping screws to hold down tell cure. So when I add top panels can add PL Premium 28 fl. oz. Polyurethane Construction Adhesive to a shelf and not drip on to my hair
as this trailer / component are very weak but as you put it together all of that makes it stronger and stronger.
As fiberglass will shrink. This makes the 90 % interior bound beam shrink in on itself so when I bound the the roof on it it will be pulling the roof ,front ,back in to the wall may run a row of 1/8 rivets .making the end side bond beam for strength in the outside for looks on out side
I pre-ground out where the bonding beam will go . in
 

Attachments

  • g1.jpg
    g1.jpg
    36.5 KB · Views: 44
  • g3.jpg
    g3.jpg
    27.2 KB · Views: 48
  • g5.jpg
    g5.jpg
    33.9 KB · Views: 50
  • g4.jpg
    g4.jpg
    42.5 KB · Views: 51
  • g6.jpg
    g6.jpg
    36.9 KB · Views: 46
  • g8.jpg
    g8.jpg
    43.4 KB · Views: 45
Last edited:

opp1

Member
In the picture with the spring clamp that is how the roof will set on top of it so we'll give me a full 2.5 in of a bonding area on the in side
 

Attachments

  • g4.jpg
    g4.jpg
    42.5 KB · Views: 35

opp1

Member
Had an hour to kill a few before the big storm came in. So i bonded the walls in .
I think this is the most important part for strength. As we all know fiberglass shrinks. so I had a bow in the panels I left the bow in the floor panel. relieve them in the wall panels but still a slight bow.
If you can get some one to help it would be nice. As this a one person show. To deal with the slight bow in the wall . I pushed with concrete blocks at the floor line. If you had help they use there foot
with the bow in the floor. I put down PL premium thin where interior fiberglass Bond beam was. thicker where the foam set. Don't worry if you have any gaps where the foam is you will be filling that up later.
When you glue floor down you can use self tapping screws to hold in place then remove. I just use quarter-inch rivets with a big head. and levee ALL BY HAND. The rest will be 1/8. The trick on 1/4 is put down a 2 by 4 wood on the floor set riveter on top and push down with 2 hands. Start in the center of the bow and work to one end. Then rest of the wall. That will pull the bow in wall and floor and make very strong. Putting your panels under load. When your finish with pod you will flip and run fiberglass
 

Attachments

  • small rivets 2.jpg
    small rivets 2.jpg
    51 KB · Views: 36
  • small rivets.jpg
    small rivets.jpg
    35.7 KB · Views: 35
Last edited:

opp1

Member
A question for structural panel gurus. Especially Scott since he's the one that did the bond beam.
ON sidewall to top it has glass that cover the foam in a h pattern. with tight clearances and bound beam.
thinking just drop the top panel they will not bend even with kerfing. Then in fill with pore foam. Then shape foam. Then bound beam. in and out side.
If panel was out of square you wouldn't have to fight that. you not fight cross angles
What do you think
 

Attachments

  • top1.jpg
    top1.jpg
    24.9 KB · Views: 28
  • top6.jpg
    top6.jpg
    43.3 KB · Views: 28
  • top4.jpg
    top4.jpg
    34.7 KB · Views: 28
  • top3.jpg
    top3.jpg
    42.3 KB · Views: 27
Last edited:

high-and-dry

Active member
okay language barriers are confusing me. I am not sure what your asking.

Do you mean do expanding foam glassed in place to lock it together?
 

opp1

Member
Do you mean do expanding foam glassed in place to lock it together? YES
you see the gap in the cross pieces. Instead of trying to cut angles that have the outside edges meet .Add pore foam in the gap then shape foam. Then sand back fiberglass to a taper . then do a bound beam a cross from wall to wall . like you did wall to roof
Do you think that be a week point
 

high-and-dry

Active member
Do you mean do expanding foam glassed in place to lock it together? YES
you see the gap in the cross pieces. Instead of trying to cut angles that have the outside edges meet .Add pore foam in the gap then shape foam. Then sand back fiberglass to a taper . then do a bound beam a cross from wall to wall . like you did wall to roof
Do you think that be a week point

The strength comes from the glass, and the core adds to it by being non compressible. So yes I do think it would work, and again the glass is the strength. If you want to max strength use uni directional glass with the fibers 90 degrees to the joint. Or even regular cloth cut in strips with the fibers at 45 degrees, fibers running parallel with the joint add nothing.

6 inch tape https://www.jamestowndistributors.com/product/product-detail/1442
 

opp1

Member
would have a shell done today but I stripped out most of panels to do another Trailtop trailer . the structural panels I think is good for somebody that wants to build it fast and cheap .The different to structurally is like Superman ,Batman and Wonder Woman fighting Pee-wee Herman when he got the flu. tequila
The top just fall in on inside bound beam .
the panels were feathered as they were loose that way I wouldn't have to do as much work when they're tied to the pod
The different in the 2 is one .relies on fiberglass bonded to the foam. The other use the skeleton frame flexible skins with two different densities of foam. and blowing up like a football .
So will make new panels. and get back next weekend.
 

Attachments

  • IMG_20211029_133911.jpg
    IMG_20211029_133911.jpg
    30.5 KB · Views: 25
  • IMG_20211031_171408.jpg
    IMG_20211031_171408.jpg
    55.4 KB · Views: 26
  • IMG_20211031_171414.jpg
    IMG_20211031_171414.jpg
    49.6 KB · Views: 27
  • IMG_20211031_171432.jpg
    IMG_20211031_171432.jpg
    42.9 KB · Views: 27
Last edited:

opp1

Member
I had several people misunderstood what I said about the structural panels they're going to outlast anybody. Activate Angel investor in several RV repair shop so I look at what's going to get messed up and and cost to fix that
Had one panel that I did not cut up .So picture of front ,how I glued to premade interior bonding beam and foam makes life easer. inside with rivets you could use self tapping screws to hold down tell glue sets and removed but same amount of work. any gap will be back filled with foam before exterior bonding
Had to make individual panels because they wouldn't bend because of all the fiberglass woven. Even try kerfing. What nice can levee in the rain out side as I build. No rot are are twisting
 

Attachments

  • IMG_20211102_151624 (1).jpg
    IMG_20211102_151624 (1).jpg
    4.7 MB · Views: 32
  • IMG_20211102_170906 (1).jpg
    IMG_20211102_170906 (1).jpg
    193.3 KB · Views: 33
  • IMG_20211102_180503 (1).jpg
    IMG_20211102_180503 (1).jpg
    3.3 MB · Views: 35
Last edited:

opp1

Member
had a gentleman on another Forum that posted then argued that you needed thousands of dollars in tools. To do your own skin that could be the farthest from the truth. $11 piece of hardboard for the flat surface , wax partall dry's -like Saran Wrap. A dollar store in Roller and paint roller, mixing cups and some Harbor Freight 2in chip brush.
 

Attachments

  • IMG_20211106_124024.jpg
    IMG_20211106_124024.jpg
    3.5 MB · Views: 27
  • IMG_20211106_124454 (1).jpg
    IMG_20211106_124454 (1).jpg
    3.5 MB · Views: 27
  • IMG_20211106_145108.jpg
    IMG_20211106_145108.jpg
    3.9 MB · Views: 31
  • IMG_20211113_165124.jpg
    IMG_20211113_165124.jpg
    3.9 MB · Views: 30

Peter_n_Margaret

Adventurer
For a truly professional job, lower weight and better physicals, add a sheet of plastic, some tape and a vacuum pump for a couple of hundred dollars.
Cheers,
Peter
OKA196 motorhome
 

opp1

Member
For a truly professional job, lower weight and better physicals, add a sheet of plastic, some tape and a vacuum pump for a couple of hundred dollars.
Cheers

This is a low cost build . For what this pod will weigh not over 200 lbs., bagging would maybe save 15 to20 lbs. . I have access to vacuum tables . just trying to show it as a low-cost build that somebody could do with things around the house just a few tools . Many don't have the room for a vacuum table. Flowing this video where he stop using his table. Will be doing a bond beam like Scott performed. As I am a bigger fan of trailtop components. I probably when I get done just cut this thing up for skins for another trailtop trailer. This this way of building with stress skin panels fantastic it's just I want the skeleton frame of the trailtop. and the look of the Exoskeleton


Attachments

  • Picture 445.jpg
    Picture 445.jpg
    86.6 KB · Views: 23
Last edited:

Forum statistics

Threads
186,377
Messages
2,885,161
Members
226,303
Latest member
guapstyle
Top