off-roader
Expedition Leader
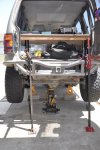
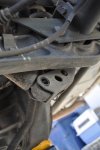
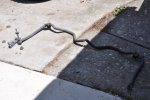
My buddy Carlos helped me install my coil spring spacers (Daystar units made for a Toyota Sequoia) and removed the rear anti-sway bars a couple of weekends ago. Finally got the pics online.
The R&R procedure is as follows.
1) Chock the front tires.
2) Raise the rear end.
- We used two 48" Hi-Lifts to raise the rear up.
- We then used two jack stands + two 2" thick concrete pavers on each side to support the frame & remove the weight from the Hi-Lifts to minimize any danger.
3) Next, used a floor jack to lift the rear pumpkin enough to remove the weight from the shocks.

4) Next, disconnect bottom bolt for both rear shocks.

5) Disconnect the end links of the anti sway bars
6) Lower the floor jack which lowers the pumpkin. The 2 coils will simply drop out.
7) There's a rubber ring that sits on top of the spring that needs to be removed. In our case, it stayed up in the top spring perch.
8) Next, put the 2" coil spring spacers on top of both springs.
9) Put both springs with their spacers onto the lower spring perch.
10) Carefully raise the rear pumpkin until the spring is back in the top perch. Make sure it goes in straight on top.
11) Re-attach the bottom shock bolts on both shocks.
12) Re-attach the antisway bar end links.
That's about it for the spacer install!

Alternatively you can also remove the antisway bar which is what I did. Rather than try and snake it out, I simply cut it in the middle using a die grinder and remove both side. :smiley_drive:

That's about it. :coffeedrink::bike_rider:
The R&R procedure is as follows.
1) Chock the front tires.
2) Raise the rear end.
- We used two 48" Hi-Lifts to raise the rear up.
- We then used two jack stands + two 2" thick concrete pavers on each side to support the frame & remove the weight from the Hi-Lifts to minimize any danger.
3) Next, used a floor jack to lift the rear pumpkin enough to remove the weight from the shocks.

4) Next, disconnect bottom bolt for both rear shocks.

5) Disconnect the end links of the anti sway bars
6) Lower the floor jack which lowers the pumpkin. The 2 coils will simply drop out.
7) There's a rubber ring that sits on top of the spring that needs to be removed. In our case, it stayed up in the top spring perch.
8) Next, put the 2" coil spring spacers on top of both springs.
9) Put both springs with their spacers onto the lower spring perch.
10) Carefully raise the rear pumpkin until the spring is back in the top perch. Make sure it goes in straight on top.
11) Re-attach the bottom shock bolts on both shocks.
12) Re-attach the antisway bar end links.
That's about it for the spacer install!
Alternatively you can also remove the antisway bar which is what I did. Rather than try and snake it out, I simply cut it in the middle using a die grinder and remove both side. :smiley_drive:

That's about it. :coffeedrink::bike_rider:
Last edited:
