Colorado camper build

Hi there,
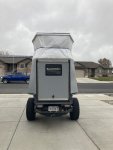
Im new to the forum, but have always watched this site for ideas. Over the years Ive had a number of campers, and currently have a big family camper for the kids. But I needed a mini camper for trips without them. I just cant see rolling down the highway at 20k lbs just for one person. Also, you're greatly limited on where that rig can go.
so here we go:
This all happened in the last 6 months or so.
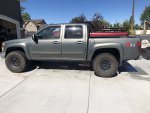
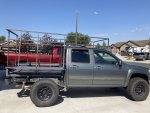
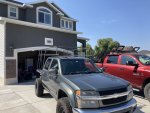
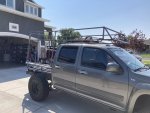
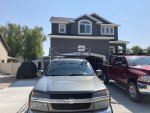
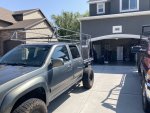
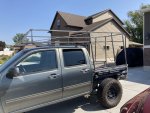
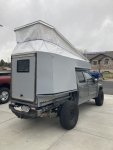
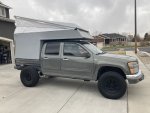
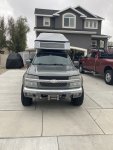
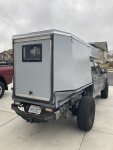
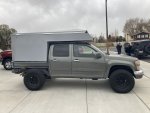
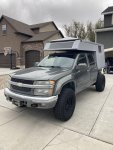
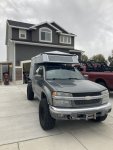
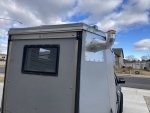
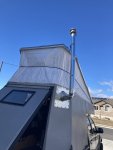
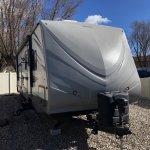
I have an older Chevy Colorado, had it for years, great vehicle. 4x4, 5.3 V8, 4 dr, you get the idea, and can see the pictures.
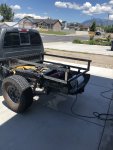
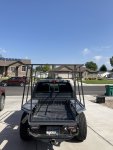
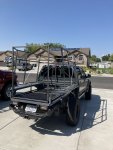
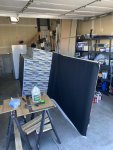
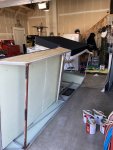
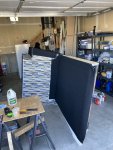
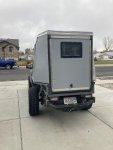
step 1: removed the bed, they are such a waste of space
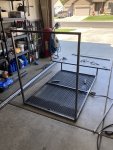
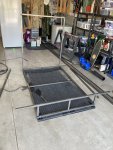
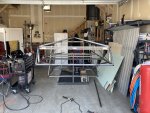
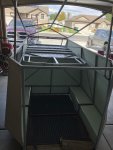
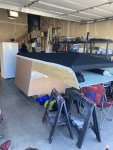
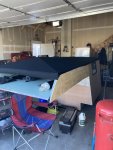
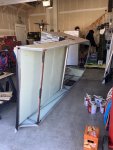
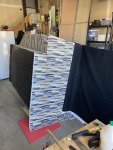
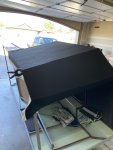
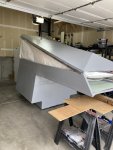
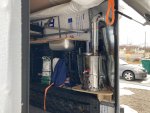
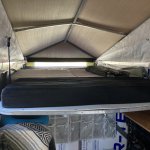
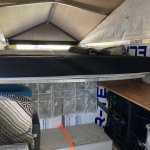
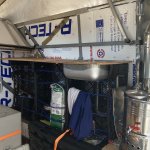
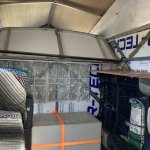
Step 2: built new bed. Eventually i will build some storage up under the fenders, toward the back. I forgot to take a picture of the completed bed before i started on the vamper frame, but all i did was slap some grey implement paint on it, and used some pressure treated boards to make the deck. Also painted.
some of my phone pictures are too large to upload. Not sure what to do about that
 

Attachments

  • 043B07BE-C8B1-408B-8AD2-A5D72D69E3D0.jpeg
    043B07BE-C8B1-408B-8AD2-A5D72D69E3D0.jpeg
    2.9 MB · Views: 82
  • 0959689A-8A6C-408F-BDEA-1226F2669045.jpeg
    0959689A-8A6C-408F-BDEA-1226F2669045.jpeg
    1.9 MB · Views: 84
So next was building a frame. Its thinwall steel tube, welded.
and the black plastic floor is cut out from the original bed liner. That corrugated stuff is tough. Plus it will be easy to get water to drain out
 

Attachments

  • 5F9F378C-938E-41DC-8B7C-2E7E37DFE0F2.jpeg
    5F9F378C-938E-41DC-8B7C-2E7E37DFE0F2.jpeg
    1.8 MB · Views: 87
  • 6B93F988-60D7-4416-885F-2997A2B35F1F.jpeg
    6B93F988-60D7-4416-885F-2997A2B35F1F.jpeg
    2.1 MB · Views: 91
  • 8410C63D-1097-4A12-BB1B-1DFE51FE7F4C.jpeg
    8410C63D-1097-4A12-BB1B-1DFE51FE7F4C.jpeg
    1.4 MB · Views: 97
  • 301CC724-DAD0-4563-B412-C9BE12DEDF22.jpeg
    301CC724-DAD0-4563-B412-C9BE12DEDF22.jpeg
    1.5 MB · Views: 99
  • 00C24870-4709-4650-90F0-381198B25A54.jpeg
    00C24870-4709-4650-90F0-381198B25A54.jpeg
    1.5 MB · Views: 95
  • 2051AFC2-7E84-42DA-B380-D3C73E7C1640.jpeg
    2051AFC2-7E84-42DA-B380-D3C73E7C1640.jpeg
    1.5 MB · Views: 96
  • 15B13E81-7349-4C27-8CEB-696B49390884.jpeg
    15B13E81-7349-4C27-8CEB-696B49390884.jpeg
    1.5 MB · Views: 90
  • 9D028E5B-F202-4C5A-ABE3-3FD1016DC8E0.jpeg
    9D028E5B-F202-4C5A-ABE3-3FD1016DC8E0.jpeg
    1.6 MB · Views: 81
  • E32A2C35-7921-4525-AEE4-7B76DB1FD899.jpeg
    E32A2C35-7921-4525-AEE4-7B76DB1FD899.jpeg
    1.7 MB · Views: 89
  • 5E95C063-B54F-4EF4-A6DC-1A98DD2CA697.jpeg
    5E95C063-B54F-4EF4-A6DC-1A98DD2CA697.jpeg
    1.7 MB · Views: 90
Back into the garage for some tweaking, finishing, and a roof.
well shoot, again with the file too big messages
 

Attachments

  • 4FC292AE-3EA0-4B04-BD91-DF02E9F08407.jpeg
    4FC292AE-3EA0-4B04-BD91-DF02E9F08407.jpeg
    2.9 MB · Views: 54
Next i needed walls. Used simple 5mm laminate poplar or whatever. Cheap, easy to repair, and light. I know its terrible for water issues. I have a plan for that... once the panels were cut to size and fitted. They were removed, and the inside and edges were painted 2 times with high quality exterior paint/primer. Why that green color? Because it was $9 in the mistint pile, rather than $45 for the same thing on the original rack. Color doesnt matter, and Im cheap.
dang, the majority of my photos are being rejected as too large. Any idea how to reduce the size when i try to upload them?
 

Attachments

  • FE2BD65B-8878-492B-BA87-BA329259DCA9.jpeg
    FE2BD65B-8878-492B-BA87-BA329259DCA9.jpeg
    1.8 MB · Views: 69
Next was some good ‘ol poor mans fiberglass. Went to the fabric store, raided the clearance racks. $15 later i was in business with some canvass. The tightbond 3 glue was more expensive at $30 per gallon.
once that was done, i painted it with more of the exterior paint. Then i painted the entire thing with Henrys 100% silicone tropicool roof coating. Great stuff. Ive used it on other projects as well. The insulation factor on it is impressive. Its not the toughest stuff out there when it gets rubbed on or scraped, but its easy to repair by just slapping some more on. Plus the camper is already water tight with exterior paint under it. So no worries.
the tent walls are 2 layers of tyvek house wrap. I was going to buy the cheaper stuff, but i have a neighbor in the construction industry, who gave me some scraps, and they fit perfectly. And before the bottom was attached, i put some 6 mm closes cell, foil backed foam in there for insulation.
 

Attachments

  • 3468E213-6D62-4F6F-A2FE-7AAC1EC4194A.jpeg
    3468E213-6D62-4F6F-A2FE-7AAC1EC4194A.jpeg
    1.3 MB · Views: 94
  • 04C8B814-A584-4D68-A095-46D287FA85A4.jpeg
    04C8B814-A584-4D68-A095-46D287FA85A4.jpeg
    1.7 MB · Views: 90
  • 720FE152-63F7-43DF-8D6C-A7D29F51C3E8.jpeg
    720FE152-63F7-43DF-8D6C-A7D29F51C3E8.jpeg
    1.3 MB · Views: 87
  • 774B0E65-C16E-4CB6-A05F-EC1335F48430.jpeg
    774B0E65-C16E-4CB6-A05F-EC1335F48430.jpeg
    1.7 MB · Views: 84
  • 200E534F-6412-4492-B3FB-AA297DA475AA.jpeg
    200E534F-6412-4492-B3FB-AA297DA475AA.jpeg
    1.9 MB · Views: 88
  • C233C84F-EB3D-4AF9-BD66-A219F26F6B12.jpeg
    C233C84F-EB3D-4AF9-BD66-A219F26F6B12.jpeg
    1.3 MB · Views: 85
  • 9C4C24B1-659E-4FAA-9EC2-7992F0C8A2E1.jpeg
    9C4C24B1-659E-4FAA-9EC2-7992F0C8A2E1.jpeg
    1.6 MB · Views: 83
  • 3E3C283A-7B03-45DD-9189-026F62AA512C.jpeg
    3E3C283A-7B03-45DD-9189-026F62AA512C.jpeg
    1.8 MB · Views: 86
  • 152920FB-C85A-4CE3-B648-0E360AE936E3.jpeg
    152920FB-C85A-4CE3-B648-0E360AE936E3.jpeg
    1.6 MB · Views: 97
  • 5517197D-360E-49E6-8716-2E98E46C80D0.jpeg
    5517197D-360E-49E6-8716-2E98E46C80D0.jpeg
    1.8 MB · Views: 98
Next was put it on the truck, and work on the interior.
all of the windows came from an old used truck shell i bought on local classifieds.The seals over the front hinge and back door are different types of garage door seals. The front hinges are stainless, from Amazon. All the latches were also amazon.
the rear door hinge and lock were also salvaged from the used truck shell.
i got a roll of bungie cord and ran it around the tent to keep it tight, and pull it in when i lower it. Many clamshell tents use this method. I didnt invent it.
the front window is kind of funny. I did not intent to put a window there. I was just going to board it up. The frame was already built when i brought home the shell to take parts off, and it had this long window in the front. It fit perfect! Almost as if i planned it that way, so it was too perfect to not use it, so i used it. Which worked out awesome, because i put my solar panels up in there, instead of having to drill through my roof to attach them. They work great.
 

Attachments

  • BC683523-A022-4865-98BC-635C837E0392.jpeg
    BC683523-A022-4865-98BC-635C837E0392.jpeg
    1.2 MB · Views: 117
  • 03CFD3D0-677B-4657-A7E2-2BCDDFC88938.jpeg
    03CFD3D0-677B-4657-A7E2-2BCDDFC88938.jpeg
    1 MB · Views: 130
  • 244FE603-7C9E-4DE8-A244-3A310D80DE37.jpeg
    244FE603-7C9E-4DE8-A244-3A310D80DE37.jpeg
    2.6 MB · Views: 130
  • 90AF79B2-2C4B-4A2E-8406-D0ECA9E436E3.jpeg
    90AF79B2-2C4B-4A2E-8406-D0ECA9E436E3.jpeg
    1.9 MB · Views: 122
  • 1C33B48D-0BC8-4CEA-88C1-265082ED473E.jpeg
    1C33B48D-0BC8-4CEA-88C1-265082ED473E.jpeg
    1.5 MB · Views: 111
  • 8A1704ED-E20C-43A1-98BB-7B6F0B540AD2.jpeg
    8A1704ED-E20C-43A1-98BB-7B6F0B540AD2.jpeg
    1.4 MB · Views: 121
  • B4C0AED0-436C-4176-944E-E5A4CC10E24B.jpeg
    B4C0AED0-436C-4176-944E-E5A4CC10E24B.jpeg
    2.7 MB · Views: 124
  • FB928AB4-AE6C-4432-8681-95DF6ADC40AD.jpeg
    FB928AB4-AE6C-4432-8681-95DF6ADC40AD.jpeg
    1.9 MB · Views: 113
  • C91F8FCD-74F6-4D6E-9286-2FE6759D94CC.jpeg
    C91F8FCD-74F6-4D6E-9286-2FE6759D94CC.jpeg
    1.5 MB · Views: 101
Thats the end of the photos i have for now, ill go get some interior photos soon, its not quite finished, but are these types of projects ever really ‘done’?
 
Thank you.
Ive had quite a few people ask a few questions, so ill add a little info here. The camper is still removable, just like a regular slide in camper. Its held down/in be the cargo straps.
the roof shape. Couple reasons for that. 1. As a general rule, flat roofs are bad. I know rv dealers do it, that doesnt make it right, it makes them lazy. Flat roofs lead to pooling or water, and failure. On a side note, if you own a flat roof rv or camper of any kind, i highly recommend covering it with henrys tropicool silicone Now! Dont wait for it to fail. A little preventative covering will go a very long way.
anyway, i had to add some sort of shape, bit i wanted it to be as low profile as possible. If it were flat, the front bed section was not built tall enough to sleep under once you put a couple inches of foam under you, so i started there, measuring how much room i actually needed. Once i got that mocked up, the original plan was to shape the back end the same way, and have a straight roof line. But the back is already about 7 feet tall when lifted. So with the front mocked up, and the roof center beam laying there, i was just about to build a matching triangle for the rear. Then i stopped to eat lunch. Came back, looked at it, and realized i think it looks cool. Plus lifting the rear was not necessary. I had all the angle i needed, and all the space i needed above the bed. So i left it alone, and started welding. I think it turned out good. And I dont have any water issues. Kinda funny how that stuff just works out sometimes.
 

Spencer for Hire

Active member
Thank you.
Ive had quite a few people ask a few questions, so ill add a little info here. The camper is still removable, just like a regular slide in camper. Its held down/in be the cargo straps.
the roof shape. Couple reasons for that. 1. As a general rule, flat roofs are bad. I know rv dealers do it, that doesnt make it right, it makes them lazy. Flat roofs lead to pooling or water, and failure. On a side note, if you own a flat roof rv or camper of any kind, i highly recommend covering it with henrys tropicool silicone Now! Dont wait for it to fail. A little preventative covering will go a very long way.
anyway, i had to add some sort of shape, bit i wanted it to be as low profile as possible. If it were flat, the front bed section was not built tall enough to sleep under once you put a couple inches of foam under you, so i started there, measuring how much room i actually needed. Once i got that mocked up, the original plan was to shape the back end the same way, and have a straight roof line. But the back is already about 7 feet tall when lifted. So with the front mocked up, and the roof center beam laying there, i was just about to build a matching triangle for the rear. Then i stopped to eat lunch. Came back, looked at it, and realized i think it looks cool. Plus lifting the rear was not necessary. I had all the angle i needed, and all the space i needed above the bed. So i left it alone, and started welding. I think it turned out good. And I dont have any water issues. Kinda funny how that stuff just works out sometimes.
When you say flat roof campers, are 4 wheel campers in that category and are you saying to add the silicone to the entire roof?
 
Yes, 4 wheel campers are flat roofed. If they make a bowed roof model, ive never seen it. My dad has a 4wc, its flat, and hes hd issues with it.
2, yes, i would get a gallon of silicone, and do the roof, go over the edges a little too. Its cheap insurance to protect any roof material, and make it last a lot longer. Also, the temperature benefits make it well worth it. Its available in a couple different colors (white, tan, grey) from home depot. Henrys tropicool 100% silicone is the best. Ive never found another product better. If there is one out there, Id love to know about it.
i painted the roof and front facia of my big camper with it as well, made a big difference, and is a good combo with the original epdm roof. Ill post some pictures of it when j get a chance, it looks great.
 
Few more photos. The interior is still pretty rough. Need to do some trimming and tidying up. But its warm and dry and comfortable. The the couch and countertop bases are plastic crates, like milk crates, but rectangle. A local nursery is always giving them away for free. They all created nice frames, and storage.
Also the couch stores my honey bucket as well. Once its outside, the couch gets a little longer. The bed also folds to create more space. Folded out, the bed is full size. 53x76ish. The plumbing is not finished, still need to plumb in the tankless water heater, and add the faucet. Going to use a QD style faucet, so i can plug a shower hose into it.
the water tank, sink, pump, hoses, and all the foam, along with some of the little bits, like coat hangers, all came from an old camper i bought off a guy for $100. He was going to scrap it. I pulled everything worth a penny out of it, kept what i needed, sold the rest, then scrapped the rest. Ended up making a few bucks on it. Pretty funny.
the fireplace is a turkish tea kettle. A little char coal or wood in that thing and its line a rocket stove. And the top tank is for water. I have to be careful, it will get so hot the water will boil and steam up the place quick. I still need a fan in one of the windows.
 

Attachments

  • A60AF220-424D-4D4F-9BB0-9D949802C744.jpeg
    A60AF220-424D-4D4F-9BB0-9D949802C744.jpeg
    2.6 MB · Views: 102
  • EF5451E6-6708-4C2E-AD64-E01DEB0AF460.jpeg
    EF5451E6-6708-4C2E-AD64-E01DEB0AF460.jpeg
    2.5 MB · Views: 111
  • D471CA38-9B3D-4259-BFA4-CF035D3EB8EC.jpeg
    D471CA38-9B3D-4259-BFA4-CF035D3EB8EC.jpeg
    801 KB · Views: 101
Few more i had to retake, also, pictures of the big camper after the silicone treatment.
within a year of buying it, the front fiber glass was trashed. Forrest river refused to warranty it. So i covered it with silicone, looks great. Also in the summer we would get a ton of heat pouring in through the front. The silicone makes a very noticeable temp difference.
 

Attachments

  • 8D8F69BC-39C2-405B-AF7D-A11197453CA4.jpeg
    8D8F69BC-39C2-405B-AF7D-A11197453CA4.jpeg
    2.4 MB · Views: 91
  • 7025969A-C0BD-49FB-A338-1FA0518894B4.jpeg
    7025969A-C0BD-49FB-A338-1FA0518894B4.jpeg
    2.1 MB · Views: 92
  • 4B2F6661-63C5-4CF7-99CD-E1406CE2C35F.jpeg
    4B2F6661-63C5-4CF7-99CD-E1406CE2C35F.jpeg
    2.8 MB · Views: 94
  • 4090FCD4-A7C9-437A-8E15-85FD01DC2E64.jpeg
    4090FCD4-A7C9-437A-8E15-85FD01DC2E64.jpeg
    2.7 MB · Views: 93
  • 333FE219-4270-40C3-902D-58EA6A60717B.jpeg
    333FE219-4270-40C3-902D-58EA6A60717B.jpeg
    2.9 MB · Views: 90
  • 9A70DE80-6180-4F81-95D8-ED73F1A61C86.jpeg
    9A70DE80-6180-4F81-95D8-ED73F1A61C86.jpeg
    1.8 MB · Views: 89

Forum statistics

Threads
186,798
Messages
2,888,156
Members
227,280
Latest member
Smithmds77
Top