coastalcop
Active member
Covert Camper Buildout
Base Vehicle 2020 F-250 XLT 7.3 Supercab 4X4 6.75 bed. Dual battery, dual alternator, locking rear diff (3.55 gears, as I coudlnt find the rest of the specs with the 4.30s) I looked at used Excursions but finding an unmolested one was tough and I wasn’t keen on the gasser engines in those (with the spark plug issues that can crop up). Lastly the Diesel is voodoo to me and couldn’t siphon off that in a pinch to run one of my bikes.
Design Scheme: Maximum usability with ability to return to stock condition (bumpers/Tires excluded)
Finally having a bed large enough for me to lay down in and enough cargo capacity to have some fun, I decided to use the lessons learned on the bullfrog refit and apply it to the build as I would do it.
After lots of thought to use and understanding that this would not be a rig for full timing (at least not for 2 people or for now ) I went with a Leer 100r shell with a single windoor on the drivers side. Now to sleeping/storage.
I plan to pull the 60% rear seat out to get an idea for space/storage options. Kids are gone, one old dog and the misses are all that are likely to ever be in this truck, and if I needed to, reinstall of that 60% would take about 20 minutes including digging up my tools. Goose Gear is getting closer to releasing a product for this 60% section in superduty supercabs.
Ordered Westin HDX Bandit bumpers front and rear with receiver hitches. Got those installed and started on the Anderson plugs to run the winch
Badlands APEX 12k winch with synthetic line, hooked it to a receiver plate so I can use it in front or behind with the Anderson Plugs. When not in use it will stored be out of sight. I have to use a hitch adapter for the rear hitch (2.5 to 2) and we are going to fit the plate for as short as possible fitment.
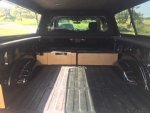
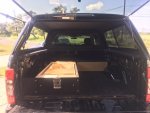
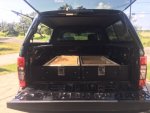
Being blessed and having access to a former NASA engineer (STS 1) who is also gangbusters with woodworking, I shot him my initial idea of a bed box terminating at the top of the wheel well, with a single large drawer centered between the wells and 4 smaller storage areas fore and aft of the wells. I Gave him a basic drawing with measurements not to scale but within a inch. Then I let him ruminate…….
Several questions about “how often would the two of you use this and how often would it just be you?, What would you carry in the drawer ? How often do you anticipate accessing the stuff in the back of the drawer?” Then an additional day to let the thoughts marinate.
So he shoots me back a 3d rendering of a four piece system that could be used in a 50%, 65% , 100% capacity. It would have two drawers of about 58” length and two bulk storage areas near the cab. Allowing for sleeping along the whole bed area for the misses and I in 100% mode, taking out one section and drawer to allow for a ½ bed sleeping area with table top and place to dress out while hunting/camping. Taking out two sections would allow for a ½ bed sleeping area and ½ use area.
Two drawers at 58” depth and all pieces easily removable/installable with the topper in place.
Decked doesn’t make a system yet for the 6.75 bed and this gave me a chance to spend some time building with my Pop (the aforementioned NASA guy). Even though we are both adults and “seasoned”, we still try to get together a couple times a year to work on a “father-son” project. This also allowed him to control most of the precision work of the build and relegating me to the muscle to move stuff. In many things I have the Russian mindset of “Perfect is the enemy of good enough”, whereas he is looking at 1/64 inch (we compromised on an 1/8)
During the drawer build the “good idea fairy” came to visit a few times, so drawer construction changed a couple times between sections, and extended build time another weekend. That’s ok though, we got to test a few ideas and the topper isn’t here yet anyway.
When the topper arrived, I started planning on a pass through. As I say before I considered, and if they still made them new I would have likely purchased an excursion. This will have to do. The local glass shop is going to charge me a pittance to pull out the rear window (non sliding) which will give me me a huge open space and a template.
The local plastics store has ¼ inch Lexan . Slap the window on the plastic, make an outline, and poof, we have a cover to reinstall (the rear window is minimally curved on the f -250)
Installation will be done with both windshield adhesive and 6 Rivnut inserts to tie the sheet to the cab as it will have some weight on it as things/people traverse the passage. Lexan was chosen as it has strength and clarity, and is in a position where it is unlikely to get scratched. The front window of the topper will be likewise removed the topper put into position .A pattern will be traced on the installed sheet allowing for a “mirror” of the topper opening. Pull the topper back again and there you go, instant (not quite, this will take a little time) pass through. A quick order to these guys https://www.accordionboot.com/shop/product/accordion-boot-wide/ is getting me premade accordion boot by the foot. This will be installed with the addition of adhesive to the seal and now I have a sealed pass through that can flex with the cab/bed interface as it moves.
All of this can be easily reversed and the truck placed back into “stock” condition for resale if needed (everyone here wants aftermarket bumpers anyway to deal with deer/wild hogs) aside from the rivserts that are covered with adhesive and not visible in the usable portion of the glass when reinstalled.


Base Vehicle 2020 F-250 XLT 7.3 Supercab 4X4 6.75 bed. Dual battery, dual alternator, locking rear diff (3.55 gears, as I coudlnt find the rest of the specs with the 4.30s) I looked at used Excursions but finding an unmolested one was tough and I wasn’t keen on the gasser engines in those (with the spark plug issues that can crop up). Lastly the Diesel is voodoo to me and couldn’t siphon off that in a pinch to run one of my bikes.
Design Scheme: Maximum usability with ability to return to stock condition (bumpers/Tires excluded)
Finally having a bed large enough for me to lay down in and enough cargo capacity to have some fun, I decided to use the lessons learned on the bullfrog refit and apply it to the build as I would do it.
After lots of thought to use and understanding that this would not be a rig for full timing (at least not for 2 people or for now ) I went with a Leer 100r shell with a single windoor on the drivers side. Now to sleeping/storage.
I plan to pull the 60% rear seat out to get an idea for space/storage options. Kids are gone, one old dog and the misses are all that are likely to ever be in this truck, and if I needed to, reinstall of that 60% would take about 20 minutes including digging up my tools. Goose Gear is getting closer to releasing a product for this 60% section in superduty supercabs.
Ordered Westin HDX Bandit bumpers front and rear with receiver hitches. Got those installed and started on the Anderson plugs to run the winch
Badlands APEX 12k winch with synthetic line, hooked it to a receiver plate so I can use it in front or behind with the Anderson Plugs. When not in use it will stored be out of sight. I have to use a hitch adapter for the rear hitch (2.5 to 2) and we are going to fit the plate for as short as possible fitment.
Being blessed and having access to a former NASA engineer (STS 1) who is also gangbusters with woodworking, I shot him my initial idea of a bed box terminating at the top of the wheel well, with a single large drawer centered between the wells and 4 smaller storage areas fore and aft of the wells. I Gave him a basic drawing with measurements not to scale but within a inch. Then I let him ruminate…….
Several questions about “how often would the two of you use this and how often would it just be you?, What would you carry in the drawer ? How often do you anticipate accessing the stuff in the back of the drawer?” Then an additional day to let the thoughts marinate.
So he shoots me back a 3d rendering of a four piece system that could be used in a 50%, 65% , 100% capacity. It would have two drawers of about 58” length and two bulk storage areas near the cab. Allowing for sleeping along the whole bed area for the misses and I in 100% mode, taking out one section and drawer to allow for a ½ bed sleeping area with table top and place to dress out while hunting/camping. Taking out two sections would allow for a ½ bed sleeping area and ½ use area.
Two drawers at 58” depth and all pieces easily removable/installable with the topper in place.
Decked doesn’t make a system yet for the 6.75 bed and this gave me a chance to spend some time building with my Pop (the aforementioned NASA guy). Even though we are both adults and “seasoned”, we still try to get together a couple times a year to work on a “father-son” project. This also allowed him to control most of the precision work of the build and relegating me to the muscle to move stuff. In many things I have the Russian mindset of “Perfect is the enemy of good enough”, whereas he is looking at 1/64 inch (we compromised on an 1/8)
During the drawer build the “good idea fairy” came to visit a few times, so drawer construction changed a couple times between sections, and extended build time another weekend. That’s ok though, we got to test a few ideas and the topper isn’t here yet anyway.
When the topper arrived, I started planning on a pass through. As I say before I considered, and if they still made them new I would have likely purchased an excursion. This will have to do. The local glass shop is going to charge me a pittance to pull out the rear window (non sliding) which will give me me a huge open space and a template.
The local plastics store has ¼ inch Lexan . Slap the window on the plastic, make an outline, and poof, we have a cover to reinstall (the rear window is minimally curved on the f -250)
Installation will be done with both windshield adhesive and 6 Rivnut inserts to tie the sheet to the cab as it will have some weight on it as things/people traverse the passage. Lexan was chosen as it has strength and clarity, and is in a position where it is unlikely to get scratched. The front window of the topper will be likewise removed the topper put into position .A pattern will be traced on the installed sheet allowing for a “mirror” of the topper opening. Pull the topper back again and there you go, instant (not quite, this will take a little time) pass through. A quick order to these guys https://www.accordionboot.com/shop/product/accordion-boot-wide/ is getting me premade accordion boot by the foot. This will be installed with the addition of adhesive to the seal and now I have a sealed pass through that can flex with the cab/bed interface as it moves.
All of this can be easily reversed and the truck placed back into “stock” condition for resale if needed (everyone here wants aftermarket bumpers anyway to deal with deer/wild hogs) aside from the rivserts that are covered with adhesive and not visible in the usable portion of the glass when reinstalled.