You are using an out of date browser. It may not display this or other websites correctly.
You should upgrade or use an alternative browser.
You should upgrade or use an alternative browser.
Custom Tundra Bed Storage: Phase 1
- Thread starter cwvandy
- Start date
Jusy came out of 10 days in Death Valley and had a chance to test out lockers and new gears. Dramatic difference in traction and handling. Was able to get over a bunch of wheels-in-the-air terrain I would not have tried before. Towed trailer down as base camp and transmission was way happier with 4:88's. Gearing also allowed more compression braking on downhills something that just didn't seem to be there with stock gearing.
Seems to run roughly 500 or so rpm higher at highway speeds so not really noticable. Fuel economy seems unchanged but I never paid that close attention with 46 gallon tank. Off road milage pretty much sucks anyway. No noise whatsoever from gears. Great set up and highly recommended.
Seems to run roughly 500 or so rpm higher at highway speeds so not really noticable. Fuel economy seems unchanged but I never paid that close attention with 46 gallon tank. Off road milage pretty much sucks anyway. No noise whatsoever from gears. Great set up and highly recommended.
Any chance you could share an electrical diagram to share how you tied everything together and what specs you used for various connections, etc.? I'm currently doing the same on my trailer in the front box and this would be helpful as it sounds as if you have good experience!
Great build out!
Great build out!
I roughly sketched it out but happy to recreate a more readable diagram. Essentially the system is as follows
Start Battery to 175 amp fuse
Fuse to Battery combiner
Battery combiner to aux battery in truck bed
Aux battery to box containing breaker panel (breakers for frig, compressor, water pump, amp/volt meter, 12 volt outlets, gauges, shut, 175 amp fuse, below)
Aux battery also to second 175 amp fuse and then on to 175 amp Anderson connector to connect trailer battery system.
Cable between batteries 0 gauge. Used only marine grade tinned wire. All connections soldered and protected with heat shrink tubing. All wire run in conduit and up-size one size from wire size charts (based on round-trip distance and expected amperage).
Stay tuned for diagram.
Back seat storage
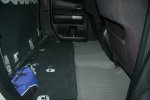
Early this summer my wife and I are planning to drive the Continental divide. Rig flying formation will be roof top tent only (no trailer). In preparation we are trying to reduce and redistribute weight and maximize storage. Because only two of us will be in the rig I have removed the back seat for weight and storage. Not only does this free up a ton of space, but also allow me to be more thoughtful about weight distribution.
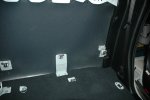
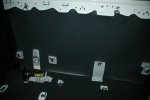
I had built a platform in my Tacoma using the back seat brackets. I considered doing this here but the installation was not quite as simple as the Tacoma. Instead I decided to simply use all the mounting bolts for the seat and seat belts and install high quality D rings. This provides the maximum flexibility (I seem to move stuff around a lot during a trip...or things seem to find their own place after time) and the simplest solution.
In the process I learned that all D rings are not created equal. You can buy fairly durable D rings for a buck or so from E-trailer and any number of hardware outfits. I tested a couple however, and a irritating problem emerged.
Cheap D rings, when not used to tie something down, make a awful rattling noise on rough roads. Multiply this by 5 or ten, and there is an irritating cacophony of lose rings rattling against themselves. Over long periods these sorts of avoidable irritants, especially in the passenger compartment, are really tiring.
I found a solution at Expedition Exchange and, although not cheap ("official Land Rover Parts"....) they are a thing of beauty. Each D ring is held in place in a plastic sleeve and there is a small tab that compresses on the base to keep the ring from rotating when tightened. I bit the bullet and bought 10. Photos are attached.
I think these rings, in combination with the "hangers" that the seat attach to, will allow me secure anything I put in the now substantial storage area in the passenger area.
Attachments
Just completed Continental Divide Trip; 1250 miles off road
We just completed an off road trip from the Mexico-New Mexico border to Lander Wyoming. Except for some fuel (and drive arounds for some snow bound passes) the trip was off road. Roads varied from 50 mph dirt roads to mud, snow, and rocky rutted 2 mph terrain. It was fabulous.
Some others had broken gear (largely suspension issues) and several winch-out episodes, but the Tundra was flawless. Everything worked. Nothing broke and the rig performed flawlessly. Great time! Big thanks to Roseann and Jonathan Hanson who led the trip.
Attachments
Last edited:
bknudtsen
Expedition Leader
Yes, the inner tubing is bolted through the roof into the roof rails. The tubing system is now a part of the canopy and can be removed with the canopy.
Thx for the reply. I really like the way you designed that.
Two more questions... Which roof rack feet are you using, and are your rails on your topper Thule, FrontRunner or something else? Looks kinda like FrontRunner stuff, but I just want to make sure. I have the LEER Thule rails, and I was wondering if the FR rack feet will work.
Bryan_FRO
Member
Thx for the reply. I really like the way you designed that.
Two more questions... Which roof rack feet are you using, and are your rails on your topper Thule, FrontRunner or something else? Looks kinda like FrontRunner stuff, but I just want to make sure. I have the LEER Thule rails, and I was wondering if the FR rack feet will work.
Yes. The Front Runner feet can work with any brand tracks. Sometimes the square nuts used in the tracks will be a slightly different size than what comes with the Front Runner feet. All you would need to do is use the ones that came with the tracks, if you still have them. If not, a trip to the hardware store will allow you to use them. You can also grind the square nuts down a little to make them fit.
Similar threads
- Replies
- 0
- Views
- 564
- Replies
- 0
- Views
- 321


