You are using an out of date browser. It may not display this or other websites correctly.
You should upgrade or use an alternative browser.
You should upgrade or use an alternative browser.
Expedition Bike? Not really, it's just WTHIJ's TW200.
- Thread starter WhereTheHellIsJames?
- Start date
WhereTheHellIsJames?
Explorer
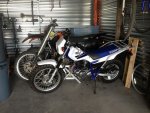
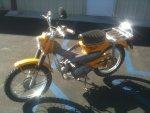
Thanks for the inspiration James! I've been considering one of these for a while now, and today we welcomed a new member to the family.
Hey, right on!
That's a good looking TW that you picked up! I'm sure that if you take it for what it is, and don't compare it to that KTM behind it in the pic, you'll really enjoy the TW!
Bonus that it appears to have come with a rear CycleRack!
A perfect segue into my next post...
WhereTheHellIsJames?
Explorer
Nice Rack!
I've done a lot to the TW to make it more reliable and comfortable, as well as squeezing just a bit more oompfh out of it with the FMF Exhaust in the last mod post. But what about more practical? With the rack that Yamaha offers for the TW200, there's really not a lot more that one could carry, aside from a lunchbox and a pair of shoes... if that!
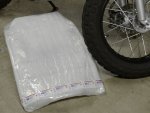
A few posts up, I posted a picture of a big white package...
Wrapped up neatly, under about 6 layers of protective plastic and foam was the holy grail of racks for the TW200- front and rear CycleRacks!
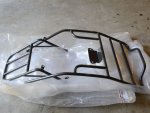
I was really stoked to receive these racks, as I've read a lot about them in my quest to put together the ultimate TW200 weekend adventurer. A couple of weeks ago, I got in touch with Marc at CycleRacks.com up in Idaho, and he helped me figure out just what I needed for the 'dub... 2 days later, there was the package sitting on my doorstep! I'd love to go into deep detail of the installation, but it was so simple that it only took about 5 minutes for each the front and rear racks.
Tools used: 1/4" socket wrench w/ 10mm socket, 3/8 socket wrench w/ 12mm & 13mm socket, 6mm Allen wrench, 3/8" torque wrench. I also used some anti-seize for the bolts that mount the rear rack to the frame at all four points.
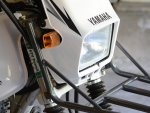
The front rack uses the existing hardware on the bike. It simply bolts up to the upper and lower triple clamps using the factory pinch bolts. Since I had everything all loose, I figured I'd give the forks a few good pumps to make sure everything was all straightened out on the front end. Note: only do this with a lightly loosened lower triple, not a totally loose upper and lower! mount up the rack, and tighten up the bolts. Tighten up the pinch bolts to their factory specs (my bike is 17 ft/lbs both upper and lower), and you're done.
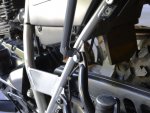
The rear rack was about the same complexity to install as the front rack was. First, take off the seat, and if you have a Yamaha rack on the bike already, remove it. Next, remove the upper bolt from both of the passenger rearsets. With the CycleRacks, there came a couple of replacement bolts and lockwashers for the rearset mounts which are longer than the factory ones. If you keep your passenger rearsets, use these. If you got rid of the rearsets, you can reuse the factory bolt, but you'll need a washer or two to put between the rack and frame for proper fitment. Loosely bolt the rack up to the rearset mounts, as well as the under-seat mounts (where the front of the Yamaha rack bolts to), tighten everything up, re-install the seat, and that's that.
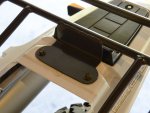
In 10 minutes the TW has gone from having little or no hauling ability, to being able to pack a weeks worth (or more!) of gear around.
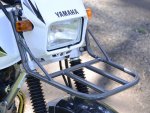
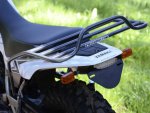
One of the neat things that I noticed about the rear rack was that it no longer puts weight on the wimpy rear subframe of the TW, but instead transfers all of the weight to the mainframe. I like this, as I've read plenty of accounts of people bending up the rear sub's with what would seem like very little weight back there. Also, it looks like the infamous tool-tube will have a great mounting spot... more on that later. If one puts anything with bulk on the front rack, it'll cover up the headlight. However, it's still a great place to put a couple of spare tubes and a first aid kit if you don't want to block the headlight. Me, I'm not worried about it... after dark, I like to sit around campfires and jam on my uke with my campsite already all set up, not ride around with all my gear still on the bike looking for a place to camp.

All said and done, I give these racks two-thumbs-up. They're solid products with a nice finish and great fitment... not to mention that they increase the usefulness of the bike by leaps and bounds. In addition, the people at CycleRacks sure know how to treat a guy right, and it's nice to do business with a company that supports their community the way that Marc and Don do.
I've done a lot to the TW to make it more reliable and comfortable, as well as squeezing just a bit more oompfh out of it with the FMF Exhaust in the last mod post. But what about more practical? With the rack that Yamaha offers for the TW200, there's really not a lot more that one could carry, aside from a lunchbox and a pair of shoes... if that!
A few posts up, I posted a picture of a big white package...
Wrapped up neatly, under about 6 layers of protective plastic and foam was the holy grail of racks for the TW200- front and rear CycleRacks!


I was really stoked to receive these racks, as I've read a lot about them in my quest to put together the ultimate TW200 weekend adventurer. A couple of weeks ago, I got in touch with Marc at CycleRacks.com up in Idaho, and he helped me figure out just what I needed for the 'dub... 2 days later, there was the package sitting on my doorstep! I'd love to go into deep detail of the installation, but it was so simple that it only took about 5 minutes for each the front and rear racks.
Tools used: 1/4" socket wrench w/ 10mm socket, 3/8 socket wrench w/ 12mm & 13mm socket, 6mm Allen wrench, 3/8" torque wrench. I also used some anti-seize for the bolts that mount the rear rack to the frame at all four points.
The front rack uses the existing hardware on the bike. It simply bolts up to the upper and lower triple clamps using the factory pinch bolts. Since I had everything all loose, I figured I'd give the forks a few good pumps to make sure everything was all straightened out on the front end. Note: only do this with a lightly loosened lower triple, not a totally loose upper and lower! mount up the rack, and tighten up the bolts. Tighten up the pinch bolts to their factory specs (my bike is 17 ft/lbs both upper and lower), and you're done.

The rear rack was about the same complexity to install as the front rack was. First, take off the seat, and if you have a Yamaha rack on the bike already, remove it. Next, remove the upper bolt from both of the passenger rearsets. With the CycleRacks, there came a couple of replacement bolts and lockwashers for the rearset mounts which are longer than the factory ones. If you keep your passenger rearsets, use these. If you got rid of the rearsets, you can reuse the factory bolt, but you'll need a washer or two to put between the rack and frame for proper fitment. Loosely bolt the rack up to the rearset mounts, as well as the under-seat mounts (where the front of the Yamaha rack bolts to), tighten everything up, re-install the seat, and that's that.


In 10 minutes the TW has gone from having little or no hauling ability, to being able to pack a weeks worth (or more!) of gear around.


One of the neat things that I noticed about the rear rack was that it no longer puts weight on the wimpy rear subframe of the TW, but instead transfers all of the weight to the mainframe. I like this, as I've read plenty of accounts of people bending up the rear sub's with what would seem like very little weight back there. Also, it looks like the infamous tool-tube will have a great mounting spot... more on that later. If one puts anything with bulk on the front rack, it'll cover up the headlight. However, it's still a great place to put a couple of spare tubes and a first aid kit if you don't want to block the headlight. Me, I'm not worried about it... after dark, I like to sit around campfires and jam on my uke with my campsite already all set up, not ride around with all my gear still on the bike looking for a place to camp.

All said and done, I give these racks two-thumbs-up. They're solid products with a nice finish and great fitment... not to mention that they increase the usefulness of the bike by leaps and bounds. In addition, the people at CycleRacks sure know how to treat a guy right, and it's nice to do business with a company that supports their community the way that Marc and Don do.
Last edited:
fourstringfletch
Adventurer
Hey, right on!
That's a good looking TW that you picked up! I'm sure that if you take it for what it is, and don't compare it to that KTM behind it in the pic, you'll really enjoy the TW!
Bonus that it appears to have come with a rear CycleRack!
A perfect segue into my next post...
Thanks James, I'm definitely enjoying it already for very different reasons than the KTM. It's great to bring my lady along! The rack is great but mine must be an older generation without the support above the fender. Let us know how much use you get out of the front rack, I considered adding one too.
Here's a job this bike should do well - I'm hoping to shape a mountain bike trail after walking behind a tiller for 1.5 miles around Memorial Day. These tires should be perfect for a smooth polish!
Stay tuned for a success report.
Hi,
I plan on traveling with an expedition type rv and want to take along a motorcycle for use as a 'tender' as well as trail scout or, in the case of a breakdown, a parts chaser. Set up and used mostly as an adventure type bike without the bulk. So, the field was quickly narrowed to the dual-purpose category. With that said, for well balanced street/trail performance, I have chosen the Yamaha WR250R. My only concern is the seat height as I am 5'8" 32" inseam. My research shows that lowering the wrr can be done with the 'factory method' (rear shock &forks) = 1"...'yamalink' mod = 1" and seat modification (spiral or seat concepts or foam shave)= 3/4"...am I wrong to assume that a total lowering of the WRR can be brought down from spec 36.6" to 33.85" ! which would be lower than the new Honda CRF250L (34.7") but still allow plenty of ground clearance. Considered the Yam TW 200 with it's low seat height (31.1") and the absolute love people display for this bike!...but was concerned about riding two up at highway speeds as well as carb performance at altitude. Have I overlooked anything? Not new to riding but it has been decades since I was involved. Your comments will be appreciated. Regards, Dean
I plan on traveling with an expedition type rv and want to take along a motorcycle for use as a 'tender' as well as trail scout or, in the case of a breakdown, a parts chaser. Set up and used mostly as an adventure type bike without the bulk. So, the field was quickly narrowed to the dual-purpose category. With that said, for well balanced street/trail performance, I have chosen the Yamaha WR250R. My only concern is the seat height as I am 5'8" 32" inseam. My research shows that lowering the wrr can be done with the 'factory method' (rear shock &forks) = 1"...'yamalink' mod = 1" and seat modification (spiral or seat concepts or foam shave)= 3/4"...am I wrong to assume that a total lowering of the WRR can be brought down from spec 36.6" to 33.85"
mog
Kodiak Buckaroo
Hi,
I plan on traveling with an expedition type rv and want to take along a motorcycle for use as a 'tender' as well as trail scout or, in the case of a breakdown, a parts chaser...but was concerned about riding two up at highway speeds as well as carb performance at altitude. Have I overlooked anything? Not new to riding but it has been decades since I was involved. Your comments will be appreciated. Regards, Dean
Just some personal experience on the TW200 from my usage.
Height – I’m 6’4” and my girlfriend is 5’4”. Both of us find the TW200 very conformable for local rides (I’ve never done a ‘long’ ride on the TW200). She has no problem with the seat height in the stock ride height.
Freeway – I have the stock gearing (no sprocket change) and the TW200 will cruise at 55mph with me on it, no problem. I could go faster, but it is happy at 55, and locally that is just fine. I’m 240+, so I would guess your two-up of “normal humans”, should get about the same performance.
To me there is a big difference in expectations/performance when using the motorcycle as a vehicle dingy/tender, (around town, food/parts run, exploring) and traveling via 2 wheels. I’ve had a zillion motorcycles and the TW200 fits the dingy/tender bill perfectly for me. It is also a great beginner’s bike. My daughter loves it, not only for the seat height (she is 5’7”) but also the power (not too little, not too much) and wide tires instill confident with her.
fourstringfletch
Adventurer
Dean,
I can speak a little to the carb at altitude as I just took mine for a little spin on the highway yesterday at 7000'
With a stiff headwind it was pretty much pinned at 55mph on a flat grade. Coming back the other way with the wind at my back was way better, but don't expect this bike to schlep 2 people up a hill at 60mph. That said, you probably shouldn't go that fast with 2 people on knobby tires anyway.
This bike is pretty new to me (see above) but so far I'm really impressed, and I'm pretty confident that the TW seat is more comfy for the passenger. Happy hunting!
805gregg
Adventurer
Just like the title of the thread says "Expedition bike? Not really...," but it's certainly an adventure bike! I suppose the adventure is what you make out of it... I've had some great adventures on the little 'dub!
I'm pretty certain that all day slab action was not what Yamaha intended for the TW, but I have to say, your 63 off a cliff is pretty conservative compared to my GPS'd 84 (pretty much off a cliff :bike_rideror frequent and easy 65/70 from SF to Marin on the 101. Did you ever tune or jet your TW for your conditions/location/elevation, or did you just ride it around with whatever setup the dealer (or PO) sold it to you with? Either way, I agree with you that it'd be a silly choice for someone who's looking to do regular highway riding or anything resembling heavy off-road riding. The TW is perfect though for riding around town, keeping it pretty mellow, and exploring some 2-track or fire roads. Sounds like you were looking for something else though, and that the DR fit you better- glad to hear that you found something that works well for ya!
I had a DR at one time too- I think it was around a '00 or '01. I thought it was a good enough bike for around town and commuter-style highway riding, and I could pack a ton of stuff on it... and pretty reliable too. But it was a pig off road, and it always felt like I was more of the bike's passenger than a rider! The TW fills a niche that bigger bikes with 450cc's more displacement don't and can't, just like your DR isn't the same type of adventure bike as say a 990, Tiger, or GSA. Sometimes I wish I had a sort of Swiss-Army bike that could do it all instead of having to have a half dozen different bikes filling up my garage, but then again, that's part of what makes motorcycling so enjoyable- variety!
I just got back from a 12 day ride to Copper Canyon in Mex, the DR performed perfect both on and off road on some tough roads, best bike of the 5
Thank you Mog and Fourstringfletch for the feedback. Have either of you, or the other readers here, heard the same rumor I have about the TW200 receiving a 2014 refresh which will include fuel injection? Of course, there is also the doom and gloom whisper of it's demise. I know that business decisions rarely take into account the emotional aspects of a creation but I would be surprised if 2013 ended it's production run with such a fanatical following. Regards, Dean
fourstringfletch
Adventurer
Happy to help Dean! My t dub is coming out of storage this weekend and heading to Moab for her first real date with my lady 
The XTW250 looks really neat. Innovative and even more unique! Must ... focus ... excitement on my TW... too much here that I long for already.
The XTW250 looks really neat. Innovative and even more unique! Must ... focus ... excitement on my TW... too much here that I long for already.
Yamaha will not stop making the TW200 any time soon.The only way they will put fuel injection on this bike,is if the engine size goes up to the 250cc. Punch XTW250 into google to see the TW with the fuel injected 250 engine.
:drool: Even if they chop off some of the show doodads, the basic core improvements to the beloved TW200 would create another 25 year affair. Add an oil cooler and go.
r80rt
Dirt Road Nomad
I just put a Lizrdbrth oil cooler on my TW, I love it!
http://tw200forum.com/index.php?/topic/10-tw200-engine-oil-cooler/

http://tw200forum.com/index.php?/topic/10-tw200-engine-oil-cooler/

Last edited:
Similar threads
- Replies
- 1
- Views
- 1K
- Replies
- 0
- Views
- 820
- Replies
- 4
- Views
- 2K

