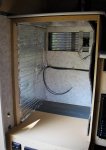
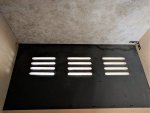
So lets move on to the build part of this little project!
The plan was simple enough: build a sliding tray that holds the Engel. When I wanted something out of the fridge, I slide it out, get what I want, slide it closed. How hard can that be? Oh ya, as long as I'm at it, I may as well surround the Engel with an insulated box to reduce heat transfer. How am I going to do that?
Hmmm . . .
Okay, the easy stuff first. What am I going to use for slides so the fridge will roll and perhaps just as important, lock closed? Back to my new favourite industrial supplier, the folks that supplied the Southco latches for the Tundra platform. There slide expert (of course they would have one of those) recommended Accuride 9308 Lock-in/Lock-out slides. This turned out to be good advice but I'll get to that latter. While these can be purchased with just one of the slides locking, he strongly cautioned against it for mobile applications. Apparently the racking caused by vehicle movement puts undo wear on the slides . My concern was how to release the latches on both slides without turning myself into a contortionist. Again, I'll get to that in a bit. These slides have a 300 lb rating in mobile applications (500 lbs in stationary ones!). More than double what I ever expected to subjected them to and these rating are when the slides are open. I would always be moving with them closed.
On to the sliding platform and insulated box.
There is a type of construction known as 'Structural Insulated Panel' or SIP. This is gaining traction in residential and light industrial building but it has been common in aircraft and boats for decades. Basically, it is two strong skins bonded to an central spacing core. The thick core creates a hugely strong torsion box. In this case I used 1/8" Baltic birch plywood (1/4" on the fridge platform) as the skins and regular Styrofoam insulation from a big box store for the core. The Styrofoam provide the core and insulation. Each panel needed a framework to surrounding the Styrofoam so the panels could be bonded together and the fridge platform needed some additional framing to reinforce the mounting points for the fridge. I will use the fridge tray as an example of how I put this together.
I built the bottom skin and framing first then cut and fitted the Styrofoam to fill the spaces.
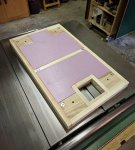
If the layout seems a bit odd, the T-nuts are for attaching the platform to the slides, the small round holes are for mounting the Engel to the platform and the large square opening lines up with a ventilation grid on the bottom of the Engel. For the tray, the framing is a lot beefier than was needed for the sides and top.
One of the issues with SIPs is whatever shape they take at glue-up is the shape they will be forever. They are very stiff and cannot be 'moosed' into shape later. I wanted all the panels to be as flat as possible so I used the table of my tablesaw as the gluing caul.
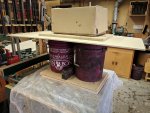
Okay, this image takes even more explaining. The SIP is actually just the wooden layer immediately above the plastic on the saw table. All the rest is weight and layers of MDF to keep the weight distributed evenly. The buckets are filled with water, the iron bar between them is just for weight and the cardboard box has a 60 lb motor in it. Creative I know but weight is weight. I used West System epoxy to glue the skins to the foam. I did a couple of tests first to make sure the epoxy would hold to the plastic foam. I works fine. The foam shredded before the glue failed. The plastic of course keeps the SIP from becoming permanently glued to my tablesaw. Once the epoxy has set the edges of the panel are trimmed and the SIP is ready for final fitting.
My collection of photos from this part of the build are a little thin. I was under time constraints. A great trip was on the horizon.
I made 5 SIPs: the tray for the fridge, the top, 2 sides and a front cover. The front cover I will explain in a minute. I dry fitted all of the SIPs in the shop before installing them in my Grandby.
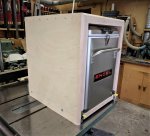
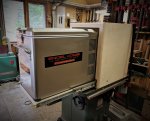
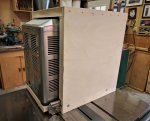
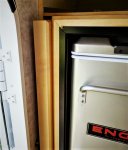
Notice in the last image that the compressor portion of the Engel is behind the SIPs. This allows for proper ventilation. The original upper outside vent and fan on the Grandby is just behind the back of the Engel and the new ventilation slots I routed in the camper (see above) are immediately below the back of the fridge. I left about 1/2" between the Engel and the sides and top of the SIPs. Not quite visible in the last image is a soft rubber gasket attached to the back edge of the SIP box that seals the gap around the fridge between the rear compressor area and the front compartments. During the installation, I built a bulkhead in the original cabinetry to seal the compressor space from the interior of the camper. Sorry no pictures of that.
Now all that was left was the final installation. That went well enough so here is what the final installation looks like.
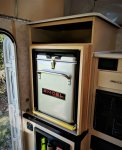

I solved the problem of the separate latches on the two slides by simply connecting them with a piece of dowel (the yellow rod at the bottom front of the fridge tray). Pushing the rod anywhere along its length releases both latches. Having lock-open and well as lock-closed turned out to be a great idea. If the camper is on a slight tilt to the left, the Engel won't slide shut until I release the latch.
So that only leaves the front cover.
I decided to build an insulated and removable from cover to both add extra insulation as well as extra security to insure the Engel won't fly out while crashing down some two-track if the catches on the slides released for some reason.
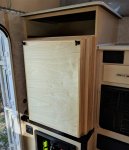
The cover is held by two pins that lock into the bottom aluminum angle below the fridge tray and two threaded screws visible in the top corners. Remove the screws and the cover lifts off.
I only use the cover when I'm travelling and at night to reduce electrical consumption. There was just enough room on the left side of the cabinet to slide the over into for out-of-the-way storage.
So, after a 3 week road trip, how did it all work out.
First, did I meet my energy goals? I have two 100 w solar panels flat on the roof and two 90 amp/hr AGM batteries in the Grandby. I did a test before I left on my trip (even in retirement, always the scientist). I put two 4 litre milk jugs in the fridge part of the Engel and two frozen 2 litre milk jugs in the freezer to act a thermal reservoirs. The freezer was set to -8 C. Then I let the unit run for a week. During the week there were 3 sunny days, 2 slightly overcast day, 1 completely overcast day and 1 rainy day. Where the camper was located, it was shaded for about 3 hours in mid afternoon. This was in late July so the sun was still pretty high. At the end of the week, the batteries still had a 75% charge. Now the fridge was the only thing running but I don't have a lot of electrical toys with me when I travel. The only other heavy consumer of power when its cold would be the furnace. So the fridge build does meet my expectations. I am more than happy with the energy outcome.
Second, is the Engel less convenient than the old upright Dometic? It first I thought it would be. I expected to have to hunt for everything I wanted and everything I wanted would be at the bottom of the Engel. However after a couple of days, I figured out a routine. By the end of the trip, I had convinced myself that there was virtually no difference in convenience. They were different to use but effectively the same, at least for me.
Third, was the build perfect? Not quite. The Engel fridges use a Sawafuji motor which has an oscillating armature rather than a spinning one. Effectively, the armature vibrates back and forth. When I had it running in my shop, I could hardly hear it. In the new cabinet in the camper, it was noticeably louder. The vibration is causing the SIP panels to vibrate as well which amplifies the sound. I am going to have to do some searching and find sound-deadening panels. This will be a bit of trial and error process but I don't think it is insurmountable. I do like my peace and quiet.
Anyway, I'm pretty happy with the way this turned out.
What is next?
This summer I will replace the fuses with a panel of circuit breakers. I had fuses but that's another story.
Thanks for following along.

