You are using an out of date browser. It may not display this or other websites correctly.
You should upgrade or use an alternative browser.
You should upgrade or use an alternative browser.
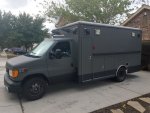
From Fire Rescue to Fly Fishing
- Thread starter bgflyguy
- Start date
OverlandFT
Well-known member
Looking good!
bgflyguy
Member
Thanks!
Looking back through the pictures, one of the first things I did was add a backup camera and new radio.
I went with a generic android unit and have been pretty happy with it. It runs torque pro, google maps, and seems good enough for me. It has GPS and an external mic too.
I don't like the back up camera i got though. I had thought I would mount it at the tag through the aluminum, but instead I have it sitting on a light at the top looking down. It's not very waterproof and fogs up sometimes. I think it was < $20 though so I'll replace it with a nice unit now that I know what I want. I tied it in to my rear scene lights, and added a switch on the dash that turns it on. I like that, because rear visibility is pretty bad during traffic.
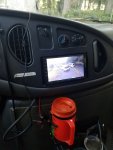
The double din units don't fit perfectly. I had to use a Dremel to cut out the top lip. Oh, and the antenna is on the wrong side and is actually too short. I had to buy a short extension. It was pretty easy to run the cabling through the module and cab though.
I started roughing out the interior. I don't really plan to change too much, I just want to add enough to make it comfortable. It would be nice to strip it down and rebuild, but I don't have the time for that right now.
I added a small table to support working remotely.

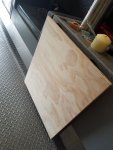
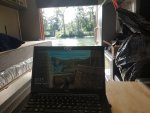
I started with V1 on the bed too. I have two mattresses for a queen, but I want them to be a bench the rest of the time. I tried building swing out supports, but they are a little wobbly and require some additional supports. It's nice doubled up as a single right now though.


I need to upholstery and add velcro so it's a bench when not made out. I'm waiting on the final design before doing that though.
I also bought a bunch of kit to keep me connected. I went with the WeBoost Reach, and finally broke down and got a MiFi from sprint. The Mifi has a MiMo antenna, and should work better than the WeBoost for data. Honestly, I've been pretty disappointed with all of it. I don't think they handle roaming and 3g very well. I don't have antennas mounted, so I'm holding off on writing it all off, but so far it hasn't been much better than just my cell. I also tried a Moto-G Power on GoogleFi and it was also disapointing. Any antenna recomendations? Is AT&T any better? I also got some 12v chargers for the laptops. I figure it will be a lot more efficient than going through an inverter all the time.
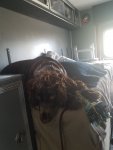
Looking back through the pictures, one of the first things I did was add a backup camera and new radio.
I went with a generic android unit and have been pretty happy with it. It runs torque pro, google maps, and seems good enough for me. It has GPS and an external mic too.
I don't like the back up camera i got though. I had thought I would mount it at the tag through the aluminum, but instead I have it sitting on a light at the top looking down. It's not very waterproof and fogs up sometimes. I think it was < $20 though so I'll replace it with a nice unit now that I know what I want. I tied it in to my rear scene lights, and added a switch on the dash that turns it on. I like that, because rear visibility is pretty bad during traffic.

The double din units don't fit perfectly. I had to use a Dremel to cut out the top lip. Oh, and the antenna is on the wrong side and is actually too short. I had to buy a short extension. It was pretty easy to run the cabling through the module and cab though.
I started roughing out the interior. I don't really plan to change too much, I just want to add enough to make it comfortable. It would be nice to strip it down and rebuild, but I don't have the time for that right now.
I added a small table to support working remotely.


I started with V1 on the bed too. I have two mattresses for a queen, but I want them to be a bench the rest of the time. I tried building swing out supports, but they are a little wobbly and require some additional supports. It's nice doubled up as a single right now though.


I need to upholstery and add velcro so it's a bench when not made out. I'm waiting on the final design before doing that though.
I also bought a bunch of kit to keep me connected. I went with the WeBoost Reach, and finally broke down and got a MiFi from sprint. The Mifi has a MiMo antenna, and should work better than the WeBoost for data. Honestly, I've been pretty disappointed with all of it. I don't think they handle roaming and 3g very well. I don't have antennas mounted, so I'm holding off on writing it all off, but so far it hasn't been much better than just my cell. I also tried a Moto-G Power on GoogleFi and it was also disapointing. Any antenna recomendations? Is AT&T any better? I also got some 12v chargers for the laptops. I figure it will be a lot more efficient than going through an inverter all the time.

bgflyguy
Member
I haven't had much of a chance to have any epic fishing getaways, but I have managed a little bit of adventure. Mostly day trips here an there, and then a journey from WA to TX. It's all been pretty uneventful, but it's helped me feel out what I need. I definitely need heat and AC for sleeping. I wasn't too worried about AC, but the if I'm going to be using it in Texas, it's not really even an option.


bgflyguy
Member
I also added a fridge, or "electric cooler" I was looking at the dometic stuff, but they did some stupid stuff I really didn't approve of and didn't act like their fridges were almost double what they should be. So I do what I have been doing lately and bought a cheap fridge to see if I liked it. I got it from costco who has always had excellent customer service.
This is even cheaper than a Yeti 45:
I ran it in my house and it was something like 1kw for a week with access a couple of times a day to grab drinks. I don't recall exactly, but it was good enough for my needs.


I read a lot of reviews about everyone liking external access for the cooler, so I thought it would work well here on the slide out shelve. It does okay, but it kind of sucks accessing it from inside. I haven't changed it, but I may do something different down the road. I also cut a hole in the back of the cabinet to install a fan. I have a giant box of old PC/server fans of all shapes and sizes, so I used a hole saw and cut a hole I thought would be an appropriate size. It turned out I didn't have all shapes and sizes, so I'll need to get a small 12v fan for that. It does get toasty on a hot day if I'm not running the AC.
This is even cheaper than a Yeti 45:
I ran it in my house and it was something like 1kw for a week with access a couple of times a day to grab drinks. I don't recall exactly, but it was good enough for my needs.


I read a lot of reviews about everyone liking external access for the cooler, so I thought it would work well here on the slide out shelve. It does okay, but it kind of sucks accessing it from inside. I haven't changed it, but I may do something different down the road. I also cut a hole in the back of the cabinet to install a fan. I have a giant box of old PC/server fans of all shapes and sizes, so I used a hole saw and cut a hole I thought would be an appropriate size. It turned out I didn't have all shapes and sizes, so I'll need to get a small 12v fan for that. It does get toasty on a hot day if I'm not running the AC.
bgflyguy
Member
During all of this, I've also added 800w solar and 560ah of LFP batteries.
This is generally what I'm going for:
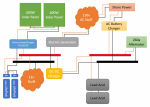
But I still don't have a DC-DC charger or the AC circuit hooked up to the house battery.
I went with Jinko cells from Santan solar. They have great prices, but it's hard to justify shipping cost for 2 panels. However, they offer to ship to the carrier and do a pick up for a lot less. Good thing, I have a lot of room to haul things around.
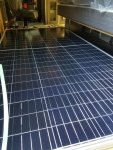
These were brand new residential panels in perfect shape. @ $200 for a 400w panel I had to give them a shot. I would highly recommend going this route if you have the space. I wanted to keep half my roof free for an old Old Town canoe I have, so I only went with 2 panels. They take up a little less than half, and I could easily add two more if I wanted.
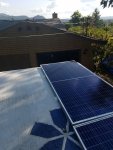
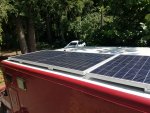
Well, I don't use 4kw of power a day, so they have been completely overkill so far. I'm thinking about trying to add in an air conditioner to use up some of the extra power during the sunny season. I hate the thought of all that power going to waste. it's pretty much just lights and a cooler right now. I'm adding an induction burner stove too, but I wont use it all that much.
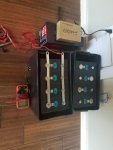
For the batteries, I went with Eve LFP280ah cells from China. I ordered them from Dongguan Lightning New Energy Technology Co. off of Alibaba. There are a lot of threads over on diysolarforum about these, but it's always a chance getting stuff from China, especially spending that much.
I received 8 cells in good condition measuring very close at resting voltage.
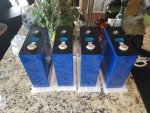
I didn't have time before my trip to Texas to build out both batteries, so I just built one.
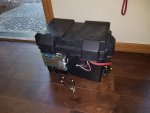
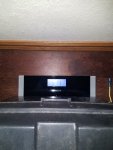

It's super easy to do, but a lot more finicky than just buying a built out battery. All during the trip I kept having a single cell tripping the high voltage cutoff during charging. It wasn't the same cell, so I'm hoping I can put it all together a little better using better lugs and busbars as well as doing a top balance. I'm adding some support for the batteries and balancing all 8 cells. Ultimately I will have two batteries for 560ah @ 12v.
This is generally what I'm going for:

But I still don't have a DC-DC charger or the AC circuit hooked up to the house battery.
I went with Jinko cells from Santan solar. They have great prices, but it's hard to justify shipping cost for 2 panels. However, they offer to ship to the carrier and do a pick up for a lot less. Good thing, I have a lot of room to haul things around.

These were brand new residential panels in perfect shape. @ $200 for a 400w panel I had to give them a shot. I would highly recommend going this route if you have the space. I wanted to keep half my roof free for an old Old Town canoe I have, so I only went with 2 panels. They take up a little less than half, and I could easily add two more if I wanted.


Well, I don't use 4kw of power a day, so they have been completely overkill so far. I'm thinking about trying to add in an air conditioner to use up some of the extra power during the sunny season. I hate the thought of all that power going to waste. it's pretty much just lights and a cooler right now. I'm adding an induction burner stove too, but I wont use it all that much.
For the batteries, I went with Eve LFP280ah cells from China. I ordered them from Dongguan Lightning New Energy Technology Co. off of Alibaba. There are a lot of threads over on diysolarforum about these, but it's always a chance getting stuff from China, especially spending that much.
I received 8 cells in good condition measuring very close at resting voltage.

I didn't have time before my trip to Texas to build out both batteries, so I just built one.


It's super easy to do, but a lot more finicky than just buying a built out battery. All during the trip I kept having a single cell tripping the high voltage cutoff during charging. It wasn't the same cell, so I'm hoping I can put it all together a little better using better lugs and busbars as well as doing a top balance. I'm adding some support for the batteries and balancing all 8 cells. Ultimately I will have two batteries for 560ah @ 12v.


bgflyguy
Member
Thanks, that would probably been a better place, I'm not going to do too much customization, just polishing the peices.
I've really enjoyed the build so far. I dont recall exactly how I ended up here, building out an ambulance, but it's been a great platform. I'm still finding extra features all the time. I discovered I had an engine heater during paint prep, and just now I found i have an extra air tank pressurized but not being used.
But, the wiring may still drive me mad.
bgflyguy
Member
So it's all fun and games until someone loses an eye, or in this case a transmission.
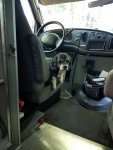
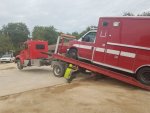
Not long after driving from WA to TX, I was headed to OK to a place where I could do the paint job. I guess the Texas heat and fast speed limits were just too much for the transmission. It went in to limp mode and left me stranded. By the time I was safely on the side of the road, the transmission was > 300F and was locked up. Ouch. A call to Good Sam and a bit of a wait had me and the pup dropped off at shop a pretty good ways away from everything. We managed to get back to where we started from, and had to push the paint trip out about 3 weeks. It's a good thing the world broke back in March and time doesn't matter anymore. A few more $s out of the bank account, and as you can tell by the previous pictures, it's back on the road.
Names have been removed to protect the innocent, but it might have been a bit heavier than it looked.
My favorite part was after getting in the tow truck and back on the road the driver asks me "Any idea how tall that thing is? There are a couple of low bridges on the way back."

bgflyguy
Member
He was good dude, and got it to the shop with no issues. I think it just surprised him a bit.
I had some cash set aside for the abominable 6.0l so it wasn't too bad, but I would have rather bought something cool. Not to mention I still might need to spend some money on the engine.
I tell everyone im glad I didn't have the older 7.3l, because you have to replace their transmissions around 120k miles.
Although, overall i'm still in it for less than some of those 7.3l go for. It was a good engine, but some people act like the pledged a blood oath to it.
I love these ads that come up pretty often, no one seems to see the irony.

bgflyguy
Member
After I had all of that sorted out, I was back on the road headed to go paint. I figured it would be a lot of work, but it was even more than that. I don't know how it took so long, but it was an endless stream of sanding and prepping.
The idea was full treatment of Raptor liner. I liked the idea of rough finish that covers up all the bumps and imperfections. I knew it would be hard enough to just get it ready to paint without trying to do any real body work.
We painted the door frames with a rattle can, as I assume those will be beat up no matter what. I wanted something that was easy to touch up and could go on in small quantities. I knew it was a bit of a learning process so I wanted to do them one at a time(slow choice #1 ?).
Anyway, it worked well and looks great, but we will have to see how often I have to touch it up.


Next up was the all the shiny bits, and the "rocker panel" I bought some Alumiprep and Alodine to convert and prep all of the aluminum. It didn't work as well as I had hoped. Even after a wire wheel and a good soak in the Alumiprep, it was hard to get a nice even gold finish with the Alodine. Hopefully it was enough to stop the corrosion. I also used the U-POL Grip#4 very liberally before spraying the Raptor liner.


I think if I ever did this again, I would stop right there. It looked good, and it took away from the ambulance paint theme enough to not scare people when I drive into a neighborhood. I think what I ended up with is much nicer, but jeez prepping the full thing was a lot of work.
I cheated a bit on this whole process, as my dad used to paint houses. I got him to do the actual spraying, and he kept things nice and even. We came across a welder who had raptor lined his work truck, a few days before the actual spray. His lines were rough, and it scared me. So for the lines we bought automotive tape, and pulled them wet. Oh, and we sprayed them with the Grip#4. Everything came out clean. Even the Raptor on Raptor lines.
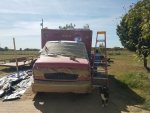
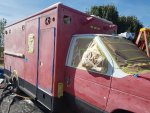
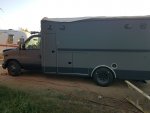
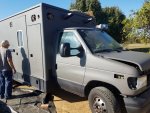


We ended up using 4L of black and 12L of Gray. I used PPG omni for the tint, and it was pretty reasonable and easy to work with. I think if we would have had more time and material, 16l of gray would have been perfect. There are a few imperfections and places I'm not quite 100% on, but I'm not going to point those out. Overall it's much better than I would have thought.
The only problem I have right now is it's no longer just a beater I bought at an auction. With the $$ for the transmission and the time for the paint, I'm committed.
The idea was full treatment of Raptor liner. I liked the idea of rough finish that covers up all the bumps and imperfections. I knew it would be hard enough to just get it ready to paint without trying to do any real body work.
We painted the door frames with a rattle can, as I assume those will be beat up no matter what. I wanted something that was easy to touch up and could go on in small quantities. I knew it was a bit of a learning process so I wanted to do them one at a time(slow choice #1 ?).
Anyway, it worked well and looks great, but we will have to see how often I have to touch it up.


Next up was the all the shiny bits, and the "rocker panel" I bought some Alumiprep and Alodine to convert and prep all of the aluminum. It didn't work as well as I had hoped. Even after a wire wheel and a good soak in the Alumiprep, it was hard to get a nice even gold finish with the Alodine. Hopefully it was enough to stop the corrosion. I also used the U-POL Grip#4 very liberally before spraying the Raptor liner.


I think if I ever did this again, I would stop right there. It looked good, and it took away from the ambulance paint theme enough to not scare people when I drive into a neighborhood. I think what I ended up with is much nicer, but jeez prepping the full thing was a lot of work.
I cheated a bit on this whole process, as my dad used to paint houses. I got him to do the actual spraying, and he kept things nice and even. We came across a welder who had raptor lined his work truck, a few days before the actual spray. His lines were rough, and it scared me. So for the lines we bought automotive tape, and pulled them wet. Oh, and we sprayed them with the Grip#4. Everything came out clean. Even the Raptor on Raptor lines.


We ended up using 4L of black and 12L of Gray. I used PPG omni for the tint, and it was pretty reasonable and easy to work with. I think if we would have had more time and material, 16l of gray would have been perfect. There are a few imperfections and places I'm not quite 100% on, but I'm not going to point those out. Overall it's much better than I would have thought.
The only problem I have right now is it's no longer just a beater I bought at an auction. With the $$ for the transmission and the time for the paint, I'm committed.
Last edited:
OverlandFT
Well-known member
Looks like your Raptor liner turned out great. I had trouble with the Raptor, but it mostly came down to my inexperience and weather. It didn't help that I sprayed it on the hottest day of the year (117 F). I started early, but it was still hot and getting breezy around the second coat. Mine turned out a bit blotchy. I ended up respraying two coats (6L) a couple weeks ago and went much, much better. You're right about the prep work though and I couldn't imagine doing the process again from scratch.
Could you see insulation when you pulled the emergency lights?
Could you see insulation when you pulled the emergency lights?
bgflyguy
Member
It's mostly styrofoam, and it's in most places. it's not up top on the front or back though. I added some random insulation there, but will have to come back with something better.
Why do you ask?
We were fighting wind and humidity. We had a couple of windows to spray and hit them perfectly. It was a lot of luck.
Why do you ask?
We were fighting wind and humidity. We had a couple of windows to spray and hit them perfectly. It was a lot of luck.
Similar threads
- Replies
- 2
- Views
- 784
- Replies
- 15
- Views
- 3K

