From Freightliner ambulance to RV - we hope!

rossvtaylor

Adventurer
I love your tires!

Thank you. We are quite pleased with them. We looked at the much more expensive Michelin, but thought these were worth a try. They're rated for 80 mph and seem quite well built. They ride well on the freeway and worked well for us on our trail explorations, so far.

These aren't nearly as beefy as the military surplus tires, like those Ozrockrat has on his rig. And when I see his tires I get a bit of tire envy. But, for our use, these were the right choice and I'm quite pleased with them - especially for the cost.

BTW, these are Dynacargo brand and we got them from Simple Tire, online. I have no affiliation with either brand, but have been pleased with the experience. The tires were delivered quickly, via a FedEx freight truck.

Ross
 

rossvtaylor

Adventurer
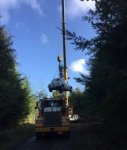
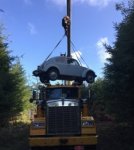
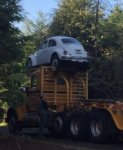
I saw a lifted VW bug this week!

I do enjoy my work, sometimes...

Screen Shot 2016-12-01 at 10.29.33 PM.jpg
Screen Shot 2016-12-01 at 10.30.02 PM.jpg
Screen Shot 2016-12-01 at 10.30.23 PM.jpg

The founder of this crane company bought that bug, new, back in 61 and ever since it's ridden around on the top of that support truck, so the crane operator and rigger/s had local transportation. Very cool!
 

patoz

Expedition Leader
wow_T.png
 

Ozrockrat

Expedition Leader
My only "complaints" were that the rig didn't have cruise control (more on that in a moment...)

Now, about that cruise control... you can all laugh at me... Kara sure did...

During the vehicle orientation at Global Emergency Vehicles, they showed me the buttons on the dash and how they worked. They pressed one button to its "on" position, then hit "set" on the other button and the engine went into high idle. I knew the reason for this, but they were great about explaining its purpose (to keep the batteries charged while parked at a scene, with all the stuff running). Now, that first button is labeled "CRUISE" and the other one is labeled "SET/RESUME." I just assumed they had re-purposed the cruise control buttons for this function. Well, I drove for 1200 miles, cramping my calf and foot on the accelerator while bouncing in the air-ride-but-not-dampened seat. Finally, I'd had enough and thought I'd see if the "high idle" function would keep me at cruise speed. I'm embarrassed to admit that the normal cruise control functions work just fine. Everything... push the button one way to increment up 1 mph, the other way to reduce speed... resume function... all of it. So, I kicked myself in the bouncing *** and cruised along the next 1200 miles in cramp-free comfort. It made the driving so much more enjoyable.

Well I hate to admit it after all the "cruise control" envy I have had. But I can now relate to how you were feeling. When I picked up the truck in Florida the first place we went was to Freightliner and I bought the most expensive set of cruise control switches around. 2 switches were about $80 but the extra $500 for a throne for the princess really stung the wallet.

So I didn't get time to install them before heading off or along the way but I did put them in their correct place so I didn't lose them.

During this week I finally opened the dash and in about 2 minutes I had them connected.

Today I got the guru with the diagnostic computer to drop by my place to "turn them on".

That's when I found out they were already configured and working.

So in summary 2500 miles of calf cramping agony and a $100 service call that could of been avoided by a 5 minute bit of work on day 1.

Now I won't kick myself in the bouncing ******** but I do think I should at least slam my male appendage in a car door for being so intellectually challenged.
 

rossvtaylor

Adventurer
Thanks for the story, Oz. I'm not laughing, honest... Actually, I'm just glad I'm not alone in the cruise control head smacking!

I've been pretty busy with travel and business stuff here. And, it's snowed twice recently. So, we haven't made much progress on the build. But, that didn't stop us from acquiring more parts. The newest addition is a KLR 650, to ride on the rear bumper. I'll pick it up on Jan 8th and post some pics then.

Merry Christmas to you all.

Ross and Kara
 

patoz

Expedition Leader
Bevan, did you ever get that O2 level alarm straightened out? I'm just curious to know whether that little circuit Bob and I built worked.


Merry Christmas and a Happy New Year to you guys!

fireman.jpg
 

rossvtaylor

Adventurer
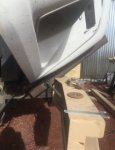
Well... after the holidays and the rush at our business, and the snow or rain, and a welding project for a friend, (and a bit of a fall down some stairs), I had a clear day at home today to work on the ambulance. Today's project was the elk guard (or, for Ozrockrat, the roo guard). Since these trucks have a front-tilting hood, the guard needs to pivot forward. I've seen lots of them, and taken many a screenshot to save a few favorites. In the end, I went simple.

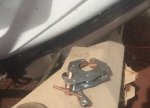
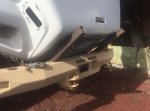
The uprights are 2x3 inch quarter-inch-wall box tube with 3/4-inch steel pipe welded through them, for the pivot bolt. I did a bit of positioning, with some rebar as a pivot point, to find the right spot that allowed the hood to tilt forward.
Screen Shot 2017-01-08 at 8.18.43 PM.jpgScreen Shot 2017-01-08 at 8.19.05 PM.jpg

And, from the front, this is what the uprights look like...
Screen Shot 2017-01-08 at 8.19.25 PM.jpg

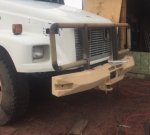
For the upper crossbar, and the side extensions, I used some 2-inch pipe we had from when we pulled a submersible pump out of our well. Yes, it's galvanized (or was, at one point) and yes I took precautions when grinding and especially welding it.
Screen Shot 2017-01-08 at 8.18.26 PM.jpgScreen Shot 2017-01-08 at 8.18.09 PM.jpg

At the point of these photos, it was just tacked together (stick, 6011) to check fit and alignment. I did need to cut a couple of welds and adjust the passenger-side "wing" and now everything lines up nicely. I finished the root pass welds and need to add the center cross piece and some mesh to protect the grill. But, at least I can see what it looks like and am getting closer to having that done. I pulled off the front bumper and can now drop the winch into its home. A little wiring and that will be functional. Then, on to the rear bumper... after this snow storm we're expecting passes by.
 

Ozrockrat

Expedition Leader
Thanks for the story, Oz. I'm not laughing, honest... Actually, I'm just glad I'm not alone in the cruise control head smacking!

I've been pretty busy with travel and business stuff here. And, it's snowed twice recently. So, we haven't made much progress on the build. But, that didn't stop us from acquiring more parts. The newest addition is a KLR 650, to ride on the rear bumper. I'll pick it up on Jan 8th and post some pics then.

Merry Christmas to you all.

Ross and Kara

OK where is the photos of riding the KLR in the snow. :roost:
 

guidolyons

Addicted to Gear Oil
The uprights are 2x3 inch quarter-inch-wall box tube with 3/4-inch steel pipe welded through them, for the pivot bolt. I did a bit of positioning, with some rebar as a pivot point, to find the right spot that allowed the hood to tilt forward.

Is it pivoting at spot of the Rebar? You going to rubber bush it or just do a straight pin in da hole?

Pivot is 3/4" pipe. Rebar was mock up.:snorkel:
 

Forum statistics

Threads
188,007
Messages
2,901,023
Members
229,320
Latest member
SMBRoamer
Top