From Freightliner ambulance to RV - we hope!

Ozrockrat

Expedition Leader
OK I found the tools to use. These ones

And you can have a sideline job checking motorcycle rims for cracks.

4753_7482_15.jpg
 

rlrenz

Explorer
Another option would be to see if you can find someone who tests boilers and pressure vessels. They should have a "Sono-ray" ultrasonic thickness meter, and it might work on an aluminum structure like an ambulance body.

Or, you could check out EBAY (http://www.ebay.com/sch/i.html?_from=R40&_trksid=m570.l1313&_nkw=ultrasonic+thickness+meter&_sacat=0), and buy your own.

ultrasonic gauge.JPG

I used to use one when I inspected boiler steam drums for the power company. It should work OK on the aluminum skin (with a coupling gel), but I don't know what it would do with the welded junction between the skin and the 2x2 tubes. It would probably just show the skin thickness until you got to one of the skin/tube welds.
 

Ozrockrat

Expedition Leader
Wow!! The first lot of ultrasonic thickness testers I bought were over $5,000 ea. Bob's right, everyone should have one in their toolbox. Not sure what for but surely we have a use for it.
 

rlrenz

Explorer
Plus, your chances of ever borrowing one in those $5000 days was right about -0-. I don't have one --- yet. But one might find its way to my tool box one of these days.
 

rossvtaylor

Adventurer
A bit of progress...

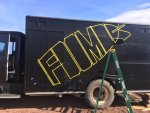
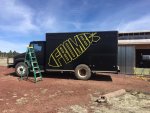
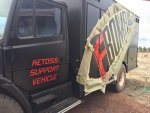
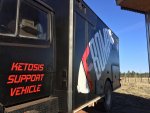
We used a projector to lay the FBomb logo image on the side, for the masking. The door text was done with stencils, cut by a place in California... www.decalboy.com - they did a nice job on those stencils and shipped them super fast. And they were pretty reasonable, I think.

keto1 taped.jpg
keto1 taped_1.jpg
keto1 paint started.jpg
 

rlrenz

Explorer
Another option would be to see if you can find someone who tests boilers and pressure vessels. They should have a "Sono-ray" ultrasonic thickness meter, and it might work on an aluminum structure like an ambulance body.

Or, you could check out EBAY (http://www.ebay.com/sch/i.html?_from=R40&_trksid=m570.l1313&_nkw=ultrasonic+thickness+meter&_sacat=0), and buy your own.

View attachment 396565

I used to use one when I inspected boiler steam drums for the power company. It should work OK on the aluminum skin (with a coupling gel), but I don't know what it would do with the welded junction between the skin and the 2x2 tubes. It would probably just show the skin thickness until you got to one of the skin/tube welds.

I did some digging, and it turns out that the low priced ultrasonic thickness gauges can't handle a paint film on top of metal - all they would show is the paint film thickness. If you want to measure the total thickness of painted metal (and hopefully see the location of the framing), you need to pony up about $600 or so for a more sophisticated meter - Amazon has several with this capability.

Darn!
 

rossvtaylor

Adventurer
All those techy gadgets look fun! But, I'll stick with the "remove an interior light" option. I didn't get to the part which required finding the roof tubes. This painting thing took longer than expected... but, doesn't everything?

I'll post some photos of some of the other less-sexy things I did, too, but here's what the logo looks like with the masking removed. I'm pleased!

KETO1 painted.jpg
 

rlrenz

Explorer
WOW! Lookin' fancy!

It goes to show what you can accomplish with a few cases of paint and a few hundred hours of labor!
 

rossvtaylor

Adventurer
Hey Ross,

First off let me apologize in advance if this post of mine "ruffles your feathers"!

Ha! No offense at all. In fact it's a good reminder and cautionary tale for others. But we have a commercial vehicle policy on this and it's registered under the business. So they know that there are logos and it's insured for that use.

Certainly, however, if you have logos on a vehicle under a private insurance policy that could pose a huge problem. So your advice is Wise.

Thanks much,

Ross
 

rossvtaylor

Adventurer
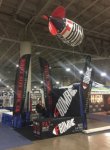
We're in Salt Lake City... this was the first "long" trip with the rig since the new tires/wheels were installed. The thing did great! We're really pleased with the drivability of it and we got 10.5 mpg, from Flagstaff to SLC. Here are a few trip and event pics, which might better explain the black paint and the logo. It all fits together...

Screen Shot 2017-04-22 at 8.04.38 AM.jpg
Screen Shot 2017-04-22 at 8.04.57 AM.jpg
Screen Shot 2017-04-22 at 8.05.26 AM.jpg
Screen Shot 2017-04-22 at 8.06.15 AM.jpg

The backboard cabinet (the tall one, at the front of the box on the driver's side) is perfect for the 200 cubic foot helium tank for the blimp. This is, really, the perfect platform for our needs and we're so glad we went the ambo route.
 

rossvtaylor

Adventurer
Well, it's been electrical play time. We drove to Salt Lake City with the winch installed, but not connected. Granted, we never went (far) off road and this was a highway trip... but still, I hated having it half done. So, I got that done and made lots of progress in the cab.

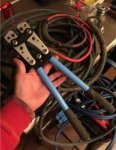
First, the winch. I removed the solenoid control box and mounted it underneath the driver's door. The 4 cables which run to the winch are #1 welding cable with marine terminal ends (which I picked up last year at a marine supply store in Oregon... far too long ago!). The terminals are crimped with a cheap crimper I got on Amazon. I've used the "hit it with a hammer" anvil crimpers and those work fine. But, damn, for under $30 delivered it's a really nice tool. Here's the link:

https://www.amazon.com/gp/product/B00MVE48Z6/ref=oh_aui_detailpage_o02_s00?ie=UTF8&psc=1

And a photo, as I was making up cables at the kitchen table...
Screen Shot 2017-05-01 at 5.35.25 PM.jpg

The cables run from the winch to the control box, mounted on a vertical panel next to some other electrical plugs - what the heck are those for? It looks like they're all blanks. Anyway, from this spot I can plug in the handheld control and sit in the cab or reach the front or stand behind the door. The control box is connected, when needed, with a plug linking it to the batteries (in the box right below this location).
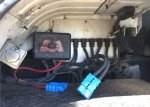
Screen Shot 2017-05-01 at 5.33.01 PM.jpg

Being able to disconnect the winch is a good idea. And, as a bonus, I have a set of jumper cables with that same connector. I'd cut the alligator clips off a set years ago and this lived in my prior Dodge truck... I could plug it in at a mating connector in the grill, where I had a winch receiver. If I need to jump someone or, worse, need a jump I can plug in and hook up. Or, better, hook up and plug in?
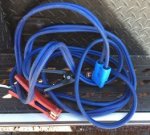
Screen Shot 2017-05-01 at 9.40.40 PM.jpg

One project done, then on to the one I've been avoiding. The center console in this rig was about 20 inches wide and probably 22 inches tall. The sidewalls, inside, were lined with terminal strips and the floor had large gauge cables and terminal blocks, the middle was a mass of wiring, and the lid had an *** ton of switches... not of all which are needed now. To put the center seat in, with some foot room, I needed to remove a lot of stuff and make what remains more compact.

Here's what remained, after removing the console itself.

<cool, scary photo goes here... but upload is barfing... I'll try tomorrow, from the office>

Clearly, those exposed terminal strips would be a problem when I make a much lower tunnel/footrest. So, I removed them and replaced them with crimp connectors which could be bundled and moved without danger of arcing. Every now and then, especially when working with wires marked with some important need (lights, ignition, etc) I powered everything up to make sure it all still worked. Better to do that as I went than to find out at the end that something didn't work.

Screen Shot 2017-05-01 at 5.33.56 PM.jpg

Then on to the switches... another mass of wires.

<photo and more to come in another post... I may have hit the limit here>
 
Last edited:

Forum statistics

Threads
188,006
Messages
2,901,018
Members
229,320
Latest member
SMBRoamer
Top