Guess who's back!?! Atl-atl's K5 Blazer + Four Wheel Camper "The Crawlin Cabin" documentation thread!

Atl-atl

Adventurer
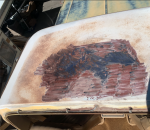
One of the last things I had to do before getting the camper back on the truck for winter camping season in the valley was repair the paint on the roof. The old section of "floor" from the cabover bed area of the camper had sagged so much from age/moisture that it was resting on the roof for some unknown but very long period of time. It had worn through the paint all the way to raw metal. Unfortunately I forgot to get a picture of the before but you can get an idea from this first picture. The areas of raw metal were not ground down by me. The red color you see is the factory primer. The white paint on top was so dried out it was literally flaking off and had texture. You can see rust/primer coming through the white paint on nearly the entire roof. Took about 20 minutes with a flap wheel and about 10 coats of spray paint to get it back in decent shape. Some day Ill have it professionally done but for now it works and Im going to use the truck.
Screen Shot 2022-11-13 at 6.51.58 PM.png
IMG_3699.jpeg
IMG_3701.jpeg
 

Attachments

  • Screen Shot 2022-11-13 at 6.51.58 PM.png
    Screen Shot 2022-11-13 at 6.51.58 PM.png
    3.1 MB · Views: 14

Atl-atl

Adventurer
After that, only thing left was prepping the piece of fiberglass I cut off the OEM top to fill the gap between the camper and the Blazer. Thankfully this has already been done by some guys over on CK5.com so I had lots of help, dimensions etc. to get started with. I proceeded to sand the cut edges flat, sand the crappy old fiberglass finish, throw some paint at it, test fit it, glue on new weather stripping, install new foam strips on the bed sides, line it up with the camper and Blazer, test fit it, drill holes yada yada yada.
IMG_3703.jpeg
IMG_3722.jpeg
IMG_3723.jpeg
IMG_3724.jpeg
IMG_3725.jpeg
IMG_3727.jpeg
IMG_3730.jpeg
IMG_3733.jpeg

It didnt go quite as smoothly as planned. My holes werent lined up as perfectly as I hoped. The camper is on the truck but its only partially bolted down. I need to unbolt it and elongate the holes in the fiberglass so its easier to take on/off and also so I can do the final sealing with silicone where the fiberglass meets the front wall of the camper since its literally unreachable when everything is bolted in place.IMG_3738.jpeg
 

Atl-atl

Adventurer
Had a little delay due to the holiday and work but last night and today I got back at it. Finally started working on the interior of the cab of the truck. Ive had the parts for months and life has just gotten in the way. Plus Flagstaff is at 7000 feet and as soon as the sun goes down it gets COLD so I cant really work at night like I used to. I did manage to get all of the trim pieces primed and painted. My garage is insulated and stays around 40-45 degrees regardless of the outside temp so thats nice and the humidity here might as well be in the negatives so paint still dries quickly. I had three different colors of trim thanks to reusing some old stuff and sourcing new stuff from various websites but a couple coats of primer and a couple coats of paint worked wonders. All of the trim is textured so it hides blemishes well and takes spray paint really well if you are patient and do multiple thin coats.
IMG_3974.jpeg
IMG_3975.jpeg
IMG_3979.jpeg
IMG_3986.jpeg
Here you can see the colors of the headliner, visors and trim. Its pretty close for all 3 coming from different places and the paint being some random brown spray paint. The trim is a little darker which Im fine with, its less apparent inside the truck. I love dark headliners and most of this truck is brown inside so it was only fitting.
IMG_3987.jpeg
The old visors were nasty, sun burnt, brittle as hell and constantly cracking just from trying to move them. The new ones did not come with the rod and spring mechanism so those had to be removed and reused which is difficult to say the least. The rod slides into a compression fitting style tube inside the visor. I wound up taking the bench grinder wire wheel to get rid of the nasty old off white paint, painting them black and coating them in white lithium to get the rods into the new visors. Worked out pretty nicely in the end.
IMG_3991.jpeg
IMG_3994.jpeg
Here is a before and after. Its hard to tell much from the pictures because the underside of the metal roof is dark red/brown primer but let me tell you, its a HUGE difference. The cab of the truck is now a cozy place to be. It feels smaller in a good way. Its also silent. Between the doubled up carpet, the new padded headliner and the darker colors the difference is amazing. It used to feel and sound like driving a tin can down the road. It almost feels modern now, almost. One thing I should mention is I accidentally ordered a truck headliner, not a Blazer one. I had a slight freakout but then realized it was too long not too short so I was able to cut about 4" off the back and fit it so nobody will ever know. Im incredibly happy with the way it turned out.
IMG_3993.jpeg
IMG_3998.jpeg
 

Atl-atl

Adventurer
Im in a bit of a pickle. Ive had the camper on the truck for a couple weeks now and have probably driven it ~100 miles. There is a serious lean to the driver side. There appeared to be a slight lean when I initially installed the suspension but I chalked it up to just needing to settle a little. Now its really bad and making me wonder if the springs are supposed to be side specific. I dont recall them being tagged in any special way or anyone ever mentioning they were side specific. Does anyone have insight into the custom ORD Alcans? Are there left and right springs? I called ORD yesterday to talk with someone and they were all busy so I left my number and never got called back. So this morning I pulled the camper off and the lean is drastically reduced but still there. I had my mind set on swapping the springs today which is a huge amount of work but now Im questioning the need for that.

Ground to fender measurements are as follows.

With the camper ON 1 3/4" lower on the driver side rear!
- Left front 40 3/4" Right front 42"
- Left rear 41 3/4" Right rear 43 1/2"

With the camper OFF still 1/2" lower on the driver side rear.
- Left front 41 1/2" Right front 42 1/4"
- Left rear 43 3/8" Right rear 43 7/8"

So the question is, has it sagged on the driver side simply from the new springs starting to break in and more weight being on that side of the truck? Or do I need to swap the springs so the driver side sits higher before the camper goes on?

Also pics for clicks, here she is flexed out for the first time with the new tires on. Definitely rubs the back of the front fenders. Time to start cutting...
IMG_4060.jpeg
IMG_4063.jpeg
 

Atl-atl

Adventurer
I decided to pass on swapping the springs and give them more time to break in and settle. Also I installed some 2.5 degree shims on the rear because I had a real slight vibration and thought my driveline angles were off. The shims made it worse so I went back to the way it was and I think simply undoing the U bolts, moving things around and reinstalling/tightening everything might have helped. Wasted about 2 hours of my Saturday evening but I guess I learned something.

Also got to work on my most dreaded project that actually turned out ok. Recovering the seats. If you recall they had horribly dried out cracking vinyl upholstery. I dont think it was factory upholstery based on the amount of hog rings when I took everything apart. At least I hope that isnt the way GM did things back in the day. I was putting off this "mod" for a long time mostly because I was concerned it would be pandoras box when the vinyl was removed. Things wound up better than expected underneath. The driver seat foam is definitely more worn that the passenger but surprisingly not bad enough that it needs to be replaced. The new driver side cover doesnt fit as well as the passenger but I aint mad about it. Anything is better than what was on before and now I can put entirely new seats farther down on the list.

The new upholstery is actually super comfy but its really light colored fabric(lighter than what I wanted) so its definitely going to need scotch guard or something like it because Ill ruin these things in no time ha!

Old crap with tape holding everything together.
IMG_4003.jpeg
Foam underneath. Frames are a little rusty but everything still functions perfectly. Normally Id take the time to sand and paint it all but these seats wont be around much longer. That pile of junk on the ground was trapped in between the seat bottom and back. #puke
IMG_4006.jpeg
IMG_4043.jpeg
IMG_4044.jpeg
They arent perfect but Ill take it for now. The wife even said "These are comfy enough Id go for a 6 hour road trip!"
IMG_4045.jpeg
IMG_4046.jpeg
I REALLY need to paint the center console now.
IMG_4051.jpeg
 

Todd780

OverCamper

Atl-atl

Adventurer
So I pulled the camper off the truck one more time to do the final sealing of the cab-to-front-wall and it went pretty well. The factory style weatherstrips worked great to seal the "filler" fiberglass piece to the cab but then there was nothing sealing the filler piece to the front wall of the camper. I decided to silicone it inside and out. Since the fit is so snug to the cabover portion I had to get creative and use a piece of brake bleeder hose on the end of the silicone tube. It worked out great and Im happy to report that I drove the truck from Flagstaff to Phoenix in horrendous wintry mix weather conditions and the seal job held up perfectly. The pop-top/canvas is another(unfortunate) story which I will have to deal with sooner rather than later which sucks because I was planning to put that off but since it wont stop raining in the desert this winter my hand is being forced by mother nature. Anyway, back to the positives, the truck looks great and drives about the same as before I did all this work but its a lot comfier inside so Im happy!
IMG_4069.jpeg
IMG_4068.jpeg
IMG_4067.jpeg
IMG_4077.jpeg
AEFB02ED-7706-46EA-9F6F-317C09F32128.jpeg
CF37E0EF-9826-49CC-8205-B2E2F2961550.jpeg
 

Atl-atl

Adventurer
Havent done much lately since the RV is taking up all my time. I have been driving the Blazer quite a lot which is fun. The other day I was pulling into a parking lot with an abnormally high curb and the wheel was turned just the right amount that it snagged the drivers 1/4 panel just behind the front tire and mangled it pretty good. So today I decided to give the front fenders a little trim. There is a lot more cancer than I expected in the space between the inner and outer fenders, especially behind the front tires, which made my trim job look pretty nasty. I did the cut and fold technique and then screwed the wheel well liner to the folded tabs of the outer fender which I tucked up behind the liner. It turned out OK but the metal is so rotten it was literally falling apart at times. Oh well, wont be rubbing now! Also took the liberty to cut off the fangs. Did the same cut and fold method. Trimmed the inner metal fender from the back side up higher than the outer painted fender and then cut slits in the outer fender and folded it over. Turned out much better than behind the tire!!
IMG_5453.jpeg
IMG_5455.jpeg
IMG_5457.jpeg
IMG_5458.jpeg
IMG_5460.jpeg
IMG_5461.jpeg
IMG_5464.jpeg
 
Last edited:

Atl-atl

Adventurer
Spent a little time on the Blazer today. The window switches have been acting up so I pulled the door panels off, sanded down the contacts and dielectric greased everything. Also the drivers door power lock switch has a broken tab but I was able to flip around the metal mount on the backside so its opposite of the compression fitting and I got it to sit snug and flush again which is cool. Wound up ordering new window switches anyway because they still arent perfect, I have to push the switches really hard up and down, I think they're on their way out after 45 years.
IMG_5749.jpeg
IMG_5750.jpeg

Work that I did a few years ago behind the door panels still looks nice n clean.
IMG_5751.jpeg

Also took the painstaking time to replace the turn signal switch and cancelling cam. My turn signals havent been working for a long time, feels oddly good to use them again hahaha. What a huge PITA it is to replace this mechanism. Special tools needed to pull the wheel and remove the c-clip. (sorry to dumb this down, its posted across multiple forums)
IMG_5753.jpeg

The white plastic piece is whats broken. This is super common in all GM steering columns. You can see the silver metal rod coming in from the left, thats the turn signal stalk. Where it attaches the plastic breaks so you can no longer select left or right with the stalk. You can see below the silver rod that the plastic is literally disintegrated. On the new one the plastic is complete around the screw hole.
IMG_5754.jpeg

The hardest part about this swap is removing the old parts and fishing the wiring/plug up through the column. There is a plastic channel the wires ride in that is super brittle and hard to get the wires out of. Mine wound up breaking in half which is fine, made it easier to get the wires and plug out. I tied a string to the plug so I could fish the new plug and wires back down the column. Old plug with string attached. Prior to doing this I couldnt believe that plug was going to fit through this column.
IMG_5755.jpeg

The 2 blue nuts and 4 blue bolts in this picture are what hold the steering column in place and also hold the wiring sheath. They have to be removed to get the wiring harness in/out.
IMG_5758.jpeg

New switch in place, you can see the new (black) plug dangling.
IMG_5756.jpeg

The hardest part of this whole process was getting the new plug, plugged in and into its holder. I actually broke the new black plastic plug in half trying to get it slotted into the metal tabs. Still works and I shouldnt have to mess with it for a looong time so I guess I dont care.
IMG_5757.jpeg

All back together.
IMG_5759.jpeg
 

Forum statistics

Threads
188,321
Messages
2,905,417
Members
229,959
Latest member
bdpkauai
Top