Halley - '17 WK2 Trailhawk Overland Build

2180miles

Endurance Adventuring
I have used handheld walk-in talkie for truck to truck... lightweight, easy, no testing or gov license needed, very simple.... if I were in a convoy, which is incredibly rare event for me, I would always be less than a mile... line of sight...

I have had 2 vehicles with built in ham radios, when it came time for convoy comms, I used the handheld Motorola walk-in talkie...

Copy that. You're lucky to roll with people that stay less than a mile and in line of sight! The group I usually do excursions with will often end up a few miles apart at different points whether I'm stopping to fly the drone for a minute, a photographer is stopping to take a shot or two, or any other misc. reason. The CBs have been an issue for us in the past with different terrain limiting their range, so we're slowly making the push for our group (usually 7-8 vehicles) to move to amateur bands.

Different strokes, obviously. Glad to hear you have a lightweight system that works for you!
 

ColinJ

Member
The group I wheel with has almost gone 100% 2-meter radio

It works out so much better if the group needs to spit up or someone runs around to scout out a branch in the trail and the quality is worth it alone. CB I was always getting annoyed at it buzzing or just randomly pickly up odd signals. The 2-meters sound like a cell phone and they have excellent handhelds these days. The only downfall is needing a license.
 

2180miles

Endurance Adventuring
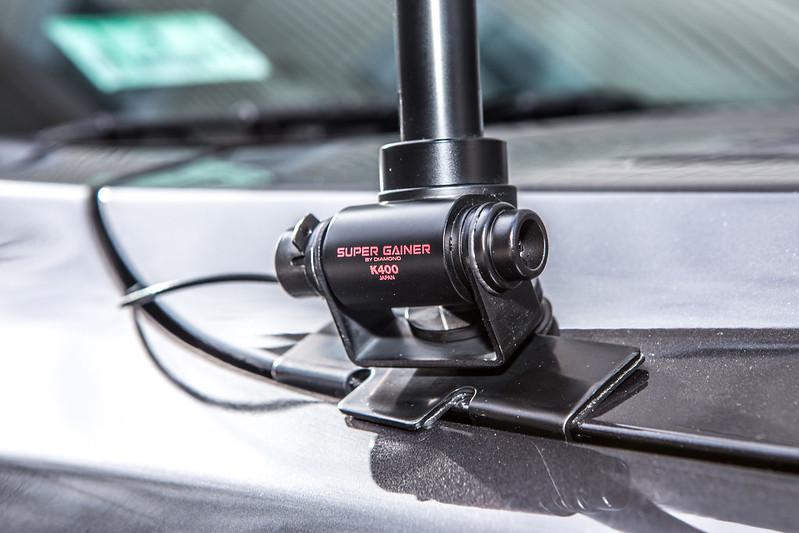
Diamond K400NMO Mount & NR72B Antenna Installation


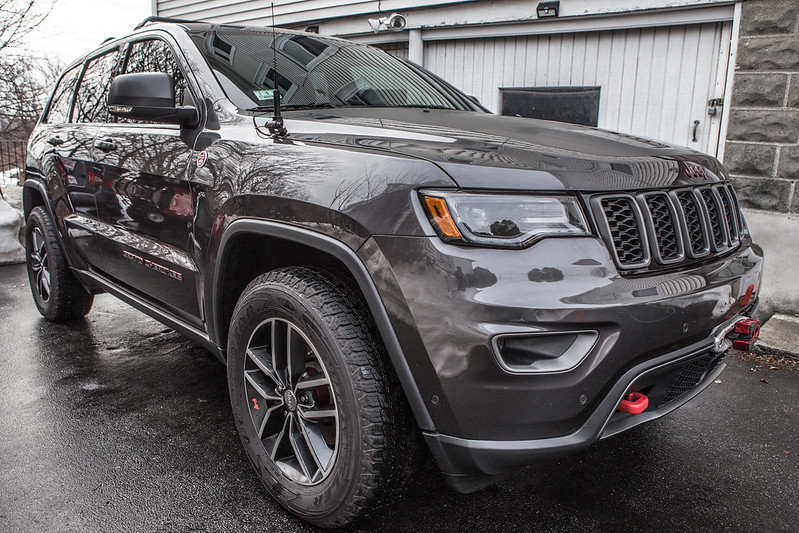
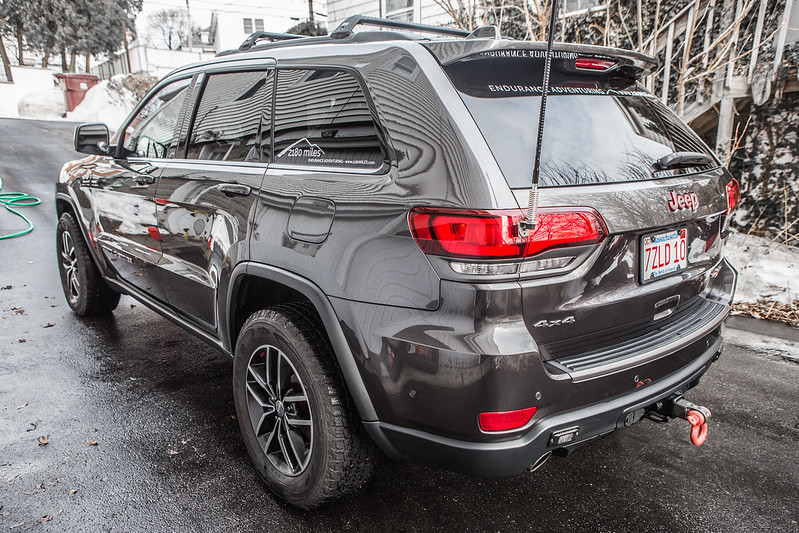
The weather in Boston has been pretty freakin' cold lately, but I finally got a break from the single digit/sub-zero temps and began the installation of my Diamond K400 mount and NR72B antenna in the WK2. Full disclosure, the photos were taken on two different days: first when the Jeep was a mess from the blizzard that had just passed, and the other after a few hours of interior and exterior detailing. Please forgive the dirty ones.

I chose the K400 mount for a hood installation as I'm not quite ready to drill into the roof, and I'm also hoping to get a RTT up there for this year, which would probably negate the ability to have a roof mounted antenna anyway. The hood may not be the single most optimal position for the antenna as far as gain and interference go, but it's clean and will be functional nonetheless. The K400 mount was recommended by a friend and allows for an unobtrusive installation wherever there's a crease in the body panels of a vehicle. It has two adjustable axis which allow to get the antenna vertical regardless of the mounting plane you put it on.

The mount comes with the necessary tools for installation, and is padded on the bottom to protect your vehicle's paint. With four simple allen key'd set-screws underneath that press a stainless steel metal bar against the underside of the mounting location, the bracket becomes secured in place. It took me a few test fittings to get the antenna perfectly vertical from all planes, but once it was aligned correctly I tightened down the adjustable axis allen heads and mounted the Diamond NR72B antenna. Standing only 14" tall, it's sleek on the hood and isn't overly obnoxious for my field of view while driving. This will be perfect for everyday use, and I'll test it on overland trips with the group... It has crossed my mind to maybe get a full 36" antenna as well for long haul trips, much in the same way I have a 3' and 5' CB on my Wrangler for when we're on trips that might separate us more. (There's no mobile dual-band radio in the TJ, just handheld)
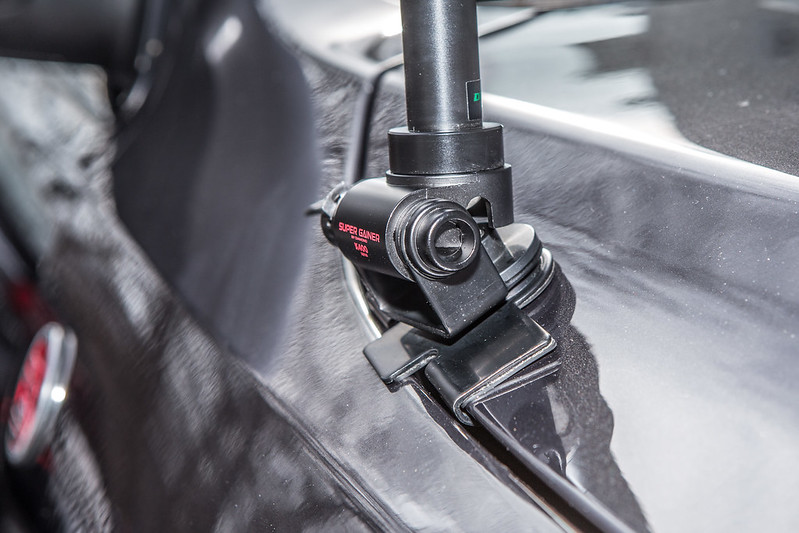


K400 NMO Mount by 2180miles


K400 NMO Mount by 2180miles


Once the antenna was mounted, I moved on to routing the supplied 13-foot coax line that came with the K400 bracket. Being spoiled by the Warn Zeon Platinum's Wi-Fi remote, I've never actually had to run cable through the firewall of the Trailhawk, so this was going to be a new adventure for me. I did some Google research and read about grommets above the gas and brake pedals, but wasn't able to locate them on this specific model. My hope was for passenger side installation, so I continued digging until I found an article referencing a grommet on the A-Pillar, passenger side of the vehicle. I pulled the necessary internal trim pieces, door sill and the kick plate on the right side of the foot-well, and located the grommet the forum was talking about. I began snaking the tiny coax through the engine bay, down behind the passenger front strut tower, through the wheel well trim, and down into the rocker panel trim piece. I then fed it up a tiny gap in the rocker trim up by the fender flare, and pulled the remaining slack through. This was no easy process, and I was constantly wishing for warmer weather, and to not be lying on the snow covered ground on my back running the cable underneath.

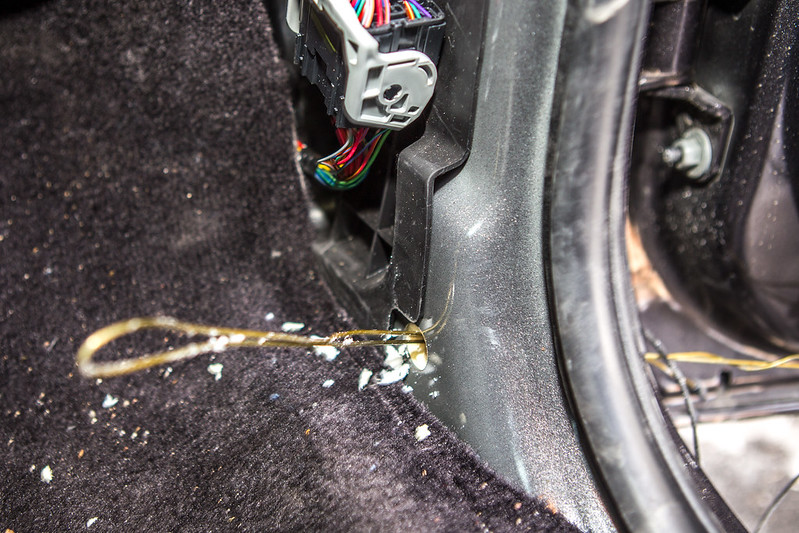
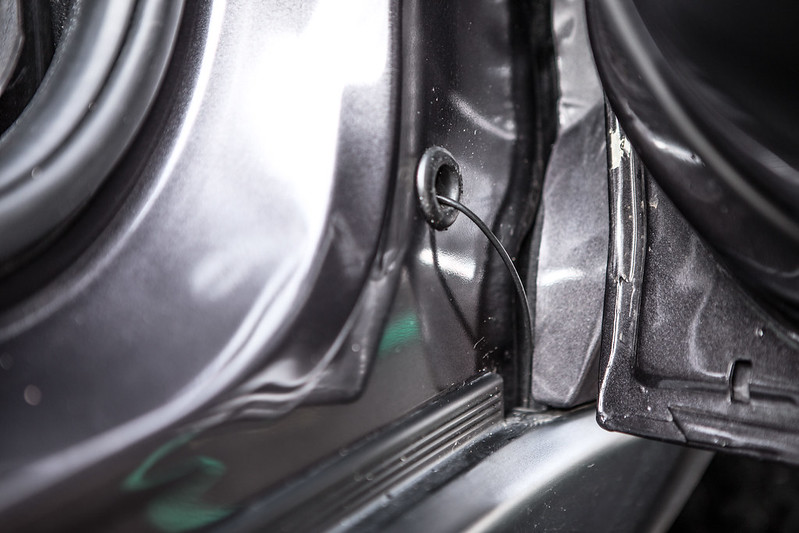
Once the cable was ready, I popped the A-Pillar grommet out of its position and drilled a small hole in it, solely large enough for the cable to get through, which required some good pressure on the tiny SMA adapter at the end to get it through the hole. Once the cable was passed through the grommet I used a coat hanger to puncture a small hole in the vehicle's insulation that was stuffed in the A-Pillar, then taped the SMA adapter to the coat hanger and pulled it back through into the cabin. I ran the coax underneath the door sill trim piece and then under the passenger seat mounting bracket, arriving at the same spot at the CB coax, directly above the battery compartment.
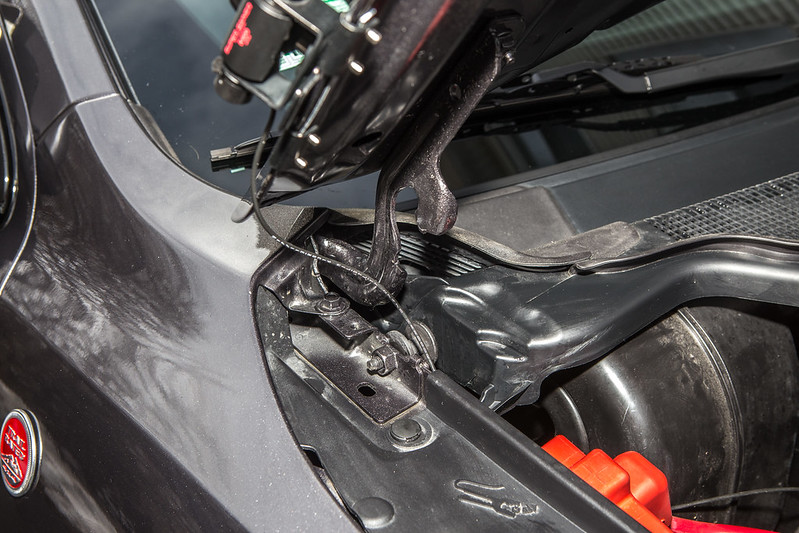


Engine Bay Routing by 2180miles


Routing Through Insulation by 2180miles
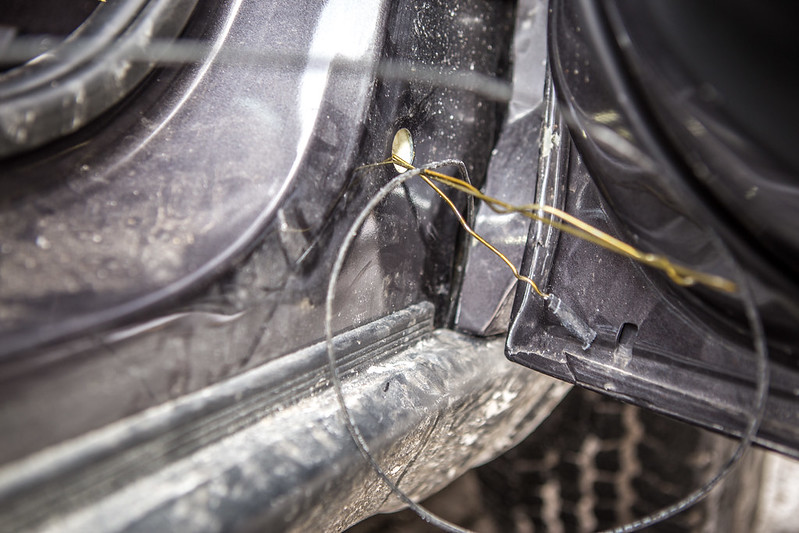

Pulling Coax by 2180miles


Door Sill Routing by 2180miles


Exterior Grommet Re-Installed by 2180miles


A-Pillar Grommet by 2180miles


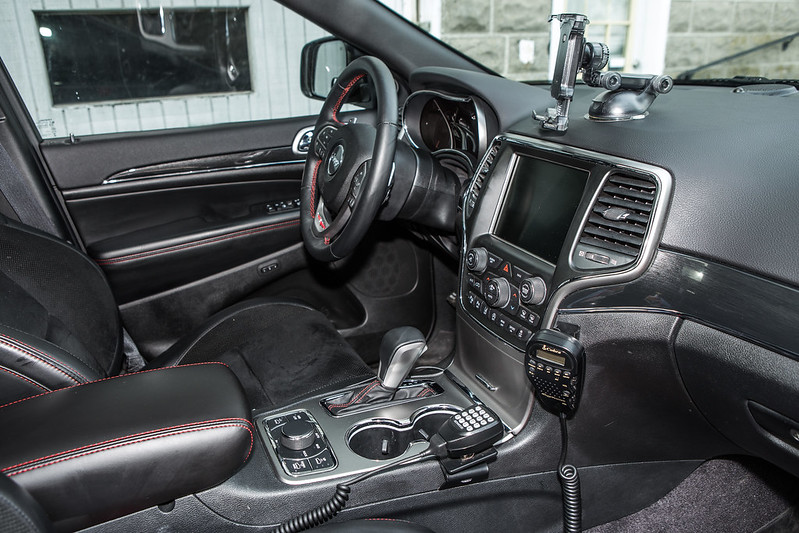
I put all the trim pieces back together, ensuring the coax was not pinched or stressed as the hood opened and closed, and set to work with moving around the comms system in the cabin. While I don't love the idea of having two transceiver mics in such a small amount of space, I'll be retaining the CB for when we do our local Jeep club runs, and the dual-band for overland trips with my more tight-knit group. I used 3M's "super heavy duty could probably hold up an elephant in an earthquake" double stick tape, and mounted a black plastic mic holder to the dashboard not far from the original mounting position. the Kenwood mic then fit into the original mic mount I made for the CB almost a year ago. It looks okay. It's fine. Dani said there's no loss to the passenger legroom, so we'll run it like this for now until I come up with something better.

In the next few days I'll get the base unit of the Kenwood installed, and then will finalize all the interior routing of cable. For now I used the 50 degree temps to detail the car and put her back in the garage to take a little vacation time.


Diamond K400/NR72B Installation by 2180miles
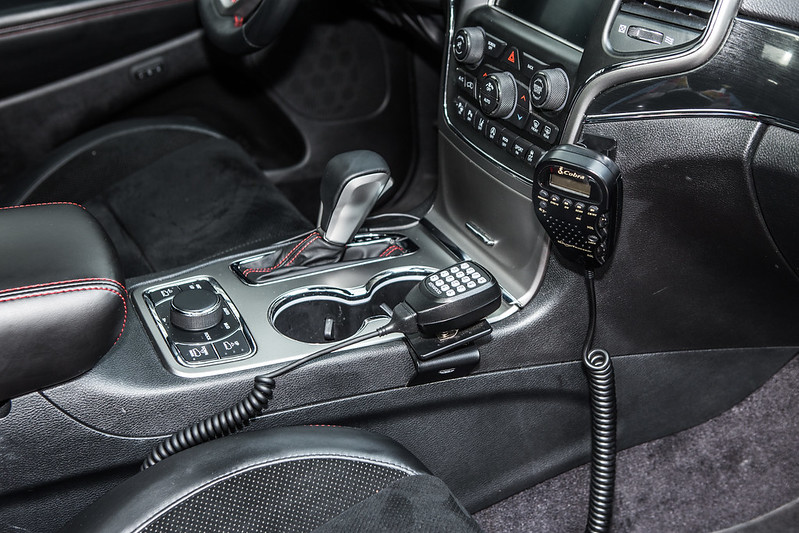

Dual-Band & CB Radios by 2180miles


Cabin Comms & Navigation by 2180miles
 
Last edited:

2180miles

Endurance Adventuring
When we left off, I had just finished installing the antenna, coax cable, and transceiver mic into the Trailhawk. Next up on the project to-do list was the installation of the Kenwood D-710G transceiver itself, as well as the head unit. After seeing a plethora of installs in WK2 Grand Cherokees with the head unit stored inside the center console cubby (i.e. where the USB charger, 12v plug, and aux input are), I decided I wanted mine to not be as hidden, and also to not be blocking anything useful like the things I listed above.

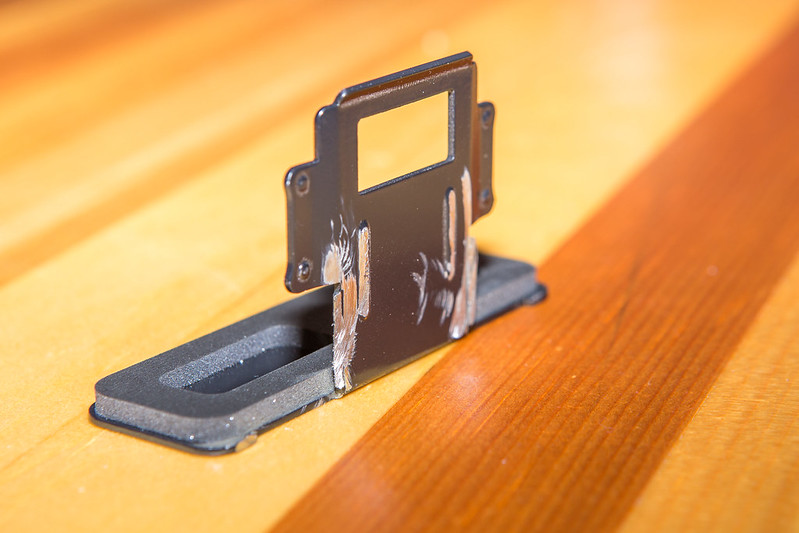
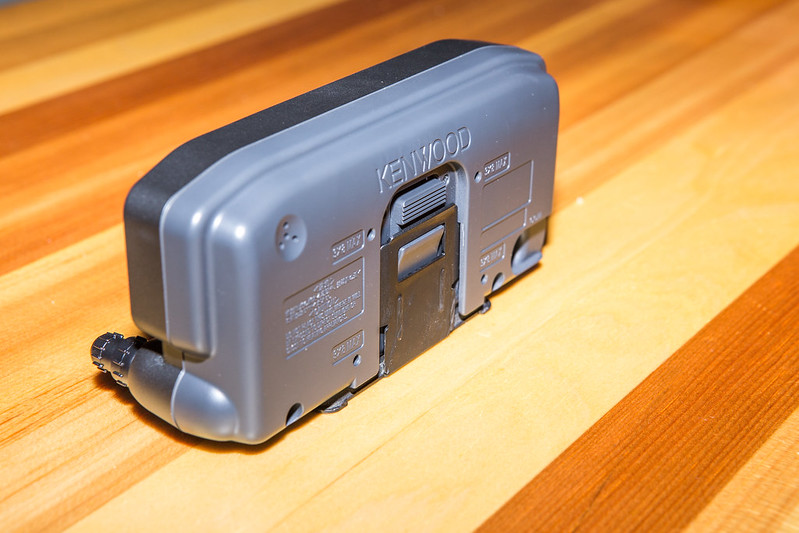
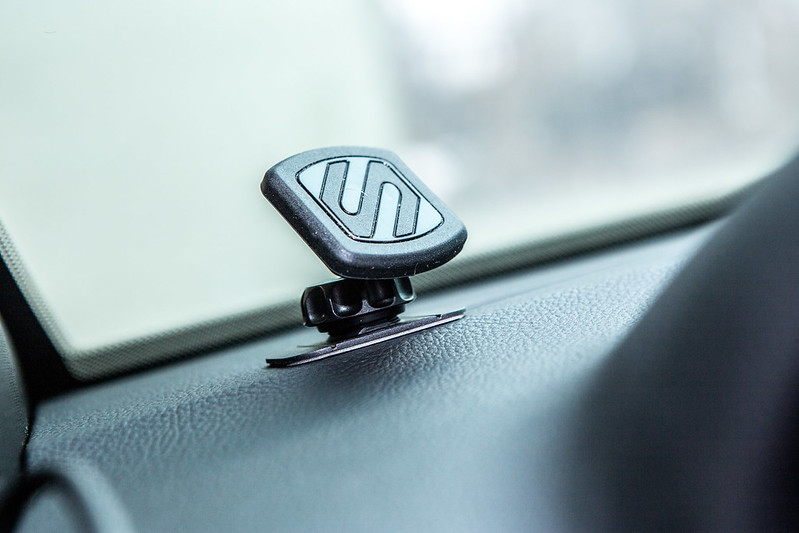
After some searching on Amazon I discovered the MagicMount universal phone mount. It's small and magnetic, with an exceptionally strong pull for whatever is mounted to it. I decided that I'd figure out a way to mount the 710 remote head to the Magic Mount and place it on the left side of the dashboard by the driver's A-pillar in the cabin. I used the supplied Kenwood remote mount, took my Dremel cut-off wheel to the two mounting/screw tabs, and made it flush across the back for the magnet portion of the mount to adhere to. I re-painted it and attached it to the Kenwood before moving on to installing the MagicMount. Sticking the mount to the dash after cleaning the area with an alcohol, I applied pressure for 60 seconds or so before letting it “cure” overnight. Once that had settled I magnetically attached the D-710G head unit and it's been holding without issue ever since.


Trimming Kenwood Bracket by 2180miles


Kenwood Bracket - Repainted by 2180miles


MagicMount Universal Mount by 2180miles


With the remote head in place I then had to connect it to the transceiver with the supplied Ethernet/Cat-6 cable. My initial hope had been to run it under the door sill trim on the driver's side, but the presence of the 6-strand cable for the auxiliary lighting switches made it too difficult to run both wires back under the front seats neatly. Slightly disappointed, I began brainstorming other solutions.

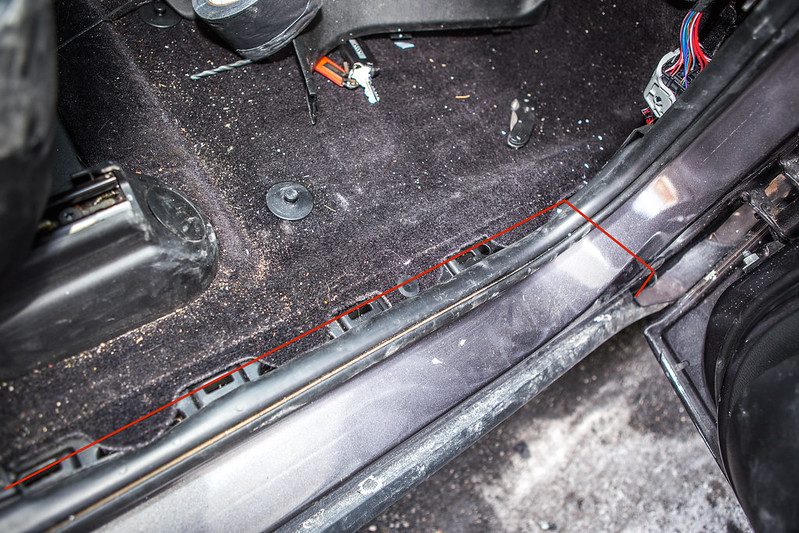
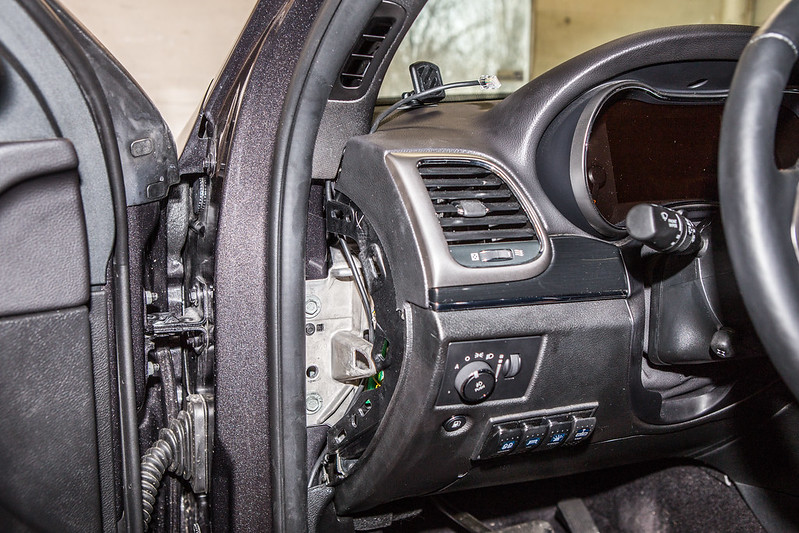
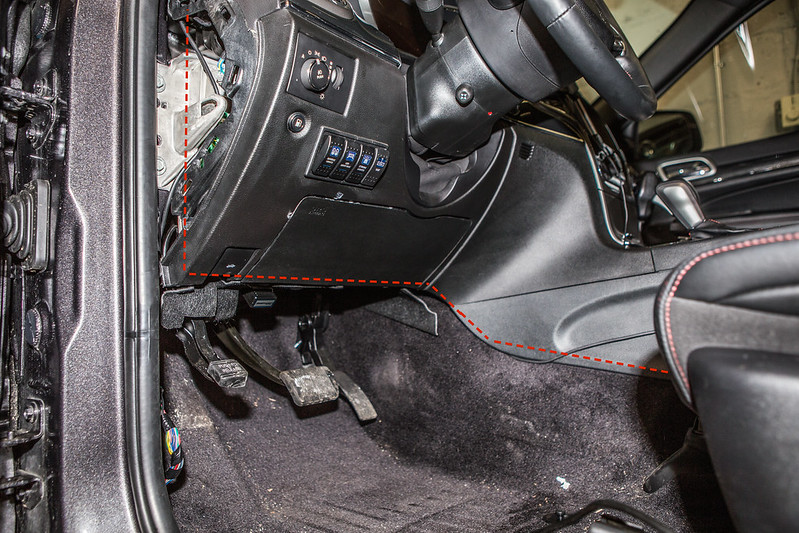
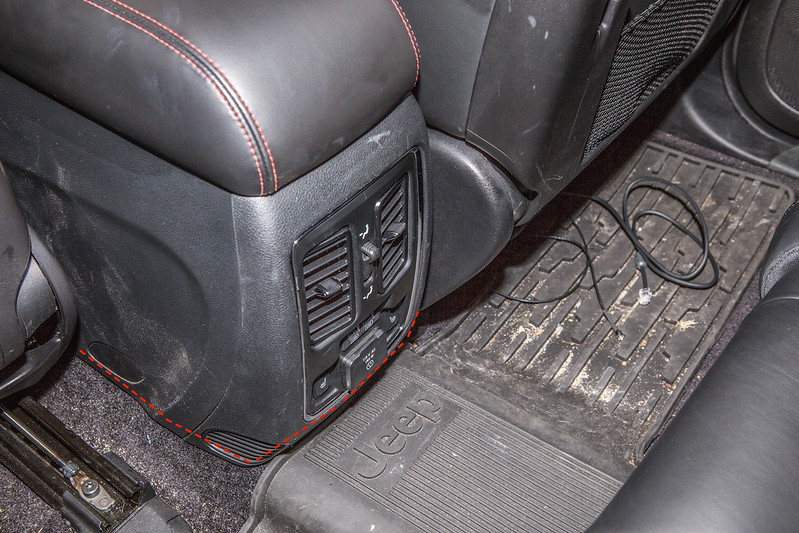
Always hoping for a clean, factory-looking install I removed the A-pillar panel from the dash, the kick trim from the driver's foot-well, and the carpet trim above the brake and gas pedals. I ran the Cat-6 from the top of the A-pillar down to just below the dash trim, then over the foot-well region, following along the tranny tunnel, pushing it ever so slightly up under the trim until I had worked my way back past the driver's seat to the backseat of the Jeep, following along the console in the back and returning it to underneath the passenger seat where the transceiver will live for now. To better illustrate this cable path for anyone interested in following it, I've used a dotted red line on the images below to give you a better idea.


Left Trim Panel Removed by 2180miles


Footwell & Console Routing by 2180miles


Rear Console Routing by 2180miles


Kenwood D-710G Velcro Mounting by 2180miles


Kenwood D-710G Install Position by 2180miles


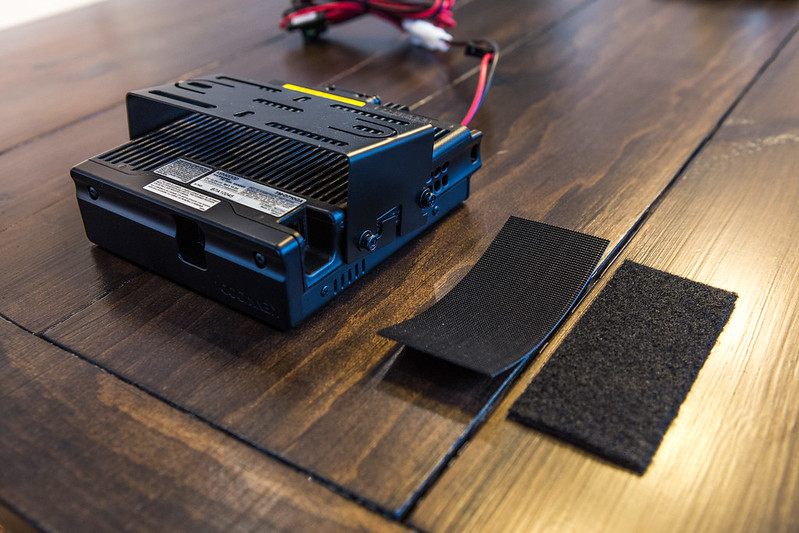
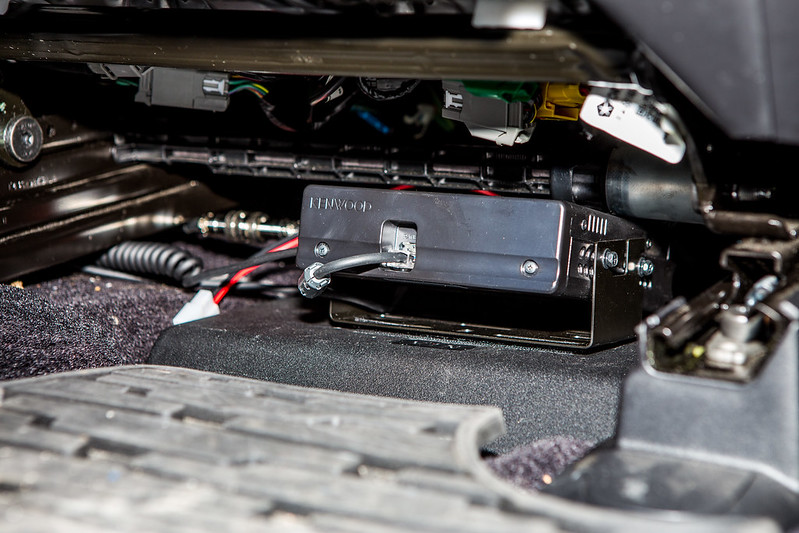
To facilitate the easy removal of the Kenwood base unit if ever need be, I used industrial strength Velcro (or hook-and-loop depending on where you're from in the world) on the top of the battery compartment tray. The passenger seat has a ton of flexibility with positioning and only comes into contact with the transceiver if it's all the way down in position… luckily my co-pilot isn't the tallest girl around so there shouldn't be any issues squishing it.

The wiring situation isn't immaculate right now so I do not have any images of the battery compartment, but I will be cleaning that up soon and ideally circumventing the potential for even messier wiring by moving to a dual-battery set-up if a few more cards fall into place over the next few months.
I used some YouTube videos for help with setting up the basic functions of the radio, and after some trial and error got the APRS set up appropriately. Within an hour I was able to see the GPS location of the Jeep on www.aprs.fi - a great trick that will be very handy in areas with no cell service throughout the continent.

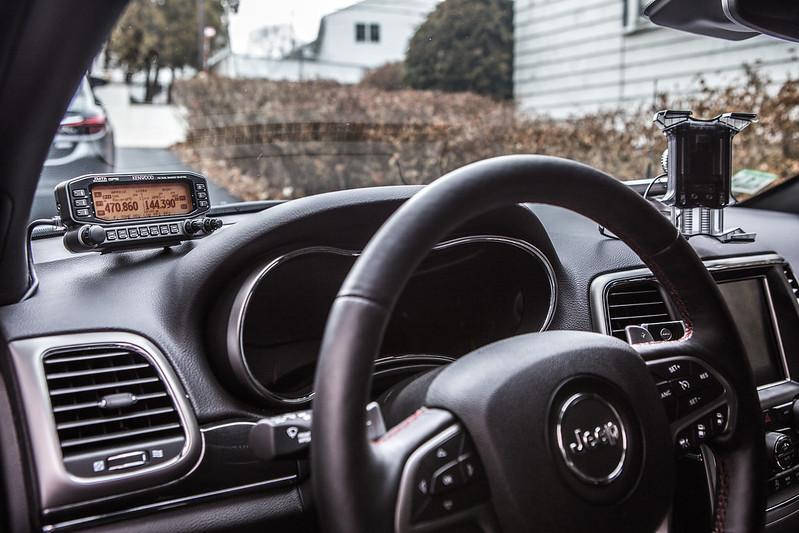
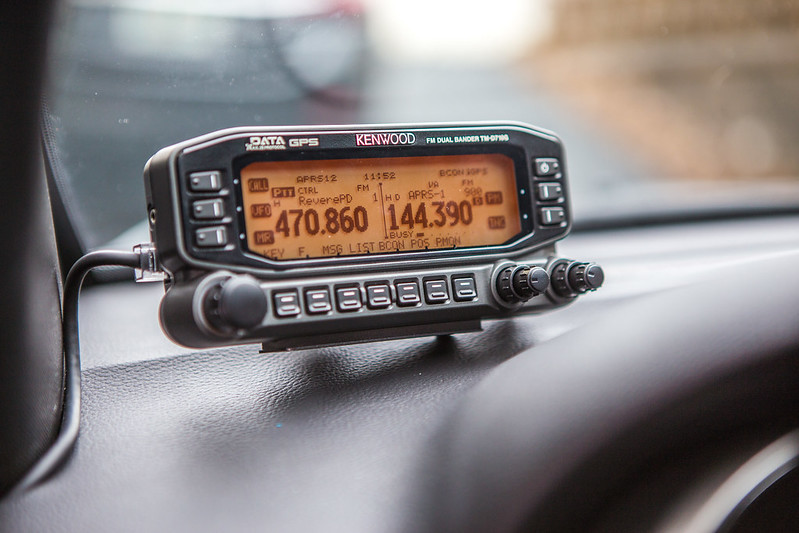
Final install photos of the radio in the main cabin... it's well out of the way of my line of sight while driving, and despite most of the functions being able to be recalled with the mic head, I can easily access the buttons on the head unit if need be.


Kenwood D-710G Head-Unit by 2180miles


Kenwood D-710G Head-Unit Cabin Install by 2180miles
 

ultraclyde

Observer
Well done! Your attention to making everything fit cleanly and correctly is admirable. I like the idea of having both the ability to go almost anywhere, the comfort to do it for long miles, and the low-key look not to attract too much unwanted attention doing it. I'm trying to do the same thing on a budget with my old ZJ. The hidden winch is particularly nice. I'd love to have a winch but I'm not wild about wearing it driving to work every day, and the smaller bumpers on the ZJ won't fit it internally.
 

2180miles

Endurance Adventuring
Well done! Your attention to making everything fit cleanly and correctly is admirable. I like the idea of having both the ability to go almost anywhere, the comfort to do it for long miles, and the low-key look not to attract too much unwanted attention doing it. I'm trying to do the same thing on a budget with my old ZJ. The hidden winch is particularly nice. I'd love to have a winch but I'm not wild about wearing it driving to work every day, and the smaller bumpers on the ZJ won't fit it internally.

Thanks for the kind words! I appreciate the recognition of the attention to detail... I truly love having a vehicle that's well outfitted with that clean OEM+ look. You're exactly right, the ability to go almost anywhere and still do it comfortably. There will be a few exterior changes to the WK2 this year, but all in the hopes of capability growth and armor/protection, while still looking sexy.

I totally hear you about not wanting to have a winch on the front driving the ZJ everywhere. Sounds like you've got a solid platform for a build... be sure to send me a link if you start a build thread!
 

ultraclyde

Observer
Great platform? ehh...maybe. It's been soundly abused and I'm chasing a LOT of repairs to bring it up to my (high) reliability standards. But if I can get it running right it does fit well with my purposes. Here's a LINK to a sort-of build thread on another forum.
 

CFD614

New member
It is a great platform and has performed flawlessly on trails I thought it would have issues on. It is a completely different animal from the older ones. The updates are night and day from the 97 you have.
 

ultraclyde

Observer
oh, no question the new ones are. He was talking about my old one. Not sure it qualifies for great, but I won't count it out yet.
 

TT-Tacoma

Observer
You sir have made me change from running my Tacoma for our camping/adventuring to using our 2014 GC Overland Diesel.

Also, some food for thought in the future when it comes time to replace those factory shoes you got on her. We cracked a factory 20" wheel this winter on what I can only assume was pothole. In searching for a replacement I found that the factory Sahara 18" wheels/tires fit perfect on the WK2. So after some searching the local CL I found a set of 5 wheels/tires and grabbed them up. They still have 75% tread so I had the TPMS sensors replaced and the tires flipped to blackwall by the local Discount Tire shop. All said and done it cost me $50 bucks more to get all that done and I now have a full size spare than replacing the one 20" wheel. An added bonus for me is that my wife asked me to make the Jeep look less mom-ish so she enjoys the look it has now.

Anywho. I will enjoy reading about your adventures with your TH.

Also, here's a quick pic of our girl. Quite dirty but you can see how the tires look when she is in OR2. I just ordered the roof cross bars and will be adding a Thule Adventurer 650 I scored off CL today for extra cargo space.

DSC_0461.jpg
 

Forum statistics

Threads
188,304
Messages
2,905,209
Members
229,959
Latest member
bdpkauai
Top