Hard-Side Tacoma Popup build

Campfinder

New member
After many years of staring at my computer screen at all the awesome rigs on this website, I finally decided to become an official member. Alright, this is just to get my build thread rolling. I actually built this camper over the last 2 years. With multiple requests for a build thread, I decided it just has to be done, even if it is a little late. My parents have an alaskan camper (which is awesome), and I love all of the hard sided popups I've seen. I just had never seen any for a small truck like my Tacoma. So this was the result of months of designing and redesigning - a kind of altered a-liner camper. Attached are some current images of it (sorry they are so small and crappy). In this thread, I will go through the entire build from beginning to end. I don't have any build pics/ good current pics of it right now - that will have to wait until after my Finals tests.
 

Attachments

  • 3k53m13o85Y65T55X2abi1472eec09c591709.jpg
    3k53m13o85Y65T55X2abi1472eec09c591709.jpg
    7.1 KB · Views: 538
  • 014.JPG
    014.JPG
    138.2 KB · Views: 519
  • 015.JPG
    015.JPG
    138.6 KB · Views: 388
  • 018.JPG
    018.JPG
    133.6 KB · Views: 370
  • 008.JPG
    008.JPG
    134.7 KB · Views: 312
  • 010.JPG
    010.JPG
    135 KB · Views: 343
  • 003.JPG
    003.JPG
    138.5 KB · Views: 396
  • 005.JPG
    005.JPG
    133.4 KB · Views: 504
Last edited:

HMR

Rendezvous Conspiracy
I LOVE IT!

What are the walls made of?
How'd you fasten the aluminum: Screws? Rivets? Any adhesive?
Is the top plastic? Did you make it from scratch?

Can't wait to see it mounted on the Tacoma. Thanks for sharing!
 

Campfinder

New member
Here is a quick summary of the build from an old writeup:

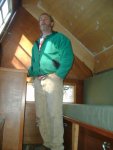
The plywood I used for the floor panel (and the walls and floor around the weelwells) was either 5/8 or 3/4 AC plywood. it is not a marine grade plywood (it would have cost way too much money). From there the walls (front panel facing cab, rear panel above bumper, and the sides hanging over the truck bed sides) were built from 2x2 and 1/4 AC Plywood. Inside these walls 1 1/2 inch blue board insulation was used to insulate. I built the roof, along with the fold-down panels seperately from the bottom half. The main roof is built with 2X2, 1 1/2 inch blue board, and 1/4 inch AC ply. the fold up panels were built from 1X2 and 3/4 inch blue board insulation (tried to keep it lighweight). I then bolted these panels onto the bottom half.
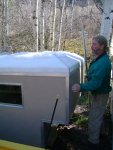
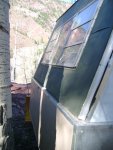
The exterior aluminum finish I am fairly pround of, especially the roof. My neighbor had some extremely thick aluminum that I used on the roof. It is heavy, but it is very sturdy and pretty much bombproof. panels were cut to place and 1/16" aluminum corner strapping was used to hold it down. this works very well and looks great. the aluminum I used on the side panels is actually just an aluminum flashing for a roof. I believe it is .0086", which is not too thick. My reasoning for it though was that if that panel was ever damaged, it would be very easy and cheap to replace. As for the finish on the aluminum, I had a lot of trouble figuring out the right way to do it. I first sanded and primed it, then I painted it with a forest green spray paint. by mid-winter the finish, especially on the roof, was chipping down to the aluminum. That spring I sanded it a ton more, and repainted it a sandy color with a white roof (I didn't get to paint the entire thing though). As far as I can tell, the new paint job is working much better, but if it doesn't work I think the next paint job would have to be an automobile paint of some sort.

Hope that clears up a bit.

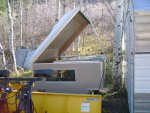
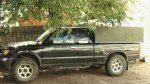
HMR - hate to say it, but I don't have any good pics of it on my truck - I didn't keep it on for long - my trucks suspension is shot and barely works without weight in the bed. Her is an old shot of it - kinda crappy but it gives you an idea...
 

Attachments

  • 3kd3o43la5O25Y55P2abi133881af01631e88.jpg
    3kd3o43la5O25Y55P2abi133881af01631e88.jpg
    7.9 KB · Views: 272

witchdoctor

New member
Excellent!

Looks great! A few questions:

- The roof looks like it's attached with piano hinges. Did you put any gaskets/weatherstripping in there to keep it airtight?
- With you being in Colorado, I have to ask: is it insulated against cold weather? Have you done any trial runs to determine performance yet?
- Do those side panels just fit into place, or are they attached in the final product?

The interior looks very spacious for such a compact external package.
 

Campfinder

New member
- The roof looks like it's attached with piano hinges. Did you put any gaskets/weatherstripping in there to keep it airtight?
- With you being in Colorado, I have to ask: is it insulated against cold weather? Have you done any trial runs to determine performance yet?
- Do those side panels just fit into place, or are they attached in the final product?

- There is weather stripping inside the piano hinges to keep it airtight. All of the other panels also have weather stripping (varying by size to fit the space) and it is almost entirely airtight. There are two locations where there are 2 small triangle holes. I just shoved some socks into them and sealed them up.

- This is the main reason I designed it to be a hard-sided camper. I haven't stayed in it in winter temperatures, but considering that all of the walls are insulated it should be great. especially if i were to put a small heater in it. I would say it would stay considerably warm just from cooking and body heat - it is still a pretty small space.

- The panels are actually also on piano hinges. the opening process:
1. Lift the roof with the roof support. this is just a pole that has 2 hooks - one that hooks onto the roof, and another that connects to the bottom half of the camper. This holds the roof up while you fold up the panels
2. Climb inside and fold up the main panel. Also fold up the rear panel (above the door) to hold up the main panel by using the deadbolt to hold them together. now fold up the front panel and use the deadbolt to lock it into place. During this process the roof will be about 3" above the panels since it is being held up by the pole.
3. go outside the camper and take the roof support out. It will then rest on the other panels and the weather stripping seals it all up.
 

adrenaline503

Explorer
I have considering doing something very similiar to this, although I was going to use a fiberglass tonneau cover for the roof.
 

rdraider

Adventurer
Cool camper!

I am currently in the process of building something similar. I was going to scrap the hard sided pop up idea because of my design and the cost associated, but this seems to be a fairly reasonable compromise between cost and utility.
 

haven

Expedition Leader
Interesting project, Campfinder! Thanks for sharing.
As more campgrounds restrict camping under canvas
due to bear problems, I think your design will become
popular.

It looks like the camper is completely self-contained.
How is the camper removed from the truck? Jacks?
Forklilft?

How much does the completed camper weigh?

[for floorplans and information about the A-Liner models,
see http://www.aliner.com/index.php ]
 

Campfinder

New member
Wow, glad to hear everyone likes it! I might be able to get more photos sometime this week, but well see.

It looks like the camper is completely self-contained.
How is the camper removed from the truck? Jacks?
Forklilft?

How much does the completed camper weigh?
My parents have 2 old camper jacks that are placed on either side of their alaskan. They are way too small for that rig (kinda sketchy putting that thing on their truck), but they work great to load and unload this little guy.

I'd say the entire weight of it is around 500 lbs. that would be an estimate. we have lifted it with one person in each corner pretty easily, which wasn't too bad.
 

Campfinder

New member
Cool camper!

I am currently in the process of building something similar. I was going to scrap the hard sided pop up idea because of my design and the cost associated, but this seems to be a fairly reasonable compromise between cost and utility.

Yeah I was heading in the direction of using canvas, but I found that this would be a lot easier. I had all of the tools already (didn't need a sewing machine), and the panels actually hold up the roof, so without the panels i would need some sort of support to hold the roof up. Also I found a great old window to put in the big panel, which is awesome for letting in some light/air. Like I said before, it should work a lot better in the cold too, which was important for my design (SKI TRIPS!).
 

Forum statistics

Threads
188,428
Messages
2,904,689
Members
230,359
Latest member
TNielson-18
Top