Yeah I agree a ridge in the roof would be a good idea but since I've already installed the cross supports I'm going with flat. I was going to install the composite panels on the inside of the roof frame but that would leave and1/8" lip around the perimeter for water to sit it so now I'm planning on installing the roof skins on the outside with VHB, Sikaflex and rivets and then gluing the foam on the inside afterwards. More on that later...
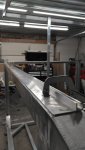
Here's where I'm at with the roof.....
I started with the same formed 1/8" alum pieces
View attachment 645288
View attachment 645292View attachment 645293
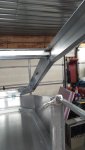
Starting to install the aluminum panels around the front using 1" VHB tape and Sikaflex 252.
View attachment 645294
I didn't get any pics of the process but I added 1/8" aluminum angle around the inside of the formed pieces to add some strength and have something to mount the the popup fabric to.
View attachment 645295View attachment 645296View attachment 645297
Up next is probably going to be mounting the roof panels and linear actuator to lift the top. I'm waiting to install the side wall panels because it's so much easier to work on everything without them in the way.