SBSYNCRO
Well-known member
If you're having problems with temperature control, you probably have a bad thermistor. Apparently they are a weak link on Dometic fridges and have been for many years. Some last 10+ years; mine lasted about 4 before it crapped out.
Luckily the CFX fridges require a lot less invasive surgery in order to replace the thermistor than the earlier models. Unfortunately I was busy doing the work and figuring things out, so my pictures aren't great, but they will give you a basic idea of what to do.
My fridge started freezing foods solid, despite being set to 40º (and showing 40º on the display). The actual interior temp ended up something more like 15º. The thermistor sits against the side of the fridge compartment and reads the temp of the interior metal liner (not the compartment itself). So it will always read colder than the compartment by a couple of degrees.
The thermistor is accessed from the area where the compressor is located. Here are the steps:
1. Turn your CFX fridge upside down with the control panel facing you
2. Remove the three tiny screws on each side panel and the 8 tiny screws on the bottom of only the end piece. Do not remove the Torx head screws that hold on the corner bumpers - (they don't hold the plastic cover onto the body)
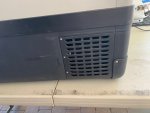
3. Gently pull the lower end panel up and toward you (standing at the end of the CFX). be careful because the control wires will be connected and there will be just enough room to lower the panel to get access to the control board
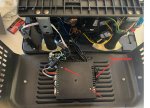
4. Remove the 2 screws holding the black plastic cover to the control board and expose the control board - note the orientation of the bundle of wires under the control board - you'll want to be able to stuff them under there again without stressing anything.
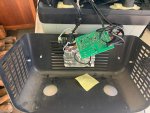
5. Locate the thermistor connection (two pins, both wires will be black) and remove from the control board.
6. Locate the other end of the thermistor where it goes into the side of the box, remove the two screws holding the wire clamps, and gently remove the black mastic holding the thermistor in place

7. Pull out the old thermistor, removing the plastic cable clamps and setting them aside. Wipe up any of the thermal paste on the old thermistor and save it if you can.
8. Using the old thermistor as a guide, fish the new thermistor in under the compressor, goop your saved paste onto it, and then insert it deeply into the hole. Then mush the mastic back over it to keep it in place. Attach the two cable clamps to secure it.
9. Plug the new thermistor into the control board, being careful to orient the wires so that they will coil up nice and flat
10. Ensuring that they are flat and not causing stress against the control board when you replace it, lay the bundle of wires under the control board, then use the two screws to attach the control board to the standoffs.
11. using the remaining two screws, attach the black cover to the other two standoffs, securing both the cover and the control board with the wires underneath.
12. Reattach the cover by inserting it all along the bottom edge where it fits into the case, then bring it up over the two round feet on the bottom of the fridge.
13. Replace the 8 screws on the bottom
14. Replace the 3 screws on each side fo the case.
Test the operation by setting the temp to 40º and then place a cup of water in the fridge overnight. Set the cup of water on a small piece of wood so that it is not in direct contact with the side or bottom of the fridge. Test the temp of the water the next morning. It will probably be a few degrees colder than the control panel indicates - so set your temps accordingly.
Luckily the CFX fridges require a lot less invasive surgery in order to replace the thermistor than the earlier models. Unfortunately I was busy doing the work and figuring things out, so my pictures aren't great, but they will give you a basic idea of what to do.
My fridge started freezing foods solid, despite being set to 40º (and showing 40º on the display). The actual interior temp ended up something more like 15º. The thermistor sits against the side of the fridge compartment and reads the temp of the interior metal liner (not the compartment itself). So it will always read colder than the compartment by a couple of degrees.
The thermistor is accessed from the area where the compressor is located. Here are the steps:
1. Turn your CFX fridge upside down with the control panel facing you
2. Remove the three tiny screws on each side panel and the 8 tiny screws on the bottom of only the end piece. Do not remove the Torx head screws that hold on the corner bumpers - (they don't hold the plastic cover onto the body)

3. Gently pull the lower end panel up and toward you (standing at the end of the CFX). be careful because the control wires will be connected and there will be just enough room to lower the panel to get access to the control board

4. Remove the 2 screws holding the black plastic cover to the control board and expose the control board - note the orientation of the bundle of wires under the control board - you'll want to be able to stuff them under there again without stressing anything.

5. Locate the thermistor connection (two pins, both wires will be black) and remove from the control board.
6. Locate the other end of the thermistor where it goes into the side of the box, remove the two screws holding the wire clamps, and gently remove the black mastic holding the thermistor in place

7. Pull out the old thermistor, removing the plastic cable clamps and setting them aside. Wipe up any of the thermal paste on the old thermistor and save it if you can.
8. Using the old thermistor as a guide, fish the new thermistor in under the compressor, goop your saved paste onto it, and then insert it deeply into the hole. Then mush the mastic back over it to keep it in place. Attach the two cable clamps to secure it.
9. Plug the new thermistor into the control board, being careful to orient the wires so that they will coil up nice and flat
10. Ensuring that they are flat and not causing stress against the control board when you replace it, lay the bundle of wires under the control board, then use the two screws to attach the control board to the standoffs.
11. using the remaining two screws, attach the black cover to the other two standoffs, securing both the cover and the control board with the wires underneath.
12. Reattach the cover by inserting it all along the bottom edge where it fits into the case, then bring it up over the two round feet on the bottom of the fridge.
13. Replace the 8 screws on the bottom
14. Replace the 3 screws on each side fo the case.
Test the operation by setting the temp to 40º and then place a cup of water in the fridge overnight. Set the cup of water on a small piece of wood so that it is not in direct contact with the side or bottom of the fridge. Test the temp of the water the next morning. It will probably be a few degrees colder than the control panel indicates - so set your temps accordingly.


