I have a lot to learn!

nwoods

Expedition Leader
Considering this was your first trip out with the camera you have nothing to be frustrated with. Time of day has a large play in getting good shots. You have some good compositions here which is a very good thing. Look through your manual and read up on metering, selective focus, and then get familiar with how to quickly make those changes as well as quickly making changes to aperture, shutter, and ISO. That will take you a long ways to getting better pictures.

Like everything else it takes practice. So just keep shooting and playing with the settings.


x2 on what Photoman said. I will also toss in that I like to crank down the exposure setting by 1/3rd whenever shooting outdoors on sunny days. It gives my images better contrast and more detail without being blownout and overexposed. Also, your images could benefit from sharpening via software before posting. I shoot all RAW, then play with them in post before uploading. Where you upload also makes a difference. Each photo site has their own compression alogrthym, some with better results than others. I am very satisified with SmugMug's image quality, and plethra of other useful features.

I think your composition is good. I think the depth of field and focus point could use some practice and experimentation. The photo of your daughter in the child seat is actually out of focus, except for the red lable at the base of the seat...its an interesting choice of focal point :)

I like the truck in the desert, with a bit of post to sharpen up the truck, but not the background, it would start to look a bit like a tilt-shift image, which is a fun effect.

The shot of your daughter "in the moment" is awesome, just needs some post-op work.
 

DrMoab

Explorer
Also, your images could benefit from sharpening via software before posting.

Would anyone be willing to give a lesson, step by step on how to sharpen via PSE, Lightroom, iphoto or any of the other programs? It's something I just haven't quite got the grasp of. I usually let PSE auto sharpen images for me and I'm not satisfied yet I really don't know how to do it. I don't under stand the terms...radius and such.

Some help here might help a whole lot of people.
 

nwoods

Expedition Leader
I can help with Photoshop, I have both CS3 and Elements. I will post up later tonight. It's VERY easy.
 

nwoods

Expedition Leader
CopyofSanRafaelSwellMay2010197.jpg

I played with this a bit in PhotoShop. I adjusted the contrast & exposure (added a bit of black), by adjusting the Histogram, boosted saturation 7%, then I lightened up her face, legs and feet a bit with the Dodge tool (set to 30%), then used Smart Sharpen set to 60, radius 1.0, cropped it a bit, and here is the result:

CopyofSanRafaelSwellMay2010197-nw.jpg
 
Last edited:

nwoods

Expedition Leader
Would anyone be willing to give a lesson, step by step on how to sharpen via PSE, Lightroom, iphoto or any of the other programs? It's something I just haven't quite got the grasp of. I usually let PSE auto sharpen images for me and I'm not satisfied yet I really don't know how to do it. I don't under stand the terms...radius and such.

Some help here might help a whole lot of people.


Here is the very quick and dirty low down on this. There are dozens of links with better examples, better information, theory, practise guides, etc... The following offers none of that.

I will include screen shots from PhotoShop Elements version 5, and PhotoShop CS3, because that's what I have on this machine. Other programs are very similar.

Disclaimer: I personally use Adobe Camera Raw for these adjustments, and only rarely use PhotoShop to perform this. ACR is non-destructive, and only applies the changes via a little text file attached to the image, instead of actually changing the image. If you have CS3 or higher, use Bridge to edit your images (or Lightroom if you have it) and its far superior at this sort of thing. ACR works on jpgs and raw files, so it's pretty handy.

For more information on RAW, check out this little tutorial that was developed as an example on POTN: http://www.nextstepdesigns.com/images/misc/PSD/raw_tutorial.pdf

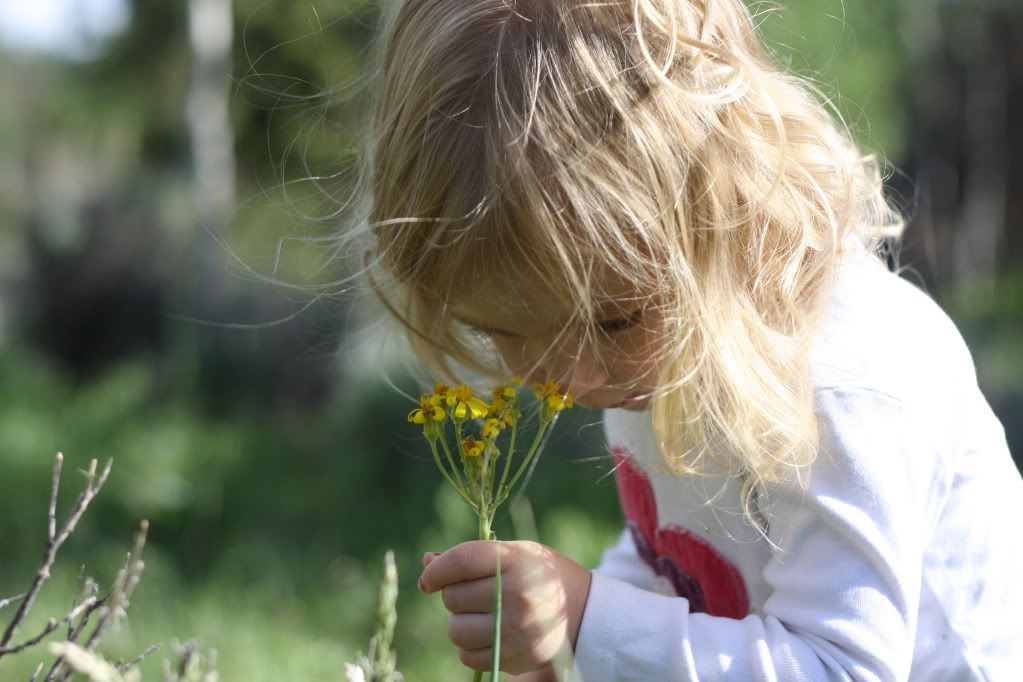
Step 1: Balance exposure. In PSE or PS, just hit Control+L or Image>Adjustments>Levels from the pulldown menus. This is the Histogram. Darks on the left, whites are on the right (by default). the perfect shape a nice rounded off mountain shape, with peak in the middle, and having the bars extend from one side to the next. If you image doesn't, you need to adjust it. Grab the little pointers on the ends and bring them towards the middle until you like what you see. Then futz around with the middle slider until you get pleasing results. Typically, I just adjust the dark, lighten the center (move it to the left), and left the far left grip alone, which is exactly what I did here. Compare:

Before:
histogram-before.jpg


After:
histogram-after.jpg


Step 2: Fill/Burn/Dodge
Depending on what tool you are using, you need to add some fill. The Fill Flash filter in PSE is a bit over the top, though the Fill slider in ACR and Lightroom is excellent. Another way is to Dodge the image, which simulates an old dark room chemical technique. The contrary tool to Dodge is Burn, which darkens areas. You might need both, you might not. Only you can determine it. In this example, I just used both. I Dodged her face, jeans, hands and feet. I Burned the sky a bit to increase the blue of the sky to simulate a polarized filter color. The key to successful use of this tool is to pick Midtones for flesh, and high or low tones for whatever else you are playing with.
dodge.jpg


Step 3: Sharpen. (this assumes other basic adjustments are done)
In PSE, use Unsharp Mask. In PS, use Smart Sharpen, or, Unsharp Mask. This requires experimentation, but generally, I find between 40 and 70% is very effective, with the radius at 1.0. I sharpened the example photo at about 60%

PhotoShop Elements - Unsharp Mask:
sharpen-PSE.jpg


PhotoShop CS3 - Smart Sharpen:
sharpen-PS.jpg


Step 4 - Adjust Image size.

For forums, don't go larger than 1024 pixels wide (generally), and for screen savers, 1928 pixels is huge, 1600 is more common. Size down your image accordingly.

Step 4.5 - Sharpen again. If you are shooting big images (3500xwhatever) with your 10 megapixel camera, when you crank it down to web size such as 1024x, 1280x, or 1600x pixel size, you will probably want to resharpen the image. Do this carefully, you don't want to oversharpen. I use SmartSharpen about about 40% and radius 1.0 for the second pass.

Step 5 - Save for Web. Image optimization for web use.
This is a VERY important step. Typically you will save to jpg for web presentation. The Save For Web (SFW) tool flattens your layers, downsamples your bit rate to 8 bits (smaller color range in the image = smaller files), and then applies a compression algorithm to the image to substantially reduce the file size. In PSE and PS, the SFW tool works about the same. I start at about 60%, and see what that does to my file size. Anything over 150kb is considered large. Sometimes that's okay, but for a web page, you are really pushing it if you exceed 70kb, so think small. Depending on how much detail there is in the image (grass is the worst!), you can pop down to 30% and still have a very good image. I use the 4 panel view to sample different percentages.

HOT TIP: I have found that an image optimized down to say, 40% is 85kb, but go down to 39%, and the image quality does not change at all, but the file size will drop noticeably, down to about 75kb sometimes. Every byte helps, so once you have the general optimization factor zoned it, drop it one percent and then save it.

SFW.jpg


Step 6 - Park it.
You can FTP it to your own personal website, or you can upload it to any number of image server services. I love SmugMug, it's the bomb! PhotoBucket is about the worst in my opinion.

That's it. Easy.
 
Last edited:

Lost Canadian

Expedition Leader
Would anyone be willing to give a lesson, step by step on how to sharpen via PSE, Lightroom, iphoto or any of the other programs? It's something I just haven't quite got the grasp of. I usually let PSE auto sharpen images for me and I'm not satisfied yet I really don't know how to do it. I don't under stand the terms...radius and such.

Some help here might help a whole lot of people.

There are about a million different ways to "sharpen" an image, and about a million different tutorials online. Nathan did a nice job of showing you one way to sharpen for web display. The only thing I will add to the discussion is that before you do any sharpening though you have to know and consider your output. Sharpening for the web is drastically different then sharpening for print. A large print sharpened using web display techniques will look horrendous. Prints, especially those of a larger nature require a very delicate touch. Reason being that sharpening is nothing more than an illusion, you're not really making the image sharper at all. What you're really doing is increasing the contrast at the edges of objects in the picture, this fools the eye when viewed in a smaller format but it really kills those nice smooth tonalities when viewed in larger formats. How sharp an image really is, is a quality of the glass you put on the camera, and not contrast masking.
 

XJBANKER

Explorer
Every time I Try to open up the larger version on flickr the site freezes I have more that I want to post just trying to figure out the bug.
 

XJBANKER

Explorer
Ewan and his Blue Eyes
GabbyandEwanJune2010012.jpg

Gabby on the Bridge at Layton Park
LaytonParkJune2010042.jpg

Gabby Throwing rocks in Butterfly Lake
IMG_4092.jpg

IMG_4077.jpg

IMG_4064.jpg

Star Trails Photo of the Cabin in the Uintas 20 min exposure about 11:30pm
IMG_4144.jpg

Gabby and the Cabin flowers
IMG_4033.jpg

Gabby at Lost Creek
Goingforadrivejune2010061.jpg
 

Every Miles A Memory

Expedition Leader
Steve it really looks like you're putting that wide angle to some good use!!

Love the last set of images you posted. Having such an awesome model sure does help:)

I like the images with the truck in the foreground, especially with it tucked into one corner but leading the viewers eye into the image away from the truck or any subject for that matter. This really makes a powerful image

I also agree with Ryan that the only way you're going to learn this and have it become second nature, is use the camera so much you work up a callus on that shutter finger.

Dont always think you have to go out shooting. While you're on your way to work, you can stop for 5 minutes and snap a dozen photos trying something new.

Do the same thing on your lunch break and after dinner. Each time, either try something new, or work on perfecting something specific

It wont take long, and you'll be really impressed with your shots. They're pretty good right now, just need to be fine tuned
 

nwoods

Expedition Leader
LOL, I think Pat's jealous. These photos are terrific Steve. Well done. I like the obvious effort you've put into these images, and I love the shot on the bridge.
 

Forum statistics

Threads
190,104
Messages
2,923,981
Members
233,414
Latest member
dhuss

Members online

Top