In search of the "perfect" camper frame

IdaSHO

IDACAMPER
Thanks for the posts guys.

Construction methods are a huge part of this thread, which is really what started it all for me.
There are a ton of ways to do it. And unfortunately it always seems to bring out the "this is the only way to do it" kind of responses.

For the past few months I have been doing a ton of research on "plywood over frame" boat building.
A simple wood frame, skinned with thin plywood, then encapsulated with epoxy resin.

And after much... MUCH time to think about it, this is the route I am going to go.


The final straw making this decision was finding a vendor through my work that I can get 1/4" 5-ply mahogany plywood.
It survived the "boil test", is light and strong, and I can get it CHEAP. Prior to finding this I was dead set on using baltic birch. But I can only get ahold of 5x5 sheets of baltic birch. That size really doesnt work into my plans very well, and would add a lot of un-needed but joints.

The mahogany comes in traditional 4x8 sheets. And will accept epoxy resin like it was meant to be.

Going plywood over frame makes the exterior skins structural, so I will be able to modify my framing layout and schedule to work with it. I should be able to shed some more weight.
Im also set on the framing. I found a good source for vertical grain douglas fir. :ylsmoke:
 

IdaSHO

IDACAMPER
Winter trip in the works, so I tossed the old camper on the truck.

Figured I may as well do some testing...

Seems that add the weight of the camper + flex = tires run out of room.

Makes sense. I guess when the solid front axle gets installed I will have to run the F350 blocks in the rear. I was hoping to keep things low, but it simply wont work that way.

And since I lowered the bed a bit during the rebuild, the old camper is VERY close to hitting the cab of the truck. Not quite making contact, but very close.

Some pics.

71.jpg


72.jpg


73.jpg
 

IdaSHO

IDACAMPER
Back in sketch-up land...

Nailing down the materials list for the basic shell.


This is my updated list. Weights are looking very good. :ylsmoke:

weightsx.jpg


The final chassis and dims. Looks very similar to before... but things have changed ever so slightly.

final01x.jpg


Framing schedule was dictated by sheeting size. 4x8 sheets limit the number of joints, but there will be considerable waste.

SHEETINGdims.jpg


The basic wall framing. I was able to loose quite a bit of framing by using the 5-ply mahogany skin and including it in the plywood over frame method.

This basic framing will be utilized on the other side of the camper, sans the door opening.

RWALLdimsx.jpg


Roof framing is substantial. But I refuse to take a chance here, as this camper will without a doubt see lots of snow pack.

ROOFdimsx.jpg


And last but not least, the front and rear wall sections... exciting, I know :sombrero:

FRWALLSdimsx.jpg
 

IdaSHO

IDACAMPER
Steel for camper jacks and the subframe is on order...

I hope the weather is crappy this weekend. Would be a great reason to start this build :sombrero:
 

IdaSHO

IDACAMPER
I have thought about the roof, and am still thinking... Per design and means of constructing it, it will be a bonded panel.

All roof framing is on 16" centers, and a maximum clear-span of less than 78". Also remember that this is all clear Douglas Fir, and that cabinets will be integrated into the frame.
Ill have to double check my load tables again to verify the 1x2 will work. I have considered 1x3 bot for strength and additional insulation in the ceiling.

Another thing I could do is simply up my outer sheeting thickness to 3/8" or even 1/2". This would add considerable weight though.

The following drawing shows how the roof section will be assembled. All wall sections will be framed first, then the ceiling will be dropped in (5-ply 1/4" mohogany), then roof framing will be dropped in, bonded and encapsulated with the ceiling panel, foam installed (bonded with adhesive to framing and ceiling panel) then the roof panels installed, bonded to framing and foam.

Let me know if that didn't make sense... that's one long sentence! :coffeedrink:

roofsection.jpg
 

IdaSHO

IDACAMPER
Thanks for the response. I appreciate the insight, as it gives me encouragement that Im on the right track.

The current layout IS on 16" centers. Im having trouble finding my reference for Doug Fir 1x span ratings, but I did find the one for the plywood.

The 5-ply 1/4 mahogany is right on par with 3/8 ACX. Assuming a 24" span, both are sufficient to meet the UBC minimum for home roof sheeting, 30# live load. Considering the 16" spans Im currently looking at, the plywood itself seems 100% sufficient. Though I wont make the final decision until I have the ceiling and framing in the roof. If I then feel the additional strength is needed, I will push to a 3/8 7-ply baltic birch.

Im currently planning on using a polyurethane construction adhesive. One that many plywood on frame boatbuilders seem to feel is NEARLY as good as good old epoxy. Loctite PL® Premium Polyurethane Construction Adhesive

http://www.loctiteproducts.com/p/pl...remium-Polyurethane-Construction-Adhesive.htm
 

IdaSHO

IDACAMPER
Still trying to get around to starting this project.

Last minute, we decided to hit the slopes this weekend. So Sat we headed up, spent the night, skied all sunday, and headed back sunday evening... or tried...

When up there I was having trouble with our cool little Carlson sealed burn furnace. Not putting out much heat, and sooting, BAD. The range worked fine, so I figured the regulator and tank were okay.

notice the soot above the vent... And yes, this is where I park every year. Just 50 yard or so from the main lift :ylsmoke:

xmas01.jpg


On the way home we got stuck in a major snow storm. We had to pull off for the night, as it was basically blizzard conditions. High winds, and near zero visibility.

This is what we woke up to, after a long COLD night in a camper without a working furnace. Still, with sub freezing temps and my wife, myself, and our 65lb dogfood powered heater, we were able to maintain 45+ degrees in the camper.

xmas02.jpg


When we got home I tore the furnace apart to inspect it.

Before cleaning.... running WAY rich. Obviously not enough O2 in the mix.

xmas03.jpg


And after cleaning. It looked like a spider or something had made its way in to the main mixing chamber and plugged things up.

but this is MUCH better. Heat without the smoke :ylsmoke:

xmas04.jpg


Now I just need to devise a way to keep the critters out of there!
 

henryzimmer

New member
Thanks for taking your time!!

Oh dear oh dear oh dear.
Your reactions to certain posts indicate that despite the title of the thread, what you’re actually asking is “is there someone out there who will validate my structure choice?”
It certainly won’t be me; your construction choice is based on false assumptions on maintenance and repairability; you have personal reasons too, but I won’t go into the questions on attitude. The method you describe is perfect for restoring an antique gypsy caravan, or a wartime railway carriage, but not for a camper that you’re going to really use.

I just want to say... that I see you as my Father figure from now on!! :wings: You can call me Billy! :wavey:
I will always look upon you with elation! :drool: Thanks for taking your time! Because of you, I will have saved 6months to 1,5 years worktime and future hassle, and lots of lifetime,cash! :bowdown:
Thanks again, congrats on fathers day...DAAD! :wings::friday:
 

kingg5

Adventurer
Thanks for the post skipperted

Unfortunately under floor heating is not an option. One objective for this camper is simplicity to increase reliability, and limiting the number of systems on-board is my way of doing it.

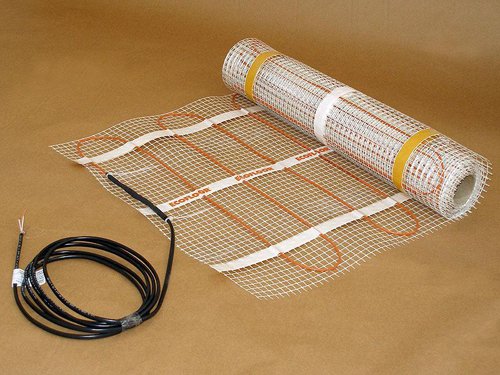
Thanks for the suggestion though. It is a good one, and one I had actually considered early on. Although, I HAVE considered one of these to run off shore power when parked...

327094335_988.jpg


I doubt Ill go that route though. A pad like that under a wood floor just doesnt seem like a good idea:)
Plus, they are designed to heat soak a ceramic or concrete floor to hold heat.

Do you have any photos of your rig? Id love to see another steel/wood camper! :ylsmoke:

I work for www.nuheat.com

check out our systems, they can be run at a reduced temp to not cause damage to wood floors. send me a pm if you have any questions!!

many rv manufacturers have used our products in their rvs over the years!!

STeve
 

bigun

Observer
I work for www.nuheat.com

check out our systems, they can be run at a reduced temp to not cause damage to wood floors. send me a pm if you have any questions!!

many rv manufacturers have used our products in their rvs over the years!!

STeve

Interesting, I am hoping to redo the floors in my class c this year heated floors would be great in the winter! You can heat the air, but the floors are always cold
 

BajaSurfRig

Well-known member
@IdaSHO do you have any pictures of the 3 point mounting system you built for the flat bed on your OBS (your old photos no longer show up)?

I'd like to build something similar for mine but am still in the design and dreaming phases.

I have a 96 F350 CCLB.


Thanks!


Was able to get a good deal of fabrication done today. The front mount is done, just waiting on some custom U-bolts.

The entire thing will be insulated from the frame by hardwood

24.jpg


25.jpg


Im no pro, but I can hold my own. And not too bad considering ALL of the steel used for the front mount was salvaged (FREE) :ylsmoke:

26.jpg


The side rails were also fabricated. 1x3 square tube, sandwiched with fish plates. Then 1-3/4" holes bored to accept the rubber bushings.

These bushings are actually "axle pivot bushings" used on the front end of this truck. They should do great.

Bolts for all bushings are 9/16" Grade 8

27.jpg


Lots more to do...
 

Forum statistics

Threads
188,304
Messages
2,905,206
Members
229,959
Latest member
bdpkauai

Members online

Top