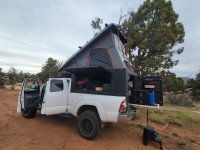
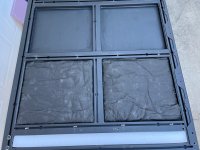
Introducing the “NEW” Alu-Cab Canopy Camper

cug

Member
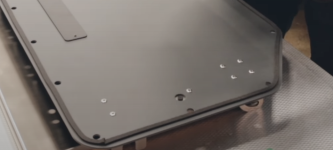
Do you know/remember from when you mounted the table whether the GP-Factor backing plate is drilled out behind this "bumper hole"?

Okay, answering my own question. I found an installation video of a GP-Factor table that showed the backside and it's pretty clear, that the bumper gets a drilled (or probably laser cut) space.

Screenshot 2024-04-03 at 13.24.00.png

This is from a Grenadier install video, but it shows that the bumper gets space in the backing plate. So far so good. The rivets in the screenshot above are from the back, I can only guess this is for space reasons. We have more than enough space behind the backing plate, so will rivet this from the front.
 

cug

Member
I’m using the Froli Travel system, not the Star. The travel works well and we can leave sleeping bags “upstairs” when closing the camper. Don’t know about the Star.
 

wackyhacky76CO

Active member
I’m using the Froli Travel system, not the Star. The travel works well and we can leave sleeping bags “upstairs” when closing the camper. Don’t know about the Star.

Cool. How thick of a mattress are you using? I was thinking of putting the STAR system under our Exped Megamat. So we are talking 5.75 of total height as it is 3/8" taller than the Travel from what I read. We let the air out of the mattress though when we close things of course, but still wondering if it would create issues closing things up.
 

cug

Member
I’m using the original Alu-Cab mattress. It works well as a combination. Didn’t want to bother with air mattresses again, we used to use Thermarest Mondo King. The combination of Froli and normal mattress is about as good and a lot less fuss.
 

TacoSauce11

New member
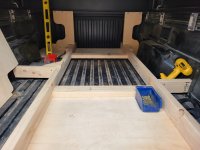
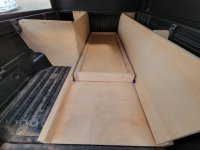
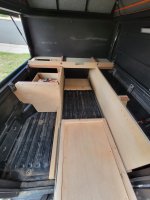
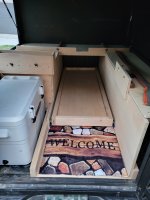
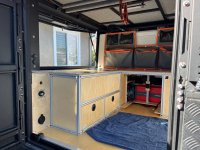
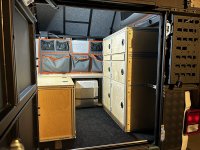
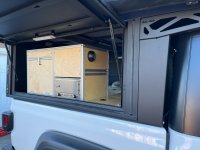
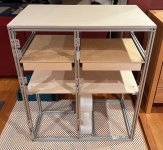
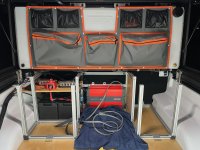
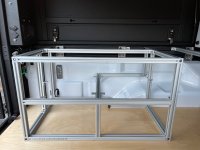
For years now I've been reading through these threads and trying to figure out how to build the interior of my ACCC. Not wanting to spend a ton of money or add too much weight, I finally took the plunge on building a slide out tray style interior.

The back door of the Alu-Cab limits the size of the slide out tray, but I decided to have the tray hug the passenger side of the opening. This allows me to squeeze into the fridge area on the driver's side to find food, and allows the Alu-Cab back door to be bungeed (or similar) to the tray for added support in the wind.

The driver side cabinet contains the solar-generator/electrical system in the rear, and a top hatch allows access for deeper storage items like tools and spare parts. The passenger-side cabinets provide more deep storage, and longer items (shower tent, table etc.) are fastened to the top of the passenger-side cabinets.

There are shelves/assemblies that fasten down with screw-knobs (or whatever they're called) to hold the top surface down on the cabinets and provide more tie-down anchors.

And it's sort of modular. Not that I would want to remove this, but I could in a couple of hours.

I'm not sure if this build concept is helpful to anyone, but I thought posting this up would be the least I could do after studying so many other builds, and going back and forth on how to make a slide-out tray work. After a desert trip last week, this really made camping much easier than spending my time at camp juggling bins.
 

Attachments

  • 20240324_152155.jpg
    20240324_152155.jpg
    3 MB · Views: 39
  • 20240330_152357.jpg
    20240330_152357.jpg
    3.1 MB · Views: 34
  • 20240412_173045.jpg
    20240412_173045.jpg
    1.5 MB · Views: 37
  • 20240418_185333_mod.jpg
    20240418_185333_mod.jpg
    2.7 MB · Views: 43
  • 20240412_193156_mod.jpg
    20240412_193156_mod.jpg
    2.5 MB · Views: 40
Last edited:

TacoSauce11

New member
I like the simplicty of it! Cheap, light, simple. I'd do something similar to this if I was building for shorter trips (less than 5 days at a time) and mostly by myself.

Other than that, it's the exact opposite of our build. We've build our's for longer trips and comfort for two:

View attachment 831983

View attachment 831985

View attachment 831984
Cug, that's an amazing set up you have. Custom 8020 cabinets? I also like the tall cabinets on the passenger side. If I saw your setup 3 weeks ago, mine would probably be a least a little bit improved.

Do you have a propane heater venting above your oven?

I overland largely for my wife's benefit, since backpacking is kind of in my roots, but packing for a 2 week trip or a 5 day trip is usually just the difference in food, and number of petrol and water Jerry cans. My wife really enjoys over-packing, so having a way to access various bins, and being kind of organized is as good as we can do.

Yours looks like a 5 star hotel! Ours looks like an absolute cluster when packed for a trip, but functional.

Thanks for sharing those pics! And I would love to see more pics of other creative build features.
 
  • Like
Reactions: cug

cug

Member
Cug, that's an amazing set up you have. Custom 8020 cabinets?

Yes, these are custom cabinets. We designed and built them ourselves and believe me, it's been a journey and it's still going on ... I'll put some more photos at the end of this post.

The heater outlet is coming from a diesel heater which isn't installed yet, we just received the panel to mount the outside components of it. It'll sit, similar to the Dickinson kit from GP-Factor, in the corner of the camper against the rear panel. For outside we've designed a panel to hold exhaust, combustion air intake, silencers for both, and a Rotopax for diesel.

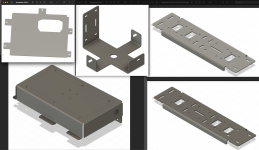
There are soooooo many things and ideas in this build, I really need to get a video together, but that'll have to wait a bit longer until we are actually done. For example, when we got the camper, we had the installer put the door in so that it opens the other way around, which then unfortunately meant that most accessories for the rear door won't fit anymore ... e.g. the GP-Factor table could be perfectly mounted – UPSIDE DOWN. ;-) That lead me down the road of learning how to use Fusion 360 to design my own sheet metal parts, have them cut and then powdercoated. I just ordered 11 more brackets and panels for various areas in and around the door ...

The furniture also means we had to build our own Mosquito net for the doors and sides since the Alu-Cab versions can't be mounted because they interfere with the furniture.

packing for a 2 week trip or a 5 day trip is usually just the difference in food, and number of petrol and water Jerry cans

That's true from a technical perspective. But for me, there is another component: How long am I willing to live in at what comfort level. I can wing it for a few days, but at some point in time, comfort becomes king. And comfort not always in obvious things:
  • Sometimes you just need inside livable space due to mosquitos, wasps, weather, privacy, whatever.
  • When sitting inside, we wanted some table space, so the drawers in the high cabinet pull out with a lid – and double as a table, each about the size as a table in a business class seat on an airplane.
  • We are diesel & electricity only. No propane, no iso-butane containers, no nothing. Induction cooking and electric kettle for cooking, diesel for the truck and the heater.
The goal for this build is a tiny travel vehicle, not an offroader with a convenient bed. If our plans work out, we'll ship it all over the world in the next two to three years.

As I said, one day I'll have to put it all together in a video or a loooooooong post ... I've been documenting the build on the Gladiator forum, it's an awefully long thread by now.
 

Attachments

  • IMG_6215.jpeg
    IMG_6215.jpeg
    799.9 KB · Views: 30
  • IMG_5980.jpeg
    IMG_5980.jpeg
    573.8 KB · Views: 29
  • IMG_5923.jpeg
    IMG_5923.jpeg
    406.8 KB · Views: 27
  • IMG_6349.jpeg
    IMG_6349.jpeg
    615 KB · Views: 29

TacoSauce11

New member
Yes, these are custom cabinets. We designed and built them ourselves and believe me, it's been a journey and it's still going on ... I'll put some more photos at the end of this post.

The heater outlet is coming from a diesel heater which isn't installed yet, we just received the panel to mount the outside components of it. It'll sit, similar to the Dickinson kit from GP-Factor, in the corner of the camper against the rear panel. For outside we've designed a panel to hold exhaust, combustion air intake, silencers for both, and a Rotopax for diesel.

There are soooooo many things and ideas in this build, I really need to get a video together, but that'll have to wait a bit longer until we are actually done. For example, when we got the camper, we had the installer put the door in so that it opens the other way around, which then unfortunately meant that most accessories for the rear door won't fit anymore ... e.g. the GP-Factor table could be perfectly mounted – UPSIDE DOWN. ;-) That lead me down the road of learning how to use Fusion 360 to design my own sheet metal parts, have them cut and then powdercoated. I just ordered 11 more brackets and panels for various areas in and around the door ...

The furniture also means we had to build our own Mosquito net for the doors and sides since the Alu-Cab versions can't be mounted because they interfere with the furniture.


That's true from a technical perspective. But for me, there is another component: How long am I willing to live in at what comfort level. I can wing it for a few days, but at some point in time, comfort becomes king. And comfort not always in obvious things:
  • Sometimes you just need inside livable space due to mosquitos, wasps, weather, privacy, whatever.
  • When sitting inside, we wanted some table space, so the drawers in the high cabinet pull out with a lid – and double as a table, each about the size as a table in a business class seat on an airplane.
  • We are diesel & electricity only. No propane, no iso-butane containers, no nothing. Induction cooking and electric kettle for cooking, diesel for the truck and the heater.
The goal for this build is a tiny travel vehicle, not an offroader with a convenient bed. If our plans work out, we'll ship it all over the world in the next two to three years.

As I said, one day I'll have to put it all together in a video or a loooooooong post ... I've been documenting the build on the Gladiator forum, it's an awefully long thread by now.
Cug, from a previous post, I noticed that your back door does not have anything mounted to it. Neither did mine until I built sort of a vertical roof-rack for the back door for carrying Jerry cans or propane or the things you don't want in the interior. I'll get a pic posted when there's daylight to work with, since this may facilitate some ideas for you.

I am also mulling over a wind-shelter-for-cooking/shower-enclosure I'll pass along if I can wrap my head around some of the limitations and figure it out.

I would absolutely want to have a sanctuary or refined space to shut the world out for a few hours at the end of the day, if our rig was built for international touring. Instead we mostly try to get a campsite with some solitude and not spend too much time setting up and spreading out since all this needs to be broken down in the morning.

I really enjoy the blank canvas, and the potential to tune or improve on what's out there that the ACCC and DIY approach offers. It also seems like one can easily spend $10K on fabricated products that don't really check all the boxes, and seem kind of limited in application scope.
 
  • Like
Reactions: cug

cug

Member
Cug, from a previous post, I noticed that your back door does not have anything mounted to it. Neither did mine until I built sort of a vertical roof-rack for the back door for carrying Jerry cans or propane or the things you don't want in the interior. I'll get a pic posted when there's daylight to work with, since this may facilitate some ideas for you.

I am also mulling over a wind-shelter-for-cooking/shower-enclosure I'll pass along if I can wrap my head around some of the limitations and figure it out.

Hey, yes, you are right, the backdoor has been a recent project. We started with planning a few weeks ago and have been slowly working our way through the various items.

From the "bracket screenshot" above, the right two are for mounting Rotopax or similar items to the outside of the rear door. The upper left will take a Redvision display (and possibly other stuff later on), the lower left is the enclosure for the outside parts of the diesel heater, and the top row middle is for holding our trash can (a bear safe container, secured with a RokStrap).

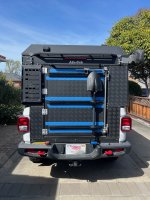
Here's the door, when we attached the RhinoRack loadbars:

IMG_6351.jpeg

The blue masking tape was just for mounting. The left side of the door will get two 2G Rotopax, and between Rotopax and shovel, there will be a small Pelican case where we'll put dirty diesel stuff (gloves, spout, etc.).

Regarding the shower enclosure, we do have the Alu-Cab shower cube, it's mounted on the driver's side.


not spend too much time setting up and spreading out since all this needs to be broken down in the morning

This has been one of the declared goals of our build: there is a place for everything and we generally don't want to move something to get to something else. Goal was 2 minute set up and break down times, including bed and awning. It's doable with our setup, since most things are stored in a way that they pack away easily after use.

It also seems like one can easily spend $10K on fabricated products that don't really check all the boxes, and seem kind of limited in application scope.

This is incredibly true! I was looking at the Goose Gear build-out for the Gladiator and while it would have saved us a lot of time, it just wouldn't have done what we wanted it to do. Weight wise, our setup is actually slightly lighter than a full Goose Gear setup, but about a billion times more comfortable in use. It wasn't all that much cheaper though, maybe a bit under half the price or so. Building with 80/20 gets out of hand VERY quickly.

We have saved money on the build, but on the other hand, we would have been done last year if we had purchased the parts. We probably could make do with these as well, it just wouldn't have been as nice, and we are an age where nice and comfortable is important. But you also end up doing a lot of stuff once, and once only, even though they are at a quality level that could be sold with good consciousness to other people.

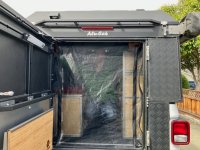
Like the mosquito net my wife made (me holding it on during a "does it fit" test):

IMG_6270.jpeg

It does not have the canvas like the Alu-Cab net, but it's the same ultrafine netting, high quality zippers, etc.

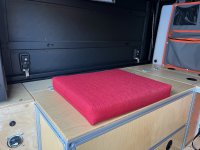
Then my wife made cushions, including anti-slip bottom:

IMG_6370.jpeg

IMG_6372.jpeg

And here's a demonstration of the table in the high cabinet while we were still working on it:


Oh, and yes, we do bring the kitchen sink, really:

IMG_6279.jpeg

But I have to agree, the DIY part has enabled us to build the truck exactly the way we envisioned it, not some put together interpretation of a shop not understanding our ideas and just using what they know and have always used or done.
 
Last edited:

TacoSauce11

New member
Hey, yes, you are right, the backdoor has been a recent project. We started with planning a few weeks ago and have been slowly working our way through the various items.

From the "bracket screenshot" above, the right two are for mounting Rotopax or similar items to the outside of the rear door. The upper left will take a Redvision display (and possibly other stuff later on), the lower left is the enclosure for the outside parts of the diesel heater, and the top row middle is for holding our trash can (a bear safe container, secured with a RokStrap).

Here's the door, when we attached the RhinoRack loadbars:

View attachment 832082

The blue masking tape was just for mounting. The left side of the door will get two 2G Rotopax, and between Rotopax and shovel, there will be a small Pelican case where we'll put dirty diesel stuff (gloves, spout, etc.).

Regarding the shower enclosure, we do have the Alu-Cab shower cube, it's mounted on the driver's side.


This has been one of the declared goals of our build: there is a place for everything and we generally don't want to move something to get to something else. Goal was 2 minute set up and break down times, including bed and awning. It's doable with our setup, since most things are stored in a way that they pack away easily after use.


This is incredibly true! I was looking at the Goose Gear build-out for the Gladiator and while it would have saved us a lot of time, it just wouldn't have done what we wanted it to do. Weight wise, our setup is actually slightly lighter than a full Goose Gear setup, but about a billion times more comfortable in use. It wasn't all that much cheaper though, maybe a bit under half the price or so. Building with 80/20 gets out of hand VERY quickly.

We have saved money on the build, but on the other hand, we would have been done last year if we had purchased the parts. We probably could make do with these as well, it just wouldn't have been as nice, and we are an age where nice and comfortable is important. But you also end up doing a lot of stuff once, and once only, even though they are at a quality level that could be sold with good consciousness to other people.

Like the mosquito net my wife made (me holding it on during a "does it fit" test):

View attachment 832083

It does not have the canvas like the Alu-Cab net, but it's the same ultrafine netting, high quality zippers, etc.

Then my wife made cushions, including anti-slip bottom:

View attachment 832084

View attachment 832085

And here's a demonstration of the table in the high cabinet while we were still working on it:


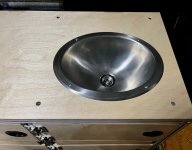
Oh, and yes, we do bring the kitchen sink, really:

View attachment 832086

But I have to agree, the DIY part has enabled us to build the truck exactly the way we envisioned it, not some put together interpretation of a shop not understanding our ideas and just using what they know and have always used or done.
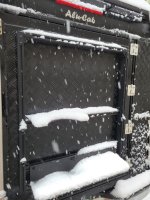
Cug, here are a couple of photos of the rack for the back door I built with extrusions. Not sure if the snow helps add contrast to see how this is put together, but it's snowing now. The second pic is the only thing I could find with the 10lbs propane tank fastened to the rack. Make sure you use stainless steel hardware not zinc coated.
 

Attachments

  • 20240427_114528.jpg
    20240427_114528.jpg
    1.7 MB · Views: 22
  • 20220430_183543.jpg
    20220430_183543.jpg
    1.5 MB · Views: 23
  • Like
Reactions: cug

cug

Member
Cug, here are a couple of photos of the rack for the back door I built with extrusions. Not sure if the snow helps add contrast to see how this is put together, but it's snowing now. The second pic is the only thing I could find with the 10lbs propane tank fastened to the rack. Make sure you use stainless steel hardware not zinc coated.

I like this idea with the extrusion. Opens options in terms of usable hardware. How long have you had this on? I used black 80/20 40-series for roof rack components a few years ago and after about a year, they had turned pink from UV exposure. Let's hope your hardware has better anodizing!

For some reason I cannot find pure stainless t-nuts for M6 and 25 series hardware. I do have all stainless bolts, but the t-nuts are at least slightly magnetic. Nothing I can do I guess. On our roofrack, we drilled a few drainholes through the extrusion so water doesn't stand in there but has a way out.

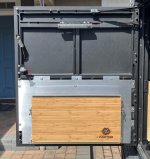
For the rear door, we used 48" RhinoRack Pioneer load bars which we cut down to 30". We cut off 9" on both ends, so we kept the mounting hole pattern which worked out perfectly for mounting the bars to the door. The bars are mounted with stainless hardware going through the door and ending up in the inside extrusion, going into an M6 t-nut. See this picture:

IMG_6345.jpeg

We've put thinsulate behind the table backplate, the lower area is just styrofoam we had from the packaging of our solar panel, it fit perfectly, so we just used that.

We plan on using the space for Rotopax containers:

IMG_6343.jpeg


The above photo is from a test when we had the door off. We don't have the brackets for mounting yet.
 

TacoSauce11

New member
I like this idea with the extrusion. Opens options in terms of usable hardware. How long have you had this on? I used black 80/20 40-series for roof rack components a few years ago and after about a year, they had turned pink from UV exposure. Let's hope your hardware has better anodizing!

For some reason I cannot find pure stainless t-nuts for M6 and 25 series hardware. I do have all stainless bolts, but the t-nuts are at least slightly magnetic. Nothing I can do I guess. On our roofrack, we drilled a few drainholes through the extrusion so water doesn't stand in there but has a way out.

For the rear door, we used 48" RhinoRack Pioneer load bars which we cut down to 30". We cut off 9" on both ends, so we kept the mounting hole pattern which worked out perfectly for mounting the bars to the door. The bars are mounted with stainless hardware going through the door and ending up in the inside extrusion, going into an M6 t-nut. See this picture:

View attachment 832122

We've put thinsulate behind the table backplate, the lower area is just styrofoam we had from the packaging of our solar panel, it fit perfectly, so we just used that.

We plan on using the space for Rotopax containers:

View attachment 832123


The above photo is from a test when we had the door off. We don't have the brackets for mounting yet.
I have had this back door rack on the Alu-Cab for 2 1/2 years and have always parked outside. I ended up replacing the zinc coated bolts going through the Alu-Cab door frame with stainless steel bolts, because they were rusting badly. The 8020 hardware was also questionable and beginning to oxide so I sprayed bed liner on the whole assembly. I painted this almost a year ago, and so far so good.

Looks like I used series 10 8020 [found receipt], and an overkill piece of aluminum angle to server as a shelf on the bottom.

The 8020 anodizing was getting bleached from UV exposure, but not pink. The worst for UV discoloration has been the black Rotopax fastening hardware/knob-things on the roof rack over the cab, but this is just cosmetic.

Wish I could tell you more about hardware, but this has been some trial and error. I do know that the 5/16” bolts fit nicely in the Alu-Cab extrusions, and the 8020 bolts had some oxidation on the exterior.
 
Last edited:
  • Like
Reactions: cug

Forum statistics

Threads
188,178
Messages
2,903,430
Members
229,665
Latest member
SANelson

Members online

Top