You are using an out of date browser. It may not display this or other websites correctly.
You should upgrade or use an alternative browser.
You should upgrade or use an alternative browser.
Introducing the “NEW” Alu-Cab Canopy Camper
- Thread starter rino
- Start date
fourfa
Observer
Previous experience with that stuff (track junkies spraying it inside rocker enclosures and B-pillars to stiffen up the chassis) has shown that it can continue to expand for a few days, and if overfilled to the brim, pop welds. I'd want to test carefully on a sacrificial structure first before doing anything irreversible to the Alu-Cab....
LunarErik
New member
Previous experience with that stuff (track junkies spraying it inside rocker enclosures and B-pillars to stiffen up the chassis) has shown that it can continue to expand for a few days, and if overfilled to the brim, pop welds. I'd want to test carefully on a sacrificial structure first before doing anything irreversible to the Alu-Cab....
Definitely a concern. The "Window and Door" variation is supposed to apply less psi to the surrounding structure than the regular stuff to prevent the distortion of whatever you are spraying it in. I don't particularly care for the stuff but its all I can come up with to insulate the interior of the box tubing used on the rear door.
MR E30
Well-known member
Definitely a concern. The "Window and Door" variation is supposed to apply less psi to the surrounding structure than the regular stuff to prevent the distortion of whatever you are spraying it in. I don't particularly care for the stuff but its all I can come up with to insulate the interior of the box tubing used on the rear door.
Assuming you mean the tubing on the rear door that gives it its structure, my personal preference is to avoid adding something like this.
My basic understanding of thermodynamics and heat transfer (degrees in ME and Mathematics) has me understand that it just ain't worth it.
Air is an incredible insulator. Packing the space where air used to be with a solid material of sorts can actually make heat transfer much worse, having the opposite of your desired effect.
The side hatches are a bit different, due to their construction, but I still wouldn't spend any time on it.
This is all nil if you are trying to 100% maximize the campers ability to hold heat inside. And if that's the case, I think you went with the wrong camper. It's doable, but tedious, and the final product will most likely still be inadequate. Even my house, with 2x6 framed exterior walls filled with insulation, ~3 feet of blown in insulation in the attic, an insulated slab, and some of the most thermally effective windows out there will still lose ~18 degrees inside over night when the outside temp drops into the 20's. And that's with an entire house full of stuff that was at ~68 degrees when the sun went down.
LunarErik
New member
Air is an incredible insulator. Packing the space where air used to be with a solid material of sorts can actually make heat transfer much worse, having the opposite of your desired effect.
Makes sense. I'm no expert but I could see where filling an air gap with something to create a thermal bridge would yield the opposite effect, however I am under the impression foams and materials that provide loft are specifically designed to have minimal thermal transfer between surfaces. I agree that the small area of the door structure tubing is most likely not going to have any significant impact. I am on the fence about doing anything just figured while I have the holes there, if I am going to fill it, now is the time before I fill the holes with rivets. My goal is just to make the camper more efficient and comfortable than it already is knowing full well it will never be igloo efficient. Keep heat out in the summer, and in during the winter as best as I can for what it is.
MR E30
Well-known member
Makes sense. I'm no expert but I could see where filling an air gap with something to create a thermal bridge would yield the opposite effect, however I am under the impression foams and materials that provide loft are specifically designed to have minimal thermal transfer between surfaces. I agree that the small area of the door structure tubing is most likely not going to have any significant impact. I am on the fence about doing anything just figured while I have the holes there, if I am going to fill it, now is the time before I fill the holes with rivets. My goal is just to make the camper more efficient and comfortable than it already is knowing full well it will never be igloo efficient. Keep heat out in the summer, and in during the winter as best as I can for what it is.
I agree with you, if the foam is applied in a specific manner.
In the case of something like a LEED certified building (really energy efficient, from building material procurement to daily energy use) these types of insulators have to be applied in a specific quantity in a specific way. For example, it has to be applied in place either by having the entire run exposed, so a bead/line of the foam can be placed along the entire length, or if that isn't possible it's applied by a device that can dispense and then retract out of the area that is being filled.
In other words, it's not an acceptable practice (in the structural engineering realm where I reside at least) to simply put the tip into a hole and then blast away until you think it's full. In that case there is likely a portion with no insulation at all (away from the opening) to an area that has the appropriate amount of insulation (a smaller portion somewhere near the center) and an area that is overfilled (near the opening).
If it's convenient for you and you want it done I say go for it. It's your truck and your build!
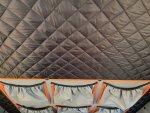
Does anyone know how the interior roof is constructed? Is there a wood or aluminum sheet where the quilted material is? I’ve seen the video where someone hard mounted a fan but wanted some more specifics. Wanting to mount a ram ball to it for my kids to enjoy movies while the adults are around the campfire.
bump. Revisiting this little project and thinking of mounting a RAM track to use for a fan/iPad mount.
Does anyone know how the roof is constructed? It feels a lot more padded than the video I saw on YouTube of a sirroco fan install.
Attachments
MR E30
Well-known member
bump. Revisiting this little project and thinking of mounting a RAM track to use for a fan/iPad mount.
Does anyone know how the roof is constructed? It feels a lot more padded than the video I saw on YouTube of a sirroco fan install.
I don't know either, but I am interested to find out more.
Having a nice, secure, pivotable way to mount an iPad would be very convenient for me.
dot_tom
Member
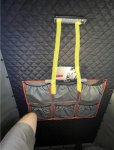
I drilled out the rivets and installed plus nuts. Messing around with some left over 8020 I made an iPad mount using a ram mount. Works perfect. A friend made me a better mount setup that I’ll be installing down the road.
BTW drilling out the rivets is pretty nerve-racking but there is a few inches above the headliner so you won’t drill all the way through.

Sent from my iPhone using Tapatalk
BTW drilling out the rivets is pretty nerve-racking but there is a few inches above the headliner so you won’t drill all the way through.

Sent from my iPhone using Tapatalk
great. This is the Kind of info I was looking for. Wonder if the rivets for the light are same width as the bag rivets. Thanks for the idea!I drilled out the rivets and installed plus nuts. Messing around with some left over 8020 I made an iPad mount using a ram mount. Works perfect. A friend made me a better mount setup that I’ll be installing down the road.
BTW drilling out the rivets is pretty nerve-racking but there is a few inches above the headliner so you won’t drill all the way through.
Attachments
dot_tom
Member
great. This is the Kind of info I was looking for. Wonder if the rivets for the light are same width as the bag rivets. Thanks for the idea!
Happy to help. I don’t think they are. If you look at the new table setup Alucab offers for the 3R rtt they have a bracket now on each side of the bag and the tent comes with the plus nuts installed.
Sent from my iPhone using Tapatalk
siebermd
Adventurer
Happy to help. I don’t think they are. If you look at the new table setup Alucab offers for the 3R rtt they have a bracket now on each side of the bag and the tent comes with the plus nuts installed.
Sent from my iPhone using Tapatalk
[/QUOTE
What exactly is a "plus nut"?
Herbie
Rendezvous Conspirator
wackyhacky76CO
Active member
The 80/20 (I use the 1 inch stuff, plenty strong) has little corner brackets that are usually used longitudinally (lengthwise) to connect the lengths of 80/20 together, but they can also be rotated perpendicular and used to mount panels to.
I like the idea of a panel nestled into the small channel of the 80/20, but I think it would be too hard to pull off.
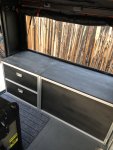
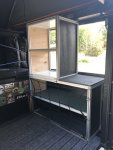
I am using 1/2" plywood for the horizontal pieces, so that we can sit on it. It will have gas struts so it can be pivoted out of the way to access the storage underneath. All vertical panels will be 26 gauge steel. Going with steel over aluminum so that we can use magnets to secure things (small pouches, cooking spice containers, etc.) to the vertical space, as we are big proponents of using vertical space as much as possible. The tiny weight difference is not a concern.
I definitely have to agree what you are both saying in regard to the 80/20. I am always trying to encourage people to do their own build. It's so easy to work with once you start playing with it and you don't need a ton of tools either. Being able to build it out exactly how you want is not only budget friendly, but you can do something way more space efficient than something like GG b/c everyone has different needs. I built half of mine to start and then after using the camper for a season decided how to "finish it". We used the new layout for a 3 week trip all over New England in Sept and still very happy with it, but if you want to change things, it's really easy to do it b/c its very easy to take apart & repurpose the extrusions. I have kept OCD level records of my build from start to finish & to date spent $1140 on what you see below. That's everything, wood, paint, 80/20, whatever it took to build those modules. They also can be removed & reinstalled with little fuss if you need to work on something. I have done that a couple times already due to poor planning.. ha ha.
Planning for the side or end panels (non opening stuff) can be the hardest part b/c you have to really determine what connectors you are using, etc. They make some slick panel mounting hardware, but it gets real pricey, so I mostly went with panels nested inside the groove using 3/16" birch plywood and coated in bed liner. I have seen folks use carpet as well in that same manner.


wackyhacky76CO
Active member
I agree with you, if the foam is applied in a specific manner.
In the case of something like a LEED certified building (really energy efficient, from building material procurement to daily energy use) these types of insulators have to be applied in a specific quantity in a specific way. For example, it has to be applied in place either by having the entire run exposed, so a bead/line of the foam can be placed along the entire length, or if that isn't possible it's applied by a device that can dispense and then retract out of the area that is being filled.
In other words, it's not an acceptable practice (in the structural engineering realm where I reside at least) to simply put the tip into a hole and then blast away until you think it's full. In that case there is likely a portion with no insulation at all (away from the opening) to an area that has the appropriate amount of insulation (a smaller portion somewhere near the center) and an area that is overfilled (near the opening).
If it's convenient for you and you want it done I say go for it. It's your truck and your build!
So, it's funny this is a current topic of discussion on here, b/c I actually was searching on the topic of insulation, ideas etc. and frankly whether doing so is even worth it at all if you don't plan on living out of it or camping during the coldest months of the year. I watched those Xoverland guys outfit two of their trucks with Canopy Campers and nice Webasto gas heaters without a second thought (so it seems) to insulating anything at all. Without an insulation package for the tent, I just am starting to feel like it isn't worth the the time and money. The only other area than the tent that we have had condensation build up on (from just our body heat + what the fridge is throwing off) is on the wire channels, which are really the only concerning thermal bridges in the overall design, so I could see possibly wanting to stuff them with some sort of insulation.
Similar threads
- Replies
- 1
- Views
- 823
- Replies
- 0
- Views
- 327
- Replies
- 3
- Views
- 854
- Replies
- 2
- Views
- 322
Forum statistics
Members online
- IdaSHO
- Iron Peak Campers
- gobi_recon
- pappawheely
- roaming.nomads
- stoneglasshaus
- Expedit
- Dan Grec
- valcon1
- NOPEC
- 85_Ranger4x4
- Pierre D
- gnel
- mandz1mc
- Westy
- Bigroaddriver
- SloinMO
- simple
- Ferjablito
- harpersJK
- luthj
- KW15
- gwittman
- RKRUGER
- geovangelist
- DVD
- 2Jeeps&PatriotX1
- dizzydom
- SDDiver5
- Bluedog1
- avlfj40
- cbwymore
- SVTRIT
- Jack Mac
- jalake
- mark5280
Total: 3,000 (members: 40, guests: 2,960)


