ITTOG's Truck Camper Build (was 6' x 12' Trailer Conversion)

StoicDemolisher

New member
[/QUOTE] I cannot do the wind deflector myself since I do not have a brake. Unfortunately all the machine shops around here appear to be booked for 6 months. So I am not sure I will get to move forward with it. I hope so though. I originally thought about it to protect the seal on the top. I figured with direct wind hitting it a leak had a higher probability. So blocking the wind would prevent that. The wind noise reduction would be a side benefit.
[/QUOTE]

Not sure if you’ve figured out the wind deflector yet or not, but if the only thing holding you up is a sheet brake or machine shop build your own. If you’ve got a sturdy welding table you can build a simple brake out of a few weldable hinges and some 2 inch 90 degree angle iron. Cut a piece of angle iron the length of the long end of your welding table and weld a hinge at each end. Weld the angle iron to the hinges add a handle from some scrap metal and now you’ve got a brake that can do simple bends in most gauge sheet metal. Then just use some heavy duty clamps to clamp another piece of flat bar or angle iron over the sheet metal you are going to bend and pull the handle up to the desired angle.

Sorry, I don’t have a picture to explain it better but I don’t have access to the one I built a few years ago at the moment. Here is a video from YouTube of what I’m trying to describe. I welded mine directly to the table. his looks liked it will work better than mine. Hope it made sense.
 

ITTOG

Well-known member
@StoicDemolisher, thanks for the info. I will have to look at building a brake. If I do I will post the build here.

I modified my last build post quite a bit. So if you want the full story, go back and read the updated post at https://www.expeditionportal.com/fo...6-x-12-trailer-conversion.199414/post-2816775.

Date: August 7 and 8, 2020
Time: 9 hours
Total Time to Date: 90 hours
Rework: 0 hours
Total Rework to Date: 24 hours

The vertigo has been kicking my butt but I was able to put in some significant work this past weekend. Hopefully that means the vertigo is going away. With the failure of the c-channel I decided to change direction and work on my flip up bed and the wedge.

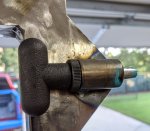
The flip up bed is about 28" and has t-handle pins to hold it in place. I completed the bed and the hinges but still need to attach the t-handles. I designed the flip up bed so I can remove it. Thus it is narrow enough that I can slide it off of the hinges. The first picture shows the bed in the down position and you can see the entire bed frame here.
IMG_20200808_152114.jpg

This picture is from the opposite side and shows the flip up bed section in the up position.
IMG_20200808_152152.jpg

It doesn't look like much but it was a lot of work.

Outside of the flip up bed I did a lot of grinding on the wedge welds. It is finished except for the weight support going on the truck bumper. Once I receive the rubber bumper I purchased I will attach it to the wedge so it can sit on the truck bumper and take some of the weight off the truck bed rails. So that should be in the next update. I will also get back to the c-channel.
 
Last edited:

ITTOG

Well-known member
Date: August 13 and 16, 2020
Time: 5 hours
Total Time to Date: 95 hours
Rework: 3 hours
Total Rework to Date: 27 hours

It amazes me how much time I have committed to this project so far. At times it seems it is taking way longer than it should. Maybe I am growing a little weary of this phase of the project. I can't wait to start working on this skin. Anyway, the latest work has been to finalize the flip up bed and the front weight support.

The t-handles allow the flip up bed to be locked in place and work well. They were a pretty easy installation. I wish all of it was this easy. These lock into the frame of the camper to keep the bed in the horizontal position.
IMG_20200813_190641.jpgIMG_20200813_190717.jpg

I previously mentioned the failure of the c-channel frame and how it bent with all the heat during welded. So I started over and built a complete new one. I only welded one inch at a time and would quench with water and let sit for 15 minutes before welding the next inch. Unfortunately it still bent. Not as bad but still too bad to sit over the front truck bed rail. Talk about frustration. The c-channel I created was three feet long. So I decided to shorten the c-channel to 15 inches and then use a sledge hammer to straighten the 2.5" angle iron. Success! It now fits over the truck bed rail and should still be plenty strong even though it has been shortened.
IMG_20200816_131551.jpg

Once the c-channel was finished I put it on the truck, along with the entire camper and started building the frame for the supplemental weight support. I made a lot of progress on the frame and believe it will work very well. The first picture shows the frame in the truck and attached to the camper. The second picture is out of the truck and not attached to anything. The third picture shows a couple things I need to finish. First, the red line shows the front bars coming up from the bottom of the frame will be cut off. The blue line shows I will add a bar on each side to connect the front part of the frame to the side frame supports just for horizontal stability/sturdiness. At this point it is all tack welded so I will have to finish welding and grinding it. Other than the c-channel complications I am happy how this is turning out.
IMG_20200816_163449.jpgIMG_20200816_182809.jpgIMG_20200816_182809..._LI.jpg
 

ITTOG

Well-known member
Date: September 5, 2020
Time: 6 hours
Total Time to Date: 101 hours
Rework: 0 hours
Total Rework to Date: 27 hours
Current Weight
Roof:
Camper:
Wedge:

Wow, over 100 hours on just the frame. Somewhere around the 20 hour mark I was thinking I will have it completed within 50 hours and would them move to skinning the frame. Clearly I didn't have a good feeling for how long it will take. Now I can see why wedge campers are priced where they are.

This update includes work on three areas: the front weight support for the truck bed rails, the door jamb, and the front angled wall to help with reducing wind drag.

I was able to finish the front weight support for the truck bed rails. On the front of it is c-channel that cradles the front bed rail. On the bottom corners, there is flat 3/16" stock that will be used to connect the bed bolts to the frame. These two features are to handle the front mounting to the truck. In the first pic you can see the entire frame. It is sitting below the camper frame (camper frame has the white paper taped to it. The frames connect with four bolts on the front of the frame and two bolts on each side of the frame.
IMG_20200908_101429.jpg

This picture shows the 3/16" plate with the hole in it where the truck bed bolt will bolt the frame down. I do need to slot the bolt hole about a quarter inch on both sides to the center of the frame. I don't have an easy way to do this so I will probably have a shop do it.
IMG_20200908_101445.jpg

This picture shows the c-channel I mentioned that cradles the front bed rail. It is in the center of the picture (silver on top and black on bottom). You can see it isn't across the entire bed rail.
IMG_20200908_102736.jpg

I have procrastinated on building the door frame because I have been waffling a bit on how to build it. But I started welding the door jamb to the camper. About 30 minutes after attaching it I wished I had offset it more than I did. The plan was to offset it towards the inside so when the door is shut it is flat with the camper on the outside. I offset it about 1/16" of an inch but wish I would have made it about 1/8" to 3/16". It is only tacked on but there are a lot of tacks. So it probably will not be flush on the outside as I wanted. But should work regardless.
IMG_20200905_132309.jpg

All of the jamb is in place.
IMG_20200905_165924.jpg

Close up of one of the corners.
IMG_20200905_165936.jpg

The backside of the jamb with 1.5" tubing clamped in place.
IMG_20200907_133810.jpg

This one to show how the door may be positioned with 1/8" weatherstripping.
IMG_20200907_133529.jpg

Next on the agenda will be to build the door. Once it is complete with just tack welds. I will test fit everything and if everything is good I will finish welding the door and the jamb. That will be an exciting step.

Finally, I began working on the front angled portion of the side walls. Remember these part is angled to help reduce wind drag. The goal is to deflect the wind instead of the wind hitting a flat wall. However, this is proving to be very difficult. Due to the angle it is almost impossible to get a flat surface on the angled wall. I have tried mocking it up with wood, cardboard, and paper. In the next two pictures you can see the paper mockup and see how the paper is not flat or uniform. The angles are just too different to be flat.
IMG_20200907_135403.jpgIMG_20200907_135419.jpg

Continued below...
 

ITTOG

Well-known member
In the next two pictures I used paper again but cut it into 2" strips instead of a single solid piece. In this mockup you can see I now have a flat, uniform surface. This looks much better but it will create a lot of fab work and shop assistance to cut the metal. It took 11 pieces of paper that varies in length from 13" to about 16". This is going to be a lot of welding and grinding. So, do I do the work or do I change directions and go to a square corner?
IMG_20200907_142442.jpg
IMG_20200907_142450.jpg

The last two pictures are just to show the entire thing and give you an idea of what it looks like. Next time I will put it on the truck and get some pictures. I need to start ordering weather-stripping and gas struts for the roof. At this point it is like building a house trying to get all the little things completed for the dry wall team to come in.
IMG_20200908_101558.jpg
IMG_20200908_101516.jpg
IMG_20200908_125755.jpg
 
Last edited:

ITTOG

Well-known member
Date: September 12 and 14, 2020
Time: 2 hours
Total Time to Date: 103 hours
Rework: 2 hours
Total Rework to Date: 29 hours

Not much happened this week. I worked on my flip up bed and door retention system, received weather stripping for my door, and scrapped my current design for weight support (to remove weight on the bed rails) for a slide in design. The design change was to simplify the installation process.

The retention system was needed because I wanted to be able to remove the flip up bed and the door. I used bullet hinges to allow the removal. I didn't want to make them permanent because the only way to remove them would be destructive and require I cut them off. I didn't want this to ever occur. Below is what the hinges look like. This shows one of the hinges welded onto the camper and the flip up bed in the up position (top tube).
IMG_20200915_074001.jpg

The flip up bed retention system with the bed in the down position (looking from above).
IMG_20200915_074020.jpg

The flip up bed retention system with the bed in the up position (looking horizontally toward the front of the camper). So all the retention system does is prevent the flip up bed from moving horizontally.
IMG_20200915_074008.jpg

Sealing the pop top and the door is one of my biggest concerns. This is always difficult when you can't have custom seals made. Yesterday the seal for the door arrived. The seal below will be placed in the door jamb. Ht = 1/2", Wd = 1/2", ID = 5/32", and O'all = 1 1/4".
weatherstripping - door jamb.png

The seal below will be placed on the door. Ht = 3/8", Wd = 1/2", and O'all = 1".
weatherstripping - door.png

So when the door is closed it will force the single bulb seal into the double bulb seal. These seals are a bit stiff and the hardness of each is Durometer 55A. Compressed with my body weight they are about 3/8" tall. My preference is no more than 1/4". I will have to mock it up on the camper to determine if 3/8" is too much.
IMG_20200915_073057.jpg

For the pop top I am planning to use one of the seals below.

For this product I am thinking about one on the camper and one on the pop top. This will give two seals contacting each other. This product has a durometer of 65A which is considered hard so it may not work. I haven't ordered it yet so I will try to find something softer but this at least gives you an idea of what I am trying to find. Ht = 1/2", Wd = 1".
weatherstripping - poptop.png

This one is softer and may be a better option. I may start with just applying to the top. If I have leaks I can look at one on the camper that will fill the void between the two bulbs. O'all = 1.5", Ht = 0.55", Wd = 0.55"
weatherstripping - poptop 2.png


Finally, I made the decision to modify my weight support system. It was making it too hard to put the camper on the truck and added too much complexity in construction, even though I was done in the front. Therefore I am changing it to include a floor so it becomes a slide in. This will help when putting it into the truck and will allow it to set flat outside the truck. I doubt I will skin the slide in frame (part below the truck bed rails) at this time. I plan to attach the camper using the bed bolts, probably four of the six. Thus, the frame you see in the picture below, which was the front weight support, will be mostly scrapped.
IMG_20200905_165945.jpg
 

ITTOG

Well-known member
Date: September 16, 17, and 20, 2020
Time: 5 hours
Total Time to Date: 108 hours
Rework: 5 hours
Total Rework to Date: 34 hours (not part of Time info above)
Current Weight: 421 pounds
Roof: 112
Camper: 309

Given I was modifying the camper to a slide in and the rear wedge bolted on, I cut the wedge apart. Welding the wedge back to the frame was not difficult but getting the angles correct and everything positioned correctly was not fun. It required a lot of measuring, clamping, re-measuring, adjusting clamps, remeasuring, etc. About three hours later, or so it seemed, I was able to begin welding the new floor for the slide in. In some situations all the rigging required to get things aligned straight and plumb is more impressive than the build. So some pic's showing the rigging before I could start welding. First step was to turn the camper upside down. This is looking at the front of the camper.
IMG_20200920_162702.jpg

This picture is from the front looking backwards. In this picture you can see two tape measures, working to get the floor level with the camper/truck rail.
IMG_20200920_162712.jpg

This is pretty much the same as above but I have added three levels to backup the tape measures for floor level and to ensure the vertical supports are plumb.
IMG_20200920_163827.jpg

Yet to be mentioned is the use of three different ratchet straps to get everything plumb.
IMG_20200920_163835.jpg

Here you can see the truck bed bar (whatever they are called) in use to spread a couple tubes. They were about 1/4" off before using the bar.
IMG_20200920_165447.jpg

Just a different angle.
IMG_20200920_165459.jpg

Welding completed and all rigging removed. Just need to grind some welds on the bottom and turn it over.
IMG_20200920_190402.jpg

Back upright and looking good. This is from the driver's side. There will be another crossbar in the middle of the floor. I may do one down the center as well. Plan is to weld on plates to use the truck bed bolts to hold the camper in.
IMG_20200921_134745.jpg

This is from the rear looking through the door that is yet to be built. I have a few things to finish and clean up and the door begins.
IMG_20200921_134800.jpg

From the front looking back.
IMG_20200921_134814.jpg

Thanks for watching the build.
 
Last edited:

Andrew_S

Observer
Man awesome progress. I'm really looking forward to seeing your pop top in action. Have you decided on how your going to lift it? One thing I didn't account for was how much extra friction the gasket can create, especially when it's compressed. Just something to consider if you haven't.
 

ITTOG

Well-known member
Man awesome progress. I'm really looking forward to seeing your pop top in action. Have you decided on how your going to lift it? One thing I didn't account for was how much extra friction the gasket can create, especially when it's compressed. Just something to consider if you haven't.
Thanks. I ended up buying gas struts with a combined 200 pounds of lifting force. My roof, without being skinned is 112 pounds. Once I skin it and do a few things I may need the ability to lift more. I never thought about the gasket seal creating a separation force to overcome. I may be sending the gas struts back? Yeah I can't wait to finish the frame so I can get it sand blasted and powder coated. That will be a big milestone.
 

Andrew_S

Observer
It's all trial and error. If you can get gas struts with bleeder screws you can get them overcharged for what you need and bleed them down to an ideal assist. Looking forward to seeing more pics.
 

ITTOG

Well-known member
Date: October 3, 2020
Time: 7.5 hours
Total Time to Date: 115.5 hours
Rework: 0 hours
Total Rework to Date: 34 hours (not part of Time above)
Current Weight: 448 pounds (calculated)
Roof: 112
Camper: 336 (309 + calculated 27 pounds)


After taking a weekend off due to good weather and getting the boat back (out for repair for 7 weeks) I was back at it this past weekend. I worked on beefing up the floor and building cradles to connect the camper to the bed of the truck by using the bed bolts. I was able to build the cradles for the middle and rear bolts. For the front the bolts sit just outside the frame of the floor. I haven't decided if I want to build something to connect there or just use the anchor points on the side of the bed. I feel the floor would be best but may make things more difficult than it is worth. At this point everything is just tack welded as I ran out of time. This picture shows the floor with the new cradles and bolts in place.
PXL_20201003_213045562k.jpg

In this picture you can see the rear of the floor. I couldn't fit all of it in the above pic. I also have laid tube in behind the wheel well that will be welded on next week.
PXL_20201003_222217129.jpg

This is a closeup of the cradle. I welded two 1.5" x 1/8 thick angle iron together to make the cradle.
PXL_20201003_213133757.jpg

This pic shows the front truck bed bolts and how it sits just outside the frame of the camper. The next time I work on it I will build cradles like above and test how well it works. I can't go much wider than what you see with the tube or I won't be able to slide the camper in past the wheel wells. I guess I could lift the camper over the wheel wells. That probably isn't the safest approach though. (That is an ugly weld.)
PXL_20201003_213145078.jpg

The rest of the pics are glamour shots. The roof is not on the camper in any of these pics.
PXL_20201003_225042548.jpg

PXL_20201003_225226901.jpg

Given the front isn't connected I added ratchet straps for additional support when I need to drive the truck.
PXL_20201003_225059124.jpg

PXL_20201003_225202317.jpg

PXL_20201003_225126878.jpg

It is coming along, but slowly. Before sand blasting and painting or powder coating I need to finish the following items.
• floor frame
• add supports from the floor to the horizontal rails of the camper that sit on the truck bed rails
○ Currently only attached a the front and rear. I need some on the side and maybe one in the middle of the front rail. See pic below for current thought on location for these supports. The blue line is part of the floor. The red
lines are what I plan to add. The yellow lines would be to transition from the angle (if I do it that way) to the vertical wall at the back.
• beef up the tubing where I will attach the four gas struts for the roof
○ I think I will weld 3/16" plate to the tube so the gas strut bolts have more meat for the threads.
• finish the door jamb
• build the door and add the door handles
• add gas strut mounts for the door
Not a lot left but it seems it always takes more time than expected.
PXL_20201003_213045562.jpg
 

ITTOG

Well-known member
Date: October 6 and 11, 2020
Time: 6.5 hours
Total Time to Date: 122 hours
Rework: 0 hours
Total Rework to Date: 34 hours (not part of Time above)
Current Weight: 452 pounds (calculated)
Roof: 112
Camper: 340 (309 + calculated 31 pounds)


Not much happened this past week but I was able to finish the floor. I finished welding and grinding all of it and I added the wings (whatever you want to call them) at the rear of the floor, just behind the wheel wells. I didn't have enough time to begin building any additional bracing from the floor to the camper. That will be next.

In order to weld above and below the floor I put the camper on the back end. It was very well balanced and worked well.
PXL_20201007_000158614.jpg

Part of the reason not a lot was completed is because I work alone and it takes me a while to move a 340 pound camper in and out of the truck. The process is to get it on my welding table and saw horses, back the truck up to it, and then muscle it into the truck.
PXL_20201011_171147079.jpg

You can see the rear wings in this picture.
PXL_20201011_171207106.jpg

The wings again but inside the truck.
PXL_20201011_190540603.jpg

Given the front truck bed bolts in the floor are so close to the frame and I don't want to widen the frame I decided I will weld a brace onto the frame that sits on the truck bed rail. I will then connect it to the d-rings, as the ratchet straps are in the pic below, the black stock anchors, or the front bed bolts. I decided this would be much easier than trying to weld a box to the floor outside the frame and still be able to get the frame inside the wheel wells. This will give me six mount points. The frame of the camper will have a 1/16" gaap between it and the truck bed rails on the side and about 5/16" gap for the front truck bed rail.
PXL_20201013_185123240.jpg
 

Ducstrom

Well-known member
I may have missed it but how are you planning to lift it in and out once completed?
If you're at 340lbs already I am betting you'll be well over 1000lbs kitted out.

You'll have to be careful putting on and off with the camper sitting so tight to the bed rails. I originally wanted mine real tight too, not touching but tight enough for a foam seal. After loading and unloading a few times I have increased the distance between and rails and the camper.
Reason being is when lifting with the jacks if one side is lifted more than the other the lower side will contact and start putting weight on the bed rail. I am over 1600lbs with my build and didn't want to end up damaging a bed side with too much weight on the rail.
 

ITTOG

Well-known member
I may have missed it but how are you planning to lift it in and out once completed?
If you're at 340lbs already I am betting you'll be well over 1000lbs kitted out.

You'll have to be careful putting on and off with the camper sitting so tight to the bed rails. I originally wanted mine real tight too, not touching but tight enough for a foam seal. After loading and unloading a few times I have increased the distance between and rails and the camper.
Reason being is when lifting with the jacks if one side is lifted more than the other the lower side will contact and start putting weight on the bed rail. I am over 1600lbs with my build and didn't want to end up damaging a bed side with too much weight on the rail.
I purchased two jacks for the front corners. I haven't attached them yet because I need some 1/4" plate. For the back I haven't decided. I may just use floor jacks. Given it extends past the bed a foot I have plenty of options. Leaning towards two more jacks like the front though. I don't ever plan to permanently install items inside. I am leaning towards a modular set up. Sometimes I may want a counter with sink and running water and other times not. Due to this I may make it so that everything is removable. I want to use it before I decide all that.

Where have you been? I could have used you before I decided all these things. LOL! I thought of issues like this but wasn't sure. I can easily adjust it by putting 3/4" plywood under the floor. I was thinking about 1/4" with two or three layers of fiberglass. Or two pieces if needed. So I am not concerned about it. I expect the camper to be about 600 pounds when complete so I may not have the issue as bad as you at almost three times my weight. I could be wrong on some of it but the nice thing about a home build is it is completely customizable.

Do you have a build thread?

Thanks for the comments. It is always better when people participate with me.
 

Ducstrom

Well-known member
I purchased two jacks for the front corners. I haven't attached them yet because I need some 1/4" plate. For the back I haven't decided. I may just use floor jacks. Given it extends past the bed a foot I have plenty of options. Leaning towards two more jacks like the front though. I don't ever plan to permanently install items inside. I am leaning towards a modular set up. Sometimes I may want a counter with sink and running water and other times not. Due to this I may make it so that everything is removable. I want to use it before I decide all that.

Where have you been? I could have used you before I decided all these things. LOL! I thought of issues like this but wasn't sure. I can easily adjust it by putting 3/4" plywood under the floor. I was thinking about 1/4" with two or three layers of fiberglass. Or two pieces if needed. So I am not concerned about it. I expect the camper to be about 600 pounds when complete so I may not have the issue as bad as you at almost three times my weight. I could be wrong on some of it but the nice thing about a home build is it is completely customizable.

Do you have a build thread?

Thanks for the comments. It is always better when people participate with me.

Yeah, so much to think about when doing a custom build.
I think one of the nice things about having it self contained and removable is the ability to get everything out in one shot and not have to break it down.
Mine has a permanent fridge, heater, cabinets for storage, bed platform and countertop, along with the entire electrical system. I don't see me using the camper without using all of the aforementioned things.
I left the water and cook surface modular. Sometimes we just need a counter to make a sandwich or something on, so I can add a portable washtub to the counter for a sink, or an electric cook top. I can also use either of these outside if we want. Or like this last trip out when it's -10 and I don't want to heat the camper all day, we just use bottled water in the fridge and leave the tank at home.

I do have a thread I started with some pictures. It's still not finished, but close enough to use.
 

Forum statistics

Threads
188,389
Messages
2,904,055
Members
230,274
Latest member
mbauerus1
Top