K.Ray's Lame Tacoma Build Thread

mouse007

Explorer
The 2016 Spring ETO Training Weekend

We had a wonderful weekend at the Clapp Farm helping the East Tennessee Overlanders group do basics-of-overlanding training!

Friday was arrival day. Folks trickled in all afternoon and evening. We setup camp in a slightly wooded section of a 30-40 acre farm on top of a little grassy knoll. The campfire was roaring as temps started dropping as a cold front passed through the area. We knew we'd have to be up early to start training so most elected to pass out at a decent hour. Amanda and I hadn't planned for the colder temps and spent a chilly night in the trusty REI half dome+.

Saturday was training day. I had three courses to teach. After sucking some breakfast down we kicked it off with communication devices. Staff went on to teach things like winching and recovery, traction devices, vehicle prep, cooking, basics of driving, types of terrain, driveline components, touched on first aid, trailing best practices, and a slew of other topics. It resulted in a rather long day of school but everyone seemed to enjoy their time and the knowledge we were imparting. I had a great time!

Sunday was their chance to put their new knowledge to the test! We did a 7 hour trail ride around Western NC and back in TN. Everyone made it with zero drama.


WOW..!! Awesome. When is the next trail/camping event..? I'm trying to get my Miami guys to head up north..!!
 

K.Ray

Adventurer
WOW..!! Awesome. When is the next trail/camping event..? I'm trying to get my Miami guys to head up north..!!

East Tennessee Overlanders(ETO) organizes three training weekends every year - Spring, Summer, and Fall. They have to work the training weekends into a busy schedule at the farm because it is utilized by other groups for various events. Right now it looks like the Summer training event will fall on the weekend of July 8th or July 15th. As soon as hard dates are set we'll do a social media push. You're bound to see it. We hope to finalize in a week or so.

Some Basics: The event currently has no admission price (is free). Bring all your own supplies, including food and beverages, for the entire weekend. Families and pets are welcome. Amenities are basic. One small bathroom available for campers at the farm owner's house.

Here's a copy of the Spring schedule for this past event to give you an idea of how it works:

 
Last edited:

mouse007

Explorer
East Tennessee Overlanders(ETO) organizes three training weekends every year - Spring, Summer, and Fall. They have to work the training weekends into a busy schedule at the farm because it is utilized by other groups for various events. Right now it looks like the Summer training event will fall on the weekend of July 8th or July 15th. As soon as hard dates are set we'll do a social media push. You're bound to see it. We hope to finalize in a week or so.

Some Basics: The event currently has no admission price (is free). Bring all your own supplies, including food and beverages, for the entire weekend. Families and pets are welcome. Amenities are basic. One small bathroom available for campers at the farm owner's house.

Here's a copy of the Spring schedule for this past event to give you an idea of how it works:


Awesome..!!! I will keep an eye out, thanks for the info..!!
 

K.Ray

Adventurer
Highland Expedition Outfitters Awning Install

The Tacoma finally gets an awning! In preparation for heading west we felt it nearly necessary to add some elements protection. HEO provided us with a 2000x2500mm awning that fits perfectly. We will probably purchase the additional wind wall or bug annex for better protection.


soonenough

Explorer
I want to switch gears for a moment and give a shout out to a good friend who's going on an amazing journey. I spent the better portion of the last two weeks helping my buddy Zach Bowman get his rig buttoned down for a 365 day tour of America. He sold nearly everything he owned and will be piling his family in his Four Wheel Camper to see all the things over the next year.

He has a ExpeditionPortal build thread here:
http://www.expeditionportal.com/forum/threads/153441-The-Bowman-Odyssey-Rig

He also writes for TheDrive.com and will be professionally documenting the entire trip here:

http://www.thedrive.com/article/982/why-im-selling-everything-and-taking-my-family-on-the-road

We did a marathon 24 hours of installs on Wednesday to finish up most of the exterior/major bits. All that's left is packing the thing and the going part. They leave in nearly 48 hours of me writing this post.

Wow I haven't checked into this thread in a while, just now catching up. Your truck has come a long way, looking good!

I've been avidly following Bowman's Odyssey over on TheDrive.com. I don't remember now where I first heard about the series, but I tuned in after he had posted the third installment and have been reading ever since. His writing is incredible. Interesting to hear that you were one of the people he talks about in the article working crazy hours trying to get the truck ready for launch. That actually looked like him in one of the pics you posted of the rear suspension install. And I'm guessing the Honda XR picture you posted was the one he wrote about dying on him right before the trip, and they ended up not taking it?

EDIT: by the way, thanks for the advice on the u-joints back in the early part of this thread. I ended up using Spicers as you recommended, and they worked out perfectly. If I hadn't read what you posted, I probably would've gone for the Moogs.

EDIT #2: Just read through your post about swapping LEDs into the ARB indicator lamps. Those light housings that come with the bumper were the biggest disappointment of the entire kit, utter junk IMO. They're not at all sealed from the elements, they used cheap electrical connectors that would be better suited to a desktop computer case, and the cheap hardware rusted within a couple months. I ended up buying the ARB 6821287 LED version of the indicators, which irked me paying almost $100 to replace the crappy parts they'd sold me, but I must admit they are so much better. Fully sealed, very high quality, stainless hardware. If you end up wanting / needing a replacement, take a look at them.
 
Last edited:

K.Ray

Adventurer
Wow I haven't checked into this thread in a while, just now catching up. Your truck has come a long way, looking good!

I've been avidly following Bowman's Odyssey over on TheDrive.com. I don't remember now where I first heard about the series, but I tuned in after he had posted the third installment and have been reading ever since. His writing is incredible. Interesting to hear that you were one of the people he talks about in the article working crazy hours trying to get the truck ready for launch. That actually looked like him in one of the pics you posted of the rear suspension install. And I'm guessing the Honda XR picture you posted was the one he wrote about dying on him right before the trip, and they ended up not taking it?

EDIT: by the way, thanks for the advice on the u-joints back in the early part of this thread. I ended up using Spicers as you recommended, and they worked out perfectly. If I hadn't read what you posted, I probably would've gone for the Moogs.

EDIT #2: Just read through your post about swapping LEDs into the ARB indicator lamps. Those light housings that come with the bumper were the biggest disappointment of the entire kit, utter junk IMO. They're not at all sealed from the elements, they used cheap electrical connectors that would be better suited to a desktop computer case, and the cheap hardware rusted within a couple months. I ended up buying the ARB 6821287 LED version of the indicators, which irked me paying almost $100 to replace the crappy parts they'd sold me, but I must admit they are so much better. Fully sealed, very high quality, stainless hardware. If you end up wanting / needing a replacement, take a look at them.

Being in the industry professionally and having grown up in it on the consumer side I've learned it's a very small world. Crazy, huh? Zach and Beth are doing well and finally heading west. I sense some excitement building in their voices when we talk. The east coast just doesn't have a lot of room for a big cummins with a four wheel camper strapped to it.

I had no idea ARB had LED indicator bits available! I think i'll milk these until they succumb to rust and corrosion. Dropping another $100 on that bumper is no higher up on my priority list than gouging my eyes out. Neat that they have that option though. And good call on the universal joints. I've already replaced a dead Moog. 'rolls eyes'

Stay tuned! We'll have some really fun stuff coming up (both Bowmand and myself).
 

K.Ray

Adventurer
Adventure University

I've been working, on the side, with a local motorcycle dealer to kick off a unique program for ADV and dualsport riders in our area. Last night they officially launched their program, Adventure University. They've got Klim, RevIt, and a few other brands onboard. Last night we discussed motorcycle packing 101. They also scheduled a fully sponsored by Klim group ADV ride for May. I'm very happy to be apart of such a great opportunity. If you're in the East TN area and want more information feel free to PM me.


K.Ray

Adventurer
XR400 Carb Issues - Round 2


Alright. We found it.

After spending an evening with some of the southeast's most knowledgeable old-timers, I ordered some new carburetor parts for the XR. They were insistent on the fact that fuel was getting past some kind of seal somewhere in the carb. This is what was causing my too-rich state of affairs. I ordered a smaller slow jet (58, down from 60) and a new fuel screw assembly from my Honda dealer. I'm not good with speaking carb. I'm just shooting in the dark, here. If I replace enough parts it's bound to work....eventually.

The parts arrived yesterday so I grabbed them on my way home and prepped the XR for surgery.

My XR didn't come with a sparkplug tool. As many of you probably know, the XR head casting is tight and requires a specific tool to massage the spark plug in and out. I found an 18mm Kawasaki tool on Amazon and it also delivered yesterday. It worked perfectly. After ripping the plug out I was greeted with the same old same old. Too rich. [Keep in mind this is with the fuel screw completely bottomed out snugly.]


Let's replace that fuel screw assembly. There's the needle itself, a spring, a washer, and a tiny little oring. The washer and oring had to be plucked out with a small pick. Old on top and new/shiny on bottom.

I also swapped the slow jet from a 60 to a 58. Egh..worth a shot, I supposed.


I'm reassembling the carb and it's not sitting right with me. Everything looks fine. These things can't be the problem. There's a BIG problem here. What gives?!

I get everything buttoned up and I flip the carb on it's side. I see the air cut valve under the choke lever. I ask myself, "hmm. I wonder if Zach checked that. Probably. He's better with this stuff than I will ever be. Well, hell, let's check it anyway. What's the worst that could happen." I know from reading online that it's spring loaded so remove gently.

Oh. My. Jackpot.

The air cut valve had disintegrated. This is where all the excess fuel was coming from. The old-timers were dead on.

The air cut valve, from my research, enrichens the bike during closed throttle coasting scenarios. (When you're racing down the road and close the throttle to coast) This keeps the bike from idling low or dying during that situation. I'm assuming it works off of some kind of vacuum or carburetor magic. One side isn't supposed to meet the other side. Mine is/was.


K.Ray

Adventurer
Quick update;

Expo and Moab trip planning has shifted into high gear. Everyone on the Bold team is rushing to finalize last minute modifications and maintenance tasks on the vehicles.

It's funny how few things you can pack into a trans-continental two week trip.

Currently on the calendar:
- Overland Expo West
- Sedona
- Grand Canyon
- Lockhart Basin
- Grand Junction
 

K.Ray

Adventurer
Bold Overland attended Knoxville's premier Cars and Coffee. Amazing turnout!

cDo4OqYl.jpg
0pAAsVel.jpg
 

K.Ray

Adventurer
Reverse Light Upgrade

The reverse lights on a 2006 Toyota Tacoma are, for lack of a better term, shlt. I decided enough was enough and upgrading was necessary. The fact I'm about to embark on a 6000+ mile journey also played into the decision.

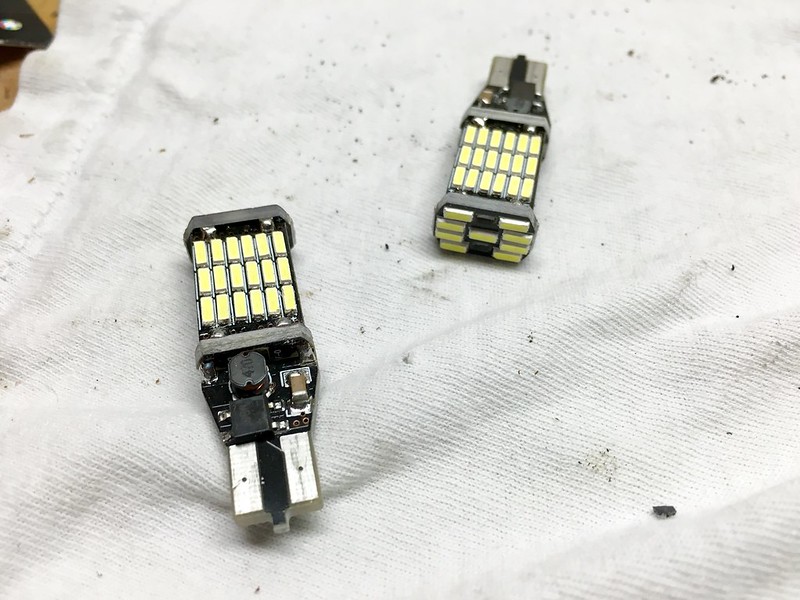
The stock bulb is a 921 type. In my research I found that many many aftermarket solutions were available. The Tacoma has a endless cavern in the rear taillight so I went big. 1000 lumens big.
I purchased them through Amazon here: FlashWolves 1000 Lumen LED


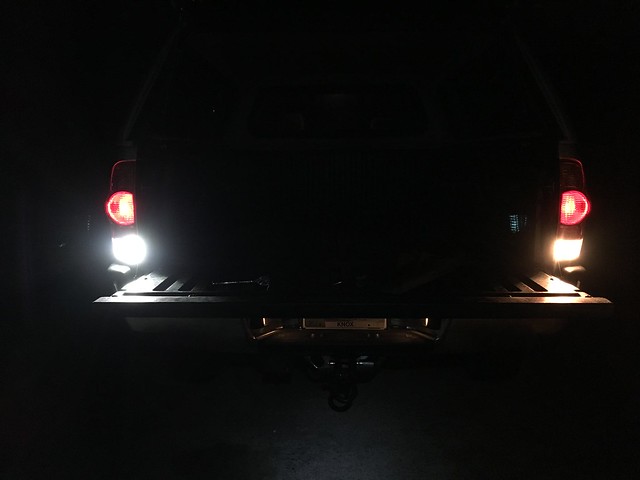
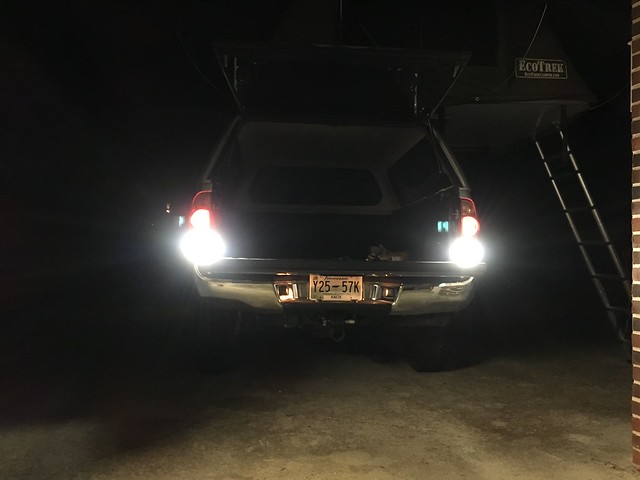
I wish I could put into words how bright these are. The iPhone6s camera doesn't do it justice. I'd say there's maybe 3 or 4 times the amount of light now.

Shoving the 6-speed shifter into reverse initiates the birth of a new sun behind my camper shell now.

 
Last edited:

BentBomber

www.bomberproducts.com
Awesome! Am I correct in reading on the Amazon listing that it comes with 45 pieces?? I may have to get some of these.
 

soonenough

Explorer
Reverse light improvements is one thing I've wanted to do for a while, so for $16 I'm probably gonna jump on this also. Thanks for the research / link! Did you have a problem with the bulbs throwing a CEL code? I saw that mentioned in several of the reviews on Amazon.

Bomber - I'm guessing the "45 pieces" shown in the listing is referring to the number of LED chips on the lights, because it also says "2-pack" in the picture.
 

K.Ray

Adventurer
Awesome! Am I correct in reading on the Amazon listing that it comes with 45 pieces?? I may have to get some of these.
I think that may be the number of diodes or whatever the small pieces are called that glow with light. You get a pair of LEDs - one for each side.

Reverse light improvements is one thing I've wanted to do for a while, so for $16 I'm probably gonna jump on this also. Thanks for the research / link! Did you have a problem with the bulbs throwing a CEL code? I saw that mentioned in several of the reviews on Amazon.

Bomber - I'm guessing the "45 pieces" shown in the listing is referring to the number of LED chips on the lights, because it also says "2-pack" in the picture.

My truck is a little bit older, so can't say this works for everyone, but no codes or issues on my end. Not sure why reverse lights would trigger a CEL but I've never owned a fancy new computerized thing before. Do it. You'll love yourself for it.
 

Forum statistics

Threads
188,456
Messages
2,905,211
Members
230,428
Latest member
jacob_lashell
Top