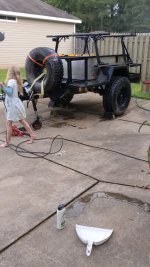
M116A3 Adventure Trailer Build

XKTX85

New member
I've gotten a lot of ideas from this site and decided I'd try to give back by sharing my build experience.

In December I purchased a M116a3 flatbed military generator trailer for $600 off a guy on Facebook. My daughter and I drove 3 hours to get it and bring it home. That same month I purchased a welder....both sat for 7 months while I tried to decide exactly what I wanted to do.

PXL_20211218_192612814.jpg


PXL_20211218_192630608.jpg

Initial assessment of the trailer: solid platform to build on, more ground clearance than my Jeep, easy to register in Georgia as a homemade. Cons...previous owner used cheap bed liner to coat the underside (all of it including bolts, grease points, wires), plus leaf springs will need to be replaced. The surge brakes are questionable at best, but it rolls and for the price I'm happy.

I've decided to use the Xventure trailer as the example I'm starting with:

FB_IMG_1661302098635.jpg

The "right choice" for where to start is probably the suspension, frame restoration, or switching to electric brakes....but I want to get out and start using this on trips with my daughter so I'm gonna build the top half first.

I've broken this into 3 phases:

Phase 1: Goal 22 oct
Jockey Wheel
• Build a subframe

• skin the trailer
• install hatches for the galley/kitchen
• remove old lights, broken jack stand
• raptor line the deck
• paint the skin

Phase 2: Goal APR 23
• convert to electric brakes (surge brake removal will loose pintle hitch and add articulating hitch
• build pullout kitchen
• fabricate slide for cooler/fridge
• build/fab bed cover
• install 12v power system (100ah+ battery, shore power, charge from tow vehicle, set up for future solar)
lights
• build swingout spare tire carrier

Phase 3: Goal July 23
fab bed rack
• Add rooftop tent
• install 20gallon water tank, pump system
• Propane water heater
• add fridge/freezer
• add solar panels
• fab 270° awning
• new leaf springs
• swap out Wheel tires for something lighter

****CURRENT PICTURE AS OF 13AUG23****
PXL_20230619_223954340_exported_7550.jpg
 

Attachments

  • PXL_20230619_223954340_exported_7550.jpg
    PXL_20230619_223954340_exported_7550.jpg
    1.8 MB · Views: 5
Last edited:
XKTX85

New member
Registration wasn't too much of a challenge in Georgia. The sherriff wasn't cool with the hand etched military data plate serial number so I paid a wopping $15 for a homemade trailer data plate and annual registration (in GA they don't title trailers under 2000lbs.

Next objective was the jockey wheel. I started practicing making welds in the garage until I felt confident enough and went to work. I decided to put a heavy duty rubber caster on the bottom of a short jack. I hammered out the curves in the foot of the jack, drilled some holes, and bolted them up.

PXL_20220819_152100281.jpg

PXL_20220819_201917066.jpg
 

XKTX85

New member
Next step I welded the jack mount on, painted anything I thought would rust, and felt quite accomplished having actually done something real with the welder.

20220930_183825.jpg


PXL_20220822_222712888.PORTRAIT~2.jpg

I got good penetration in some places and less in others, but for its purpose I was satisfied.

PXL_20220822_231414323.jpg

Can now move it in and out of the garage to work on it as needed.
 

TheRizz

New member
Thanks for sharing your build (so far). I'm just hoping to find one of these sometime and its great to see what other folks have put together! Look forward to more.
 

XKTX85

New member
Thanks for sharing your build (so far). I'm just hoping to find one of these sometime and its great to see what other folks have put together! Look forward to more.


Thanks for commenting! I've been day dreaming about this for awhile and finally putting it into action has been really rewarding.
 

XKTX85

New member
With the jockey wheel under my belt, I headed down to the local steel supply and picked up what I estimated I needed. The folks at Dillion Supply we're great and let me wander around the warehouse to actually look at the different gauges and sizes...really helpful for someone embarking on thier first fabrication job. I purchased 60 feet of 1/8" 1.5x1.5" square tube and 20 feet of 16ga 1"x1" square tube. In hind sight I should have reversed those, but 16ga tube is pretty affordable and I later bought 60 feet more.

20220824_133719.jpg

After some practice on my new steel I put my anxiety aside and started squaring up the frame and tacking it together. Working with the thicker 1/8" material was pretty forgiving. I purchased a Diablo steel cutting blade for my miter saw, which due to age and use I discovered it wouldn't consistently keep straight lines.

20220908_061256.jpg

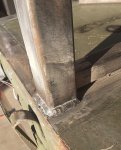
Some welds were great, some were...not so great, but I felt confident they'd hold up under a rooftop tent. As I heard early on "a grinder and paint will make you the welder you ain't."

20220909_174501.jpg

20220909_174511.jpg

Once I got the side rails complete I set them up with magnets and finally got an idea of what this could really look like.

20220909_181412.jpg
 
Last edited:

XKTX85

New member
We took the trailer on a camping trip with the local Overlanding group. I removed everything and just strapped my gear down like a pack mule. Everyone appreciated how much room for activities it provided especially around dinner time.
20220918_124609~3.jpg

Next I removed the fender extensions over the wheels. I wanted to ensure my widest point was the tires so that hopefully any tight trails will have the trailer bouncing off an obstacle rather than crushing the metal. Due to all the bolts being rusted on I found the best tool to be the grinder.

20220918_183821~2.jpg

That same day I notched and cut out the ridges in the deck where I planned to have frame crossing perpendicular.

20220918_183747~2.jpg
 

XKTX85

New member
This post should catch the build up through the present.

I tackled what is probably the most dangerous part of the job, I removed the paint from the trailer anywhere I anticipated welding to the deck. Military vehicles are coated in CARC paint (Chemical Agent Resistant Coating) which is exceptionally toxic if inhaled. I used a flap disk on the grinder, used my respirator, then used a shop vac to clean up, followed by wiping the whole trailer down with acetone. Here's to praying I didn't just cut a few years off my life.

20220928_184326.jpg

20220928_184332.jpg

I then added the middle legs to the side rails, used a grinder to clean them up. Learned putting a bevel on the edges really helps to get good penetration on the welds.

20221001_000946.jpg

You would think if all your legs are equal lengths they'd stand level...and you would be right if you're mounting surface wasn't the abused and warped deck of a 20 year old military trailer. I had to do a lot of small cuts to get them to even out.

20221001_094340~2.jpg


20221001_101536~2.jpg

I then moved on to completing my subframe. I went with 16ga for the cross members and bottom. The bottom pieces are more to attach the skin to rather than structural integrity. My neighbor helped me move the frame off and into the garage to finish weld, and then prep for paint.

20221002_094311~2.jpg

Once it was burned in, I began framing the hatch openings for the kitchen. I cut myself off to make dinner but l intend to get it skinned this week.

20221002_191251.jpg
 

XKTX85

New member
Not gonna lie, going from tacked to fully welded, ground, and sanded is a lot of work! Here's a completed sub-frame on the trailer. The open end bows in a bit but I'll straighten it out when I burn it on to the deck tomorrow.

Really getting a feeling of accomplishment see this materialize.

20221003_214328.jpg

20221003_214348.jpg

20221003_214335.jpg
 

XKTX85

New member
I was supposed to be leading a group on the Georgia Traverse this weekend (hence the October deadline for Phase 1), but between most getting sick and my jeep being in the shop the trip has been postponed. In my hurry to get the trailer ready I made the decision to weld the frame to the trailer without cracking the code on how I'm going to use adhesive to attach the skin in the crack between the wheel wells and the frame.

20221006_193313.jpg


Next issue was deciding if I was going to weld all the frame to the deck or just the vertical posts. When planning the trailer I had intended to weld everything down, but due to the warped deck and finishing the frame off trailer I realized the the gaps between the horizontal beams and the deck were varying and often too large.

I think I am going to stick with posts and then use a good Automotive sealant along the bottom of the skins and inside the frame. If someone has a better idea before I pull the trigger let me know. Actually really happy with my welds on the frame posts.
20221006_082553-jpg.746036
 

Attachments

  • 20221006_082553.jpg
    20221006_082553.jpg
    1.6 MB · Views: 308

XKTX85

New member
I decided to fab up some simple gussets to reinforce the load carrying joints. Probably not needed as everyone seems to tell me 1/8" square tube is gonna be fine...but they're small and add little weight for some security.

20221007_185955.jpg

I thought I'd get to painting today but instead kept building. I'm building two storage boxes on either side of the bed. I liked the idea of "wet storage" for chalk blocks, fire wood, muddy shoes, towels, etc. So I'm not putting it in with my clean gear, or food.

20221007_202009~2.jpg
The black would be level and tied into the wheel well so I'd have 42" by 13" flat surface on either side of the trailer for activities. The Red would by expanded steel or something similar that would allow air flow and not trap moisture. The rear would be a small door.
20221007_201920.jpg
I think its a very practical use of space. I'm just debating if I'd rather make it dry storage and seal it off. I got the idea from the Patriot Campers trailers.
Screenshot_20221007-203829_Chrome~2.jpg

Unfortunately I ran out of welding wire mid effort, so I'll have to finish up next week.
 

XKTX85

New member
Spent the long weekend working on my jeep instead of camping which sucked, but I made time to add a small detail to the trailer. I wanted running lights on the sides. My daughter helped me pick the locations, I go to her for artistic/preference opinions when I'm not sure so she feels part of the process. We decided to do amber near the front and one above the center of the wheel well (thought might be a good marker for navigating obstacles in the dark). And two reds behind the wheel wells

20221011_121916.jpg20221011_122927.jpg

I got these off Amazon, I think they'll blend in with the black paint well.

Screenshot_20221012-122348_Chrome.jpg
 

XKTX85

New member
Fwiw,
I used those same ’Partsam’ lamps on a trailer. Four of the reds failed after a few hours. The ambers still doing fine going on about fifty hours.
The reds I replaced with TruckLite lamps.
Lets hope you have better luck.

Thanks for the warning. Hopefully they pan out.
 

XKTX85

New member
Spent A LOT of time on it this weekend...I can't say how many hours and a quick look it doesn't seem to be any difference lol. I finished 95% of the welding (I think) added more gussets, completed the frame of the rear storage boxes, and added framing to support the galley hatches.
20221016_120527.jpg
20221016_135744~2.jpg
I went to it with a grinding disk to clean up the dirtier welds, then a flap disk to polish any rough edges and removes any rust from condensation, and finally went over it with a 120grit sander. I keep reading that paint is all about good prep work.
20221016_135806~2.jpg

I'm planning to pick up so e bondo or body filler to clean up any outward imperfections this week...Hopefully paint next weekend...maybe...

20221017_231642.jpg
Here's the hatchs for the galley. I'm planning on having them open upward with a latch but played around with the idea of having them fold down since the pullout kitchen will over it anyway. I wanted them to open to the left, but I messed up my math/measurements and decided to do the best with what I have.
20221017_231723.jpg

Vs

20221017_231828.jpg

These I got off amazon at Boat Hatch. They're very sturdy, can easily be water tight, and save me tons of anguish trying to perfectly square up doors.

Screenshot_20221017-234025_Chrome.jpg

I'm actually leaning towards using a different size for the rear storage and having it be sealed instead of wet storage, so I can keep my kitchen ware organized and readily available on the kitchen side of the trailer and possibly put my power compartment in the passenger side box. I think I'm gonna take a couple top down pictures and draw out storage options. I really want to have all welding done, sanded, and over before I start putting paint down.

Hope this is helpful information for someone.
 
Last edited:

Forum statistics

Threads
188,184
Messages
2,903,528
Members
229,665
Latest member
SANelson

Members online

Top