M2 Freightliner Ambulance Conversion Project. 2007 Crew Cab

Ozrockrat

Expedition Leader
I like the look of those expanded tube connections but the cost of the tooling is prohibitive. I will probably just use the crimp ring style. The tools are cheap and small enough that we can carry them with us.

We do not foresee having a mains connection to our water system so it will be 12v pump only. I also have the ability to pressure test up to hydraulic pressures if needed so doing a leak down test to 120 psi should cover off the PEX connections.
 

java

Expedition Leader
I like the look of those expanded tube connections but the cost of the tooling is prohibitive. I will probably just use the crimp ring style. The tools are cheap and small enough that we can carry them with us.

We do not foresee having a mains connection to our water system so it will be 12v pump only. I also have the ability to pressure test up to hydraulic pressures if needed so doing a leak down test to 120 psi should cover off the PEX connections.

You will never see pressures that high.... Look for a rental place, the expansion fittings are much better than the crimp IMO. IIRC I paid about $350 for the milwakee tool with three different sized heads.
 

Ozrockrat

Expedition Leader
Hmmm maybe I should just drive up to Flagstaff and get Ross to do them for me . We could compare toilets and shower designs at the same time.
240 miles @ 8mpg = 30 gallons of diesel @ $2.65 a gallon that’s only $80 in fuel and 5 hours driving. Maybe renting is the answer.
 

patoz

Expedition Leader
When y'all get all of this figured out, don't forget to take lots of pictures and make some good drawings, because inquiring minds want to know! :unsure: :LOL:
 

Ozrockrat

Expedition Leader
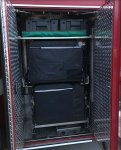
Well the last few weeks have been busy. But a lot of it was under the deck in places I wasn't going to photograph. But I did manage to get both the fridge and freezer onto good quality slides and have been running them fulltime for the last week keeping drinks cold (need lots of hydration with the weather we have had 100+).

Lessons learned in the fridge exercise. With the fridges I used the 500lb Accuride but made up my own side supports. After all the running around and paying for 4" x 1/4 aluminum angle I figured that in the future I should just buy the ones that are made by accuride. My way was more expensive in $$ and time both of which could of been put to other uses.

Big Red Fridges.jpg

I also replaced the rubber boot between the cab and the box. But I don't know what to glue the overlap together with!! Any ideas gentlemen?????

Best place I could find to buy the boot material was www.fixmyambulance.com .
 

Victorian

Approved Vendor : Total Composites
Well the last few weeks have been busy. But a lot of it was under the deck in places I wasn't going to photograph. But I did manage to get both the fridge and freezer onto good quality slides and have been running them fulltime for the last week keeping drinks cold (need lots of hydration with the weather we have had 100+).

Lessons learned in the fridge exercise. With the fridges I used the 500lb Accuride but made up my own side supports. After all the running around and paying for 4" x 1/4 aluminum angle I figured that in the future I should just buy the ones that are made by accuride. My way was more expensive in $$ and time both of which could of been put to other uses.

View attachment 448249

I also replaced the rubber boot between the cab and the box. But I don't know what to glue the overlap together with!! Any ideas gentlemen?????

Best place I could find to buy the boot material was www.fixmyambulance.com .


I can show you at the Expo.
 

rlrenz

Explorer
As far as adhesive suggestions, probably 3M has a cement (https://www.3m.com/3M/en_US/company...0676+8710815+8711017+8744590+3294857497&rt=r3) that would do the job just fine. Amazon sells many of the 3M adhesives.

Remember that extruded rubber shapes are usually lubed with a soap solution during extrusion, and they have to be cleaned before adhesive will bond.

When I can't find the right size in aluminum angle, I've bought architectural aluminum channel, and cut off one leg. The architectural stuff has straight legs with no taper.

After looking at every possible design for a slide support for my generator, I reached for the most important design tool I could have -- a pencil eraser, and I started simplifying. My design simplified itself down to an aluminum flat plate as a base with two cut down channels for the slides. That let me have thicker aluminum than I could get bent in a friend's shop (I'd have to pay a shop to do the bending, and cutting down channel was cheaper than bending)
 

Ozrockrat

Expedition Leader
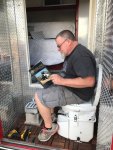
For once I can be proud of saying I did a sh!thouse job!!!!!!

Or maybe it should be captioned "Thunderbox is GO"

Thunderbox.jpg

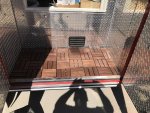
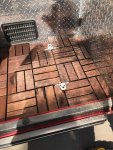
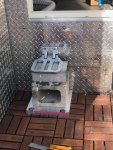
Fitting this up took an extraordinary amount of time. We used some teak tiles from IKEA as the flooring as they sit on a plastic frame and will allow airflow and water drainage when we get the shower installed. But they were a PITA to cut the slots for the hinges.

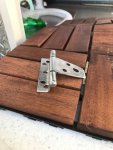
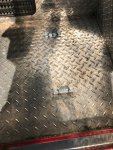
As we want the ability to actually remove the LOO when having a shower I decided that the brackets that are used to hold it in place needed to be flush mounting when the loo was out. So I grabbed some stainless hinges for home depot and with a little bending and finessing with the flapper disk I have lay down semi flush mount brackets. Sticking to my "do it twice then do it right" mantra I managed to make up a spare set for when I remove the teak tiles :unsure: and then the ones that actually fit.

Then it was a case of testing the height for the foldup step. Saves a lot of extra gyrations when entering the loo from the inside with a full bladder.

IMG_6560.jpgIMG_6561.jpgIMG_6562.jpgIMG_6563.jpgIMG_6564.jpg
 

Ozrockrat

Expedition Leader
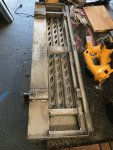
Next thing on the list is covering the generator. There will be more on this as the project proceeds. But today's effort entailed cutting about 6" out of the existing step. Circular saw and sawzall made fairly short work of it but what a bloody mess.

IMG_6569.jpg
 

Ozrockrat

Expedition Leader
That is some nice use of space!

Sent from my SM-G950U using Tapatalk

Our plan is to live in this rig fulltime in about 5 years time. So the ability to have a real shower and toilet was one of the key decision points in changing from Old Yella to this rig.
 

java

Expedition Leader
That is some nice use of space!

Sent from my SM-G950U using Tapatalk

Our plan is to live in this rig fulltime in about 5 years time. So the ability to have a real shower and toilet was one of the key decision points in changing from Old Yella to this rig.
Yeah I totally agree! Maximizing the tiny spaces is key. We decided on no inside shower. Had one, never used it, so we skipped it on this truck. Used the outside one today tho!

Sent from my SM-G950U using Tapatalk
 

patoz

Expedition Leader
Our plan is to live in this rig fulltime in about 5 years time.


Well, you let the cat out of the bag now, but good for you!

Maybe by then I'll finally have my rig road worthy, and we can meet up somewhere and have a couple of drinks around the fire. Maybe, even invite a few other folks!
 

Mattersnots

Adventurer
For once I can be proud of saying I did a sh!thouse job!!!!!!

Or maybe it should be captioned "Thunderbox is GO"

View attachment 448558

Fitting this up took an extraordinary amount of time. We used some teak tiles from IKEA as the flooring as they sit on a plastic frame and will allow airflow and water drainage when we get the shower installed. But they were a PITA to cut the slots for the hinges.

As we want the ability to actually remove the LOO when having a shower I decided that the brackets that are used to hold it in place needed to be flush mounting when the loo was out. So I grabbed some stainless hinges for home depot and with a little bending and finessing with the flapper disk I have lay down semi flush mount brackets. Sticking to my "do it twice then do it right" mantra I managed to make up a spare set for when I remove the teak tiles :unsure: and then the ones that actually fit.

Then it was a case of testing the height for the foldup step. Saves a lot of extra gyrations when entering the loo from the inside with a full bladder.
Great work, that's a nice sized shower/toilet space.
 

Ozrockrat

Expedition Leader
One of the best things we picked up at expo. For the outside door to the toilet.

f1717e3c2a03d34775d6530304e5e3b1.jpg


“Thunderbox

Noun

thunderbox (plural thunderboxes)

(Britain, Australia, slang) An outhouse or latrine: a rudimentary outdoor toilet.”
 
Last edited:

Forum statistics

Threads
188,191
Messages
2,903,627
Members
229,665
Latest member
SANelson
Top