Friday, I had a stated goal of finishing this air compressor installation. I basically achieved what I set out to do, although I didn't realize at the time that I'd have to make a slight adjustment after the fact. First, Braden and I did some basic troubleshooting of his Jetta's air conditioning system to confirm that the compressor clutch is faulty. Now he can decide whether to repair it or not.
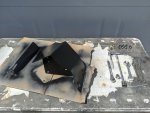
Okay. So. I had roughed out everything before we went to Vermont, right? And then, while we were traveling, I made what further progress I could. However, once everything was installed, I realized there were a couple minor issues. Most importantly, I couldn't get the hood alignment quite right, so it was making very slight contact with the fender when I'd open or close it. That HAD to be fixed. I just opened up the bolt holes in my bracket slightly and that was resolved. The other issue was that there was some extra material on my bracket. I didn't know exactly where the compressor would want to land when I was building it, so I made the bracket as big as I could. But I didn't want to be running a cutoff wheel at a campground; no one wants to hear that. So, while I had some time at the shop, I trimmed off the excess. Finally, there was the issue of raw steel. So, I sanded the brackets down, cleaned them with alcohol, primed them and painted them black.
I let them bake in the sun while I set to work on wiring the compressor up. This is pretty straightforward, just 12V constant and ground. Generally, we'll only run the compressor when the engine is running so as not to kill the starting battery, but I wanted the option to run it with the engine off, too, just in case. If I'm blowing up an air mattress or something for someone, it would be silly to have to run the engine for that. So, I removed the alligator clips on the air compressor wiring and extended it a couple feet on each lead and snaked them through the firewall with the driver's side harness and routed them into the driver's seat base. Once there, I installed ring terminals. There is a good chassis ground in there, but it's hidden under the plastic carriage holding the...stuff. I dunno most of what's under there, but they look like assorted control units. Probably a body control module, maybe one for the head unit. I dunno what else. But there's a ground under there. There's also a 12V constant terminal. I forget the nomenclature, but I think it's Terminal 30? Anyways, this isn't the tech forum, and I don't have a picture but, in any event, the one I used was wrong. I mean, it worked, but it only supports 25A. I didn't really think about capacity at the time. I'd learn this lesson soon.
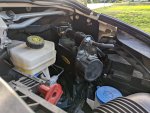
By then, the paint was dry, so we did a final assembly of everything and bolted the compressor down onto the brackets for hopefully the last time. It's pretty simple to install and there are no interferences with anything. I used a spare Velcro strap to secure the hose to the compressor body for storage. Long term, I might make some slight adjustments to the hose setup for even more ease of use. But it works great as is now. Pop the hood, connect the hose, and flip the switch. No more opening the rear doors to dig the compressor out of the trunk, unbagging it, and hooking up the alligator clips. Plus, we have that space back in our trunk now, too!
I put the interior bits back together and then we headed over to my sister's again to hang out for the night. I spent a long while getting my new phone up and running because the automatic data transfer didn't work like it did last time. As the shadows grew longer, Loki joined us at the big kid's table.

Okay. So. I had roughed out everything before we went to Vermont, right? And then, while we were traveling, I made what further progress I could. However, once everything was installed, I realized there were a couple minor issues. Most importantly, I couldn't get the hood alignment quite right, so it was making very slight contact with the fender when I'd open or close it. That HAD to be fixed. I just opened up the bolt holes in my bracket slightly and that was resolved. The other issue was that there was some extra material on my bracket. I didn't know exactly where the compressor would want to land when I was building it, so I made the bracket as big as I could. But I didn't want to be running a cutoff wheel at a campground; no one wants to hear that. So, while I had some time at the shop, I trimmed off the excess. Finally, there was the issue of raw steel. So, I sanded the brackets down, cleaned them with alcohol, primed them and painted them black.

I let them bake in the sun while I set to work on wiring the compressor up. This is pretty straightforward, just 12V constant and ground. Generally, we'll only run the compressor when the engine is running so as not to kill the starting battery, but I wanted the option to run it with the engine off, too, just in case. If I'm blowing up an air mattress or something for someone, it would be silly to have to run the engine for that. So, I removed the alligator clips on the air compressor wiring and extended it a couple feet on each lead and snaked them through the firewall with the driver's side harness and routed them into the driver's seat base. Once there, I installed ring terminals. There is a good chassis ground in there, but it's hidden under the plastic carriage holding the...stuff. I dunno most of what's under there, but they look like assorted control units. Probably a body control module, maybe one for the head unit. I dunno what else. But there's a ground under there. There's also a 12V constant terminal. I forget the nomenclature, but I think it's Terminal 30? Anyways, this isn't the tech forum, and I don't have a picture but, in any event, the one I used was wrong. I mean, it worked, but it only supports 25A. I didn't really think about capacity at the time. I'd learn this lesson soon.
By then, the paint was dry, so we did a final assembly of everything and bolted the compressor down onto the brackets for hopefully the last time. It's pretty simple to install and there are no interferences with anything. I used a spare Velcro strap to secure the hose to the compressor body for storage. Long term, I might make some slight adjustments to the hose setup for even more ease of use. But it works great as is now. Pop the hood, connect the hose, and flip the switch. No more opening the rear doors to dig the compressor out of the trunk, unbagging it, and hooking up the alligator clips. Plus, we have that space back in our trunk now, too!

I put the interior bits back together and then we headed over to my sister's again to hang out for the night. I spent a long while getting my new phone up and running because the automatic data transfer didn't work like it did last time. As the shadows grew longer, Loki joined us at the big kid's table.


