MrWhite's Tacoma Flippac Adventure Rig - pic heavy

MrWhite

New member
Those chuck locations are going to get trashed up under the truck and with no covers on them, at least the one I had under the rear of my old Tacoma did.

Yeah, I was a bit worried about that as well. Consequently I angled them toward the rear of the vehicle and created little plugs that go in the quick-disconnects (you can see the plugs in the picture). What isn't very obvious from the pictures is that they are located between two of the slider support bars, which I think protect them a bit. So far, in over a year and half of being in this spot, they are still working well and haven't been damaged yet or filled with dirt. I'm probably a little fortunate here that I don't drive in much mud or muck, mostly desert areas.
 

MrWhite

New member
Dual batteries...

Having in mind the Flippac, a fridge, etc., I wanted to run dual batteries. My approach is similar to what many have done here, with one little twist...

First, I replaced the larger stock battery with two group 35 Sears Diehard Platinums. I decided to fab my own mount made from bent scrap sheet steel and riveted together aluminum angle. Both batteries are located in the normal stock battery location:
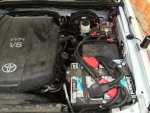
IMG_0920.jpg

I also created an accessory fuse mount from a piece of Lexan for two 80A Blue Sea circuit breakers (one for an in-cab accessory fuse block and one that feeds the house fuse block in the bed), one Blue Sea fuse block, and a 500A solenoid (located underneath the mount in the above picture). The house fuse block is located in the passenger-side bed cubby, which feeds all the accessory loads within the Flippac.
IMGP0137.jpgIMG_0625.jpg

To connect the batteries I used info from the "$50 isolated dual battery" thread (thanks FLHummer): so a 500A solenoid is tied into a switched 12V fuse such that the two batteries are connected when the car starts. Here is where the twist I added comes in... I didn't want the batteries to connect until the engine was actually running. There are a lot of ways to accomplish this, but I chose to add a relay tied into the oil pressure sensor. From memory this is my rough schematic:
IMG_0921.JPG
The tricky part of this on the 2nd gen Tacoma is that the oil pressure switch acts on the negative side of the electrical system. So, when there is no oil pressure the switch connects to ground (chassis). When there is oil pressure the switch floats ground. This is why I had to add the additional relay, so that when ground is floating the relay closes/connects the load to the solenoid. Due to using a switched 12V source, the relay will only activate the solenoid if two things are true: 1) the ignition is switched on, and 2) the oil pump is producing oil pressure. Hopefully I explained that well enough.

This setup has been working perfectly for about 15 months now. It was cheap to make, but I recognize there are also more components involved that could fail than would be the case if I had purchased an off-the-shelf smart isolator.
 
Last edited:

MrWhite

New member
Bumpers!

I'm pretty sure my wife and daughter thought I had lost my mind when they came outside and saw be doing this to a three month old truck with less than 2000 miles on it:
IMG_3306.jpg

I won't show all the details of putting the bumpers and armor on, pretty mundane stuff really. You can see pictures of how they look in the opening post. Maybe some quick thoughts on my choices though: 1) PelfreyBilt rocks! Really nice product and excellent customer service. 2) The choice of using Monstaliner products (chassis saver primer w/ Monstaliner on top) was a good one. This stuff is crazy tough and pretty easy to work with.

For the rear swing-out I had my buddy help me custom build the gate...
IMGP0031.jpgIMGP0032.jpg

I wanted the gate to be pretty modular so it would be easy to reconfigure loading. I used Hi-Lift slide-n-lock channel for all the accessories to mount to (with stainless carriage bolts). This makes it easy to slide things around or put them in different places. There are also mounting points welded in for a spare tire carrier if I every want to put a tire back there, and a 1-1/4" trailer hitch for the bike rack. If anyone wants to see more details let me know and I can post up some better pictures.
 

Forum statistics

Threads
189,309
Messages
2,915,426
Members
232,078
Latest member
Babbert
Top