Raw7s
Adventurer
My system isn't going to win any awards for craftsmanship like some of yours, but it works for me and is exactly what I want. I'd like to thank everyone that posted pictures of their systems as I gathered ideas from seeing them, and I'm sure you'll recognize parts of your cabinet in mine. I've been doing this on a budget and I'm just under $100 total for the build.
I feel like I have left room for modifications without causing too much extra work, so if anyone has an idea please feel free to share.
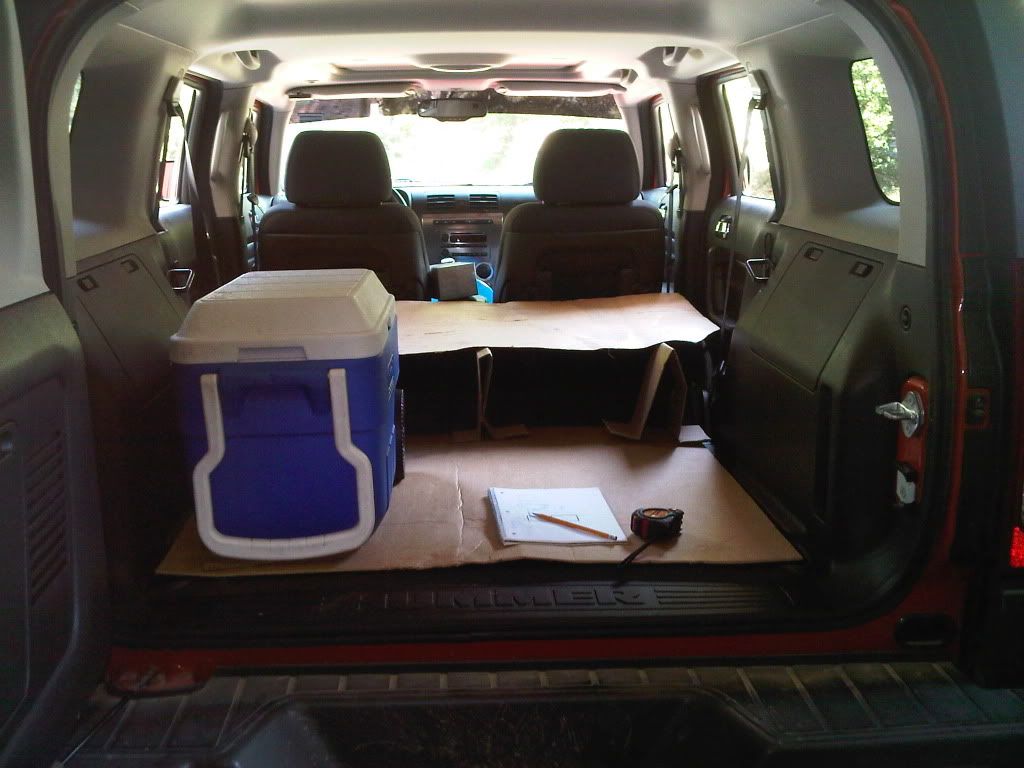
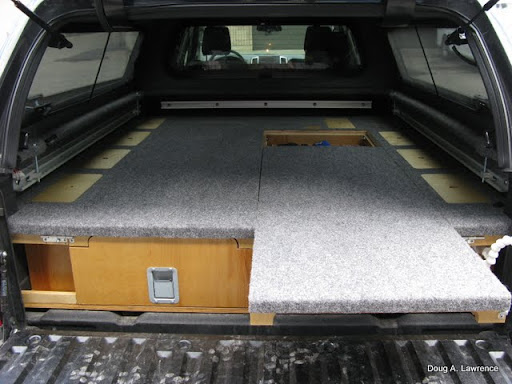
My cardboard concept. One of my biggest concerns was seeing if the extension piece could fit through the doors, it's 48"x31", luckily it can be rotated inside with the front seats forward. I determined the drawers/cabinet could not be more than 8" in height if I wanted to keep a simple level platform top that would rest on the folded down rear seats. I also noticed that keeping it at 8" I am still able to access the cargo area power outlet, and can still use the storage compartments.
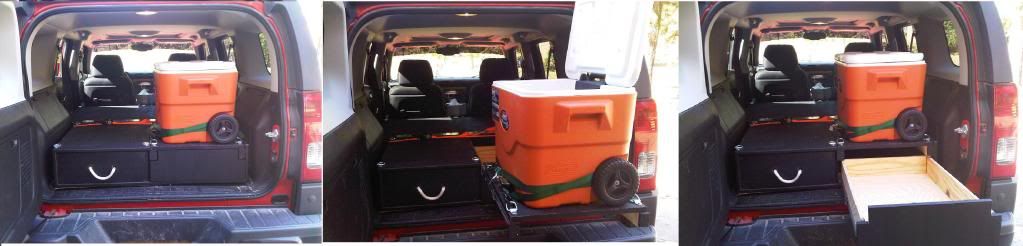
because the rear hatch does not open to a full 90* angle, I had to move the location of the slide-out-tray for the cooler to the right side so it can each full extension.
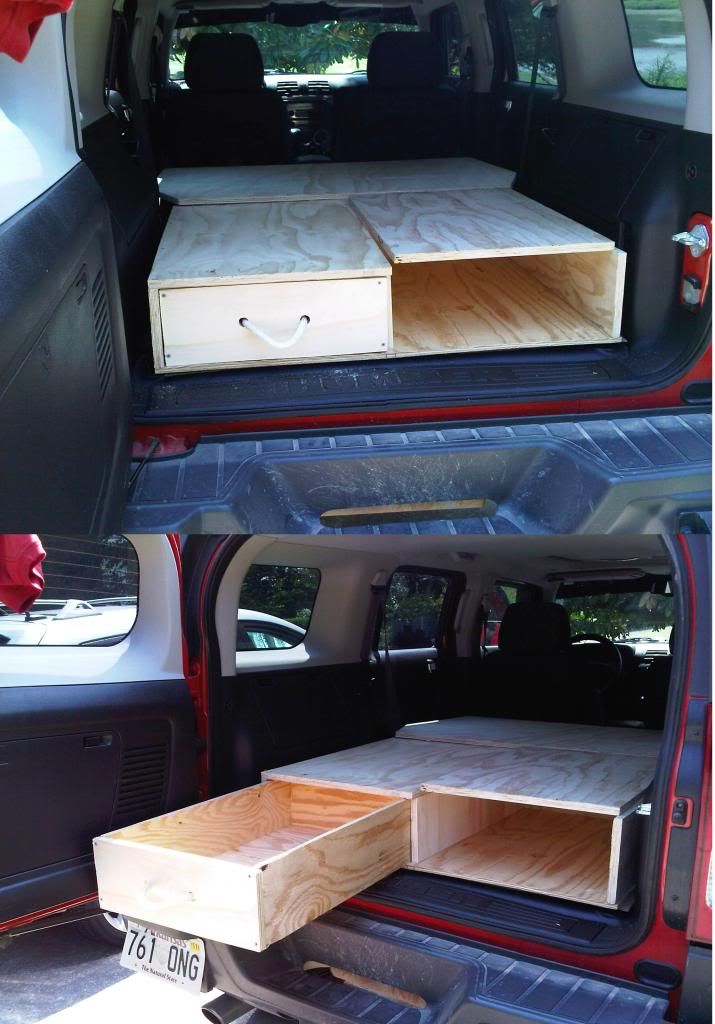
I left space on the sides, instead of having the cabinet touch both sides of the cargo area, so I can still reach the anchor points on the floor to strap the cabinet down.
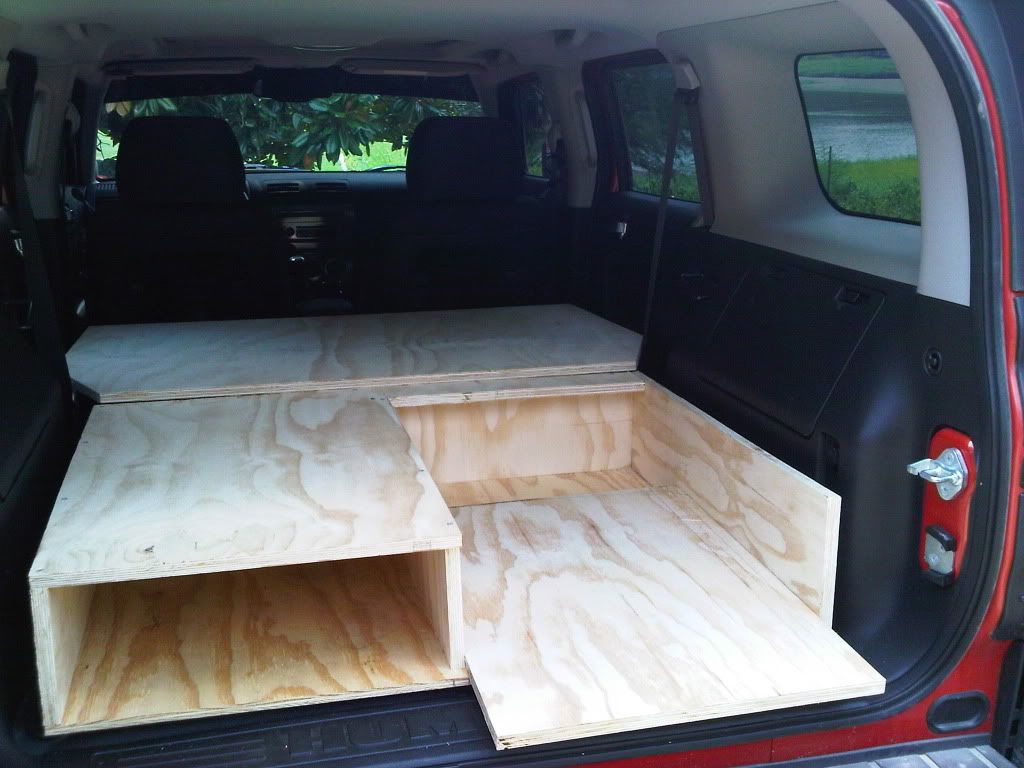
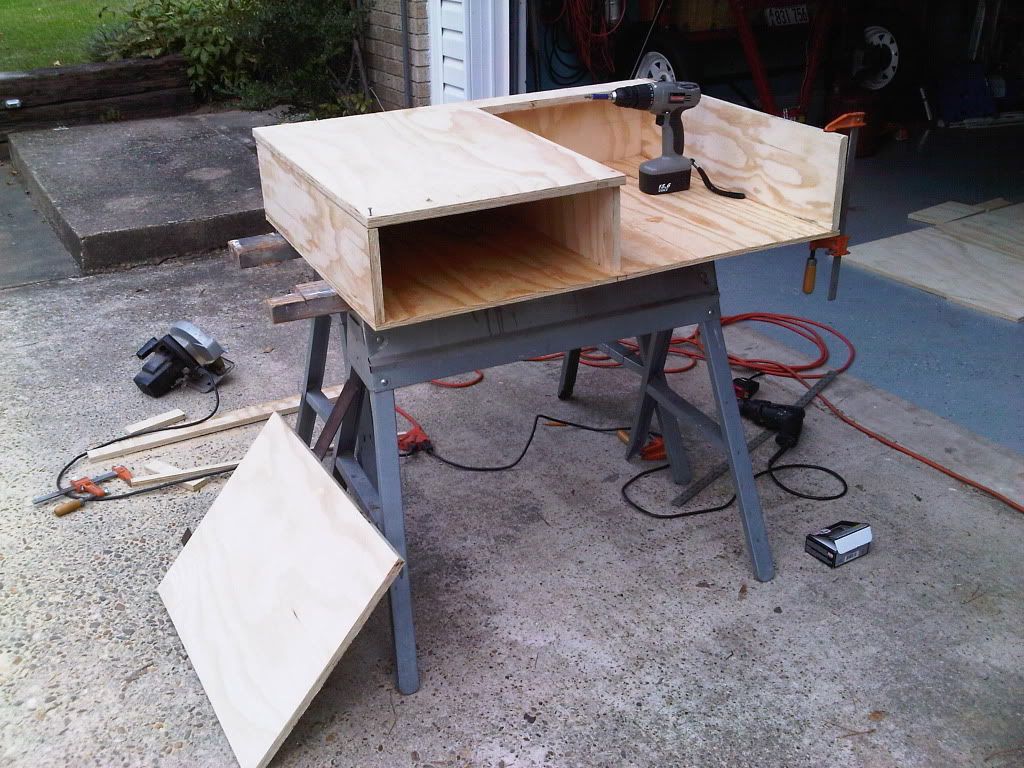
drawer #1 is done, and I decided on using a rope for the handle instead of a metal option. I tied a knot on the back side and fused it together with a torch. It's very unlikely to fail, it doesn't make any noise, and it takes up no room. There aren't any sliders for this drawer, it slides well enough on the bare wood. It was built with the measurements of my Coleman grill/stove and accessories to be stored in. That piece sitting on the right side is planned for a cooler to sit on and slide out. It is explained a little more at the end.
I sprayed bed liner on all of the surfaces that will come in contact with items. I first used Duplicolor, and it was even lower quality than expected, imagine that. Then I tried Rustoleum, it worked much better and was worth the $8/can.
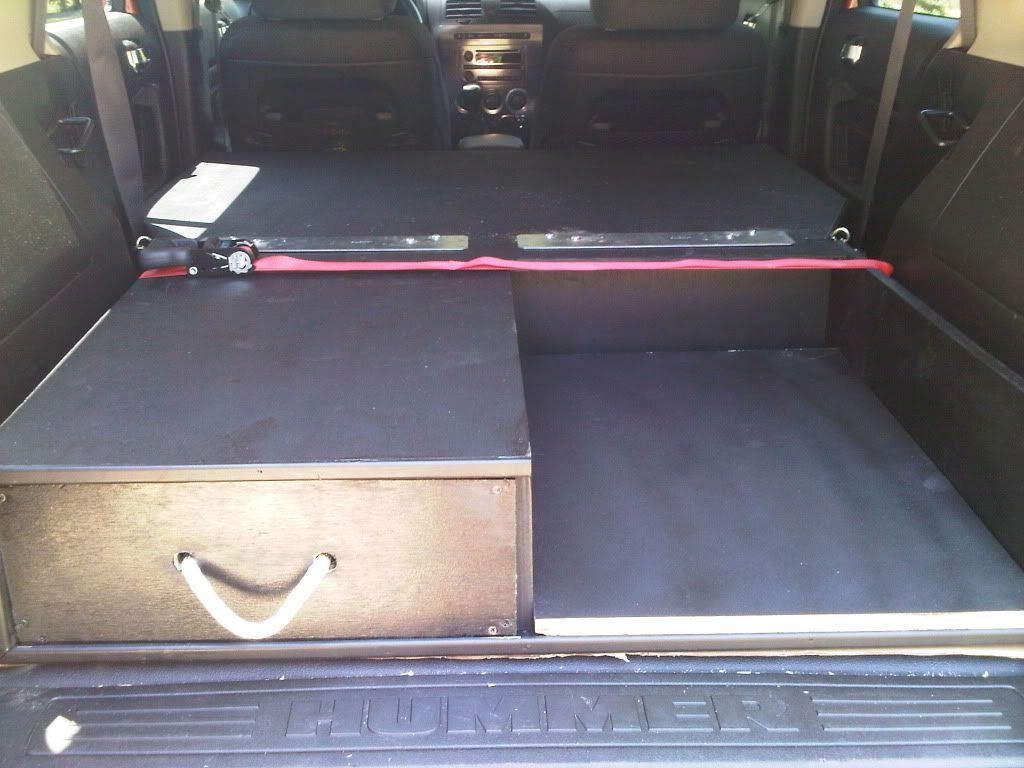
I bolted two metal plates to the extension board, with about an inch extending over so it can rest on the cabinet and hold my weight. I used 4 carriage bolts in each plate, with fender washers on the back side. I may add a couple more for each plate cause when I was testing it and was bouncing my entire weight I heard signs of stress around the plate.
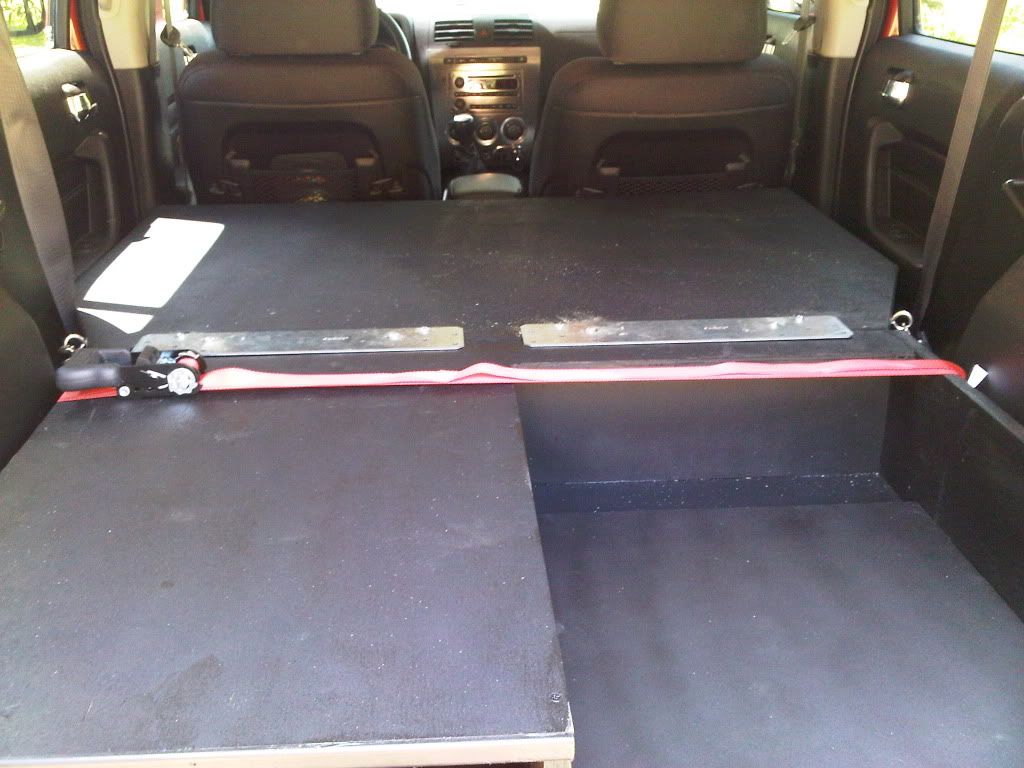
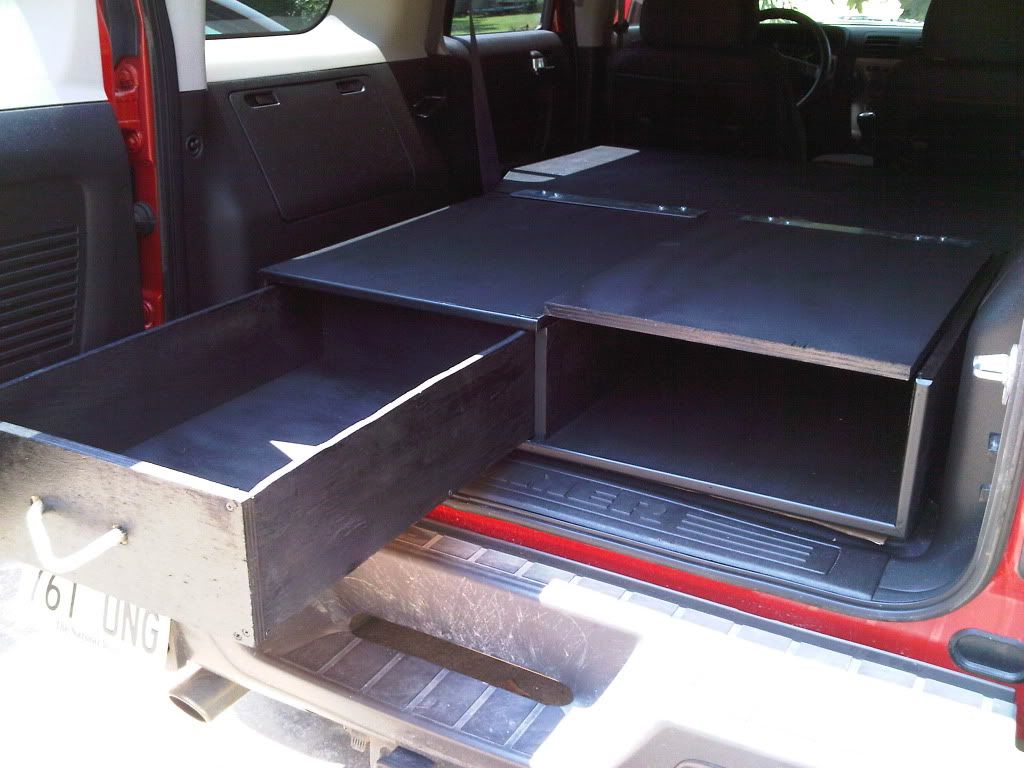
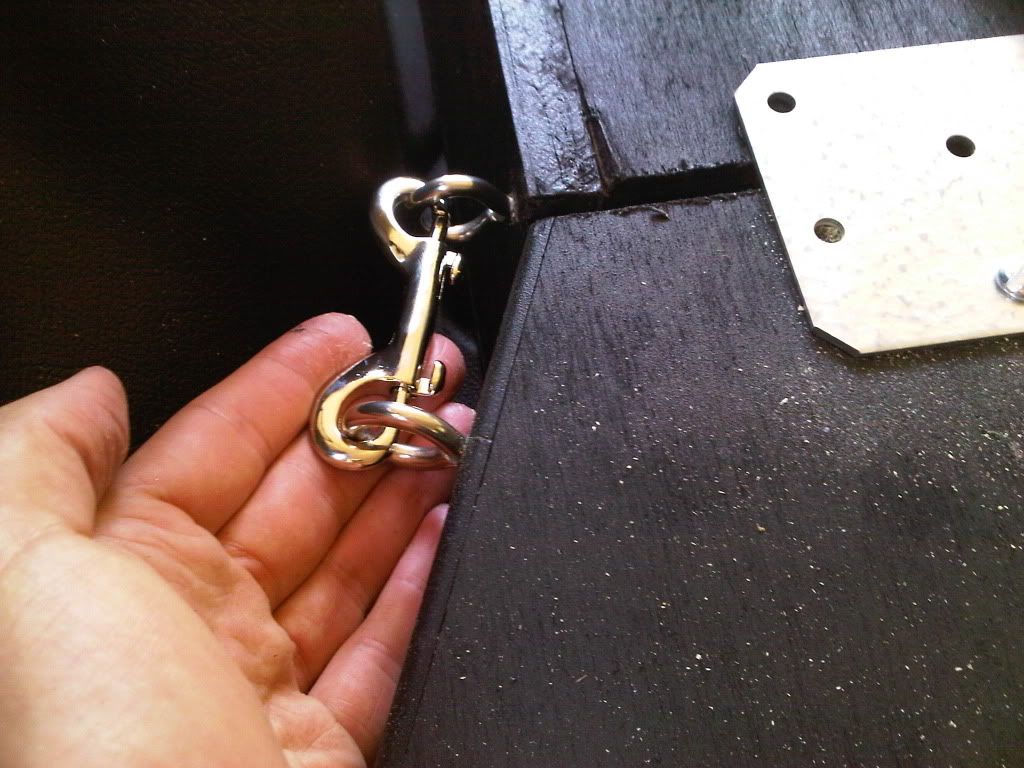
This is my simple way of attaching the extension board to the cabinet. After taking a drive with this, the metal pieces knocking together makes too much noise, and I have since wrapped the anchored loops with electrical tape and the noise is gone.
The whole thing can be easily removed in 2 minutes. Or I can leave just the drawer section in with the rear seats folded up. Versatility was one of my biggest objectives as my H3 is my daily driver.
I'm not sure if I'm done because right now I can sit my cooler in the empty space where I planned on putting a drawer, and this leaves enough space above it to open the lid without hitting the ceiling. But I'd like to use this space for a second drawer. My plans were to build a top tray that the cooler would sit on using the concept of this guy's expert work:
http://www.expeditionportal.com/forum/showthread.php?t=47516
To maximize space I was going to go with sliders instead of bearings. Does anyone know a slider than can extend to 26"-28" that can handle a fully loaded ice chest while driving on a rough trail? Or will any 150-200lb slider work well enough?
I feel like I have left room for modifications without causing too much extra work, so if anyone has an idea please feel free to share.
My cardboard concept. One of my biggest concerns was seeing if the extension piece could fit through the doors, it's 48"x31", luckily it can be rotated inside with the front seats forward. I determined the drawers/cabinet could not be more than 8" in height if I wanted to keep a simple level platform top that would rest on the folded down rear seats. I also noticed that keeping it at 8" I am still able to access the cargo area power outlet, and can still use the storage compartments.
because the rear hatch does not open to a full 90* angle, I had to move the location of the slide-out-tray for the cooler to the right side so it can each full extension.
I left space on the sides, instead of having the cabinet touch both sides of the cargo area, so I can still reach the anchor points on the floor to strap the cabinet down.
drawer #1 is done, and I decided on using a rope for the handle instead of a metal option. I tied a knot on the back side and fused it together with a torch. It's very unlikely to fail, it doesn't make any noise, and it takes up no room. There aren't any sliders for this drawer, it slides well enough on the bare wood. It was built with the measurements of my Coleman grill/stove and accessories to be stored in. That piece sitting on the right side is planned for a cooler to sit on and slide out. It is explained a little more at the end.
I sprayed bed liner on all of the surfaces that will come in contact with items. I first used Duplicolor, and it was even lower quality than expected, imagine that. Then I tried Rustoleum, it worked much better and was worth the $8/can.
I bolted two metal plates to the extension board, with about an inch extending over so it can rest on the cabinet and hold my weight. I used 4 carriage bolts in each plate, with fender washers on the back side. I may add a couple more for each plate cause when I was testing it and was bouncing my entire weight I heard signs of stress around the plate.
This is my simple way of attaching the extension board to the cabinet. After taking a drive with this, the metal pieces knocking together makes too much noise, and I have since wrapped the anchored loops with electrical tape and the noise is gone.
The whole thing can be easily removed in 2 minutes. Or I can leave just the drawer section in with the rear seats folded up. Versatility was one of my biggest objectives as my H3 is my daily driver.
I'm not sure if I'm done because right now I can sit my cooler in the empty space where I planned on putting a drawer, and this leaves enough space above it to open the lid without hitting the ceiling. But I'd like to use this space for a second drawer. My plans were to build a top tray that the cooler would sit on using the concept of this guy's expert work:
http://www.expeditionportal.com/forum/showthread.php?t=47516
To maximize space I was going to go with sliders instead of bearings. Does anyone know a slider than can extend to 26"-28" that can handle a fully loaded ice chest while driving on a rough trail? Or will any 150-200lb slider work well enough?