My No-Weld Trailer project - Sort of

old_CWO

Well-known member
you're correct, quarter tons tipped in around 500 lbs dry and are substantially beefier than really needed for this type of application. Rarely do I see photos of Jeep trailer carnage on the main chassis. It's almost always suspension, suspension attachment points or the tongue/coupler you see broken while driving off road. Those are the areas needing a little more beef.

Your chassis is lighter than I would expect for what you have there but I just don't understand the vision. It seems needlessly complicated to satisfy a simple requirement. I think I get why you turned the 2x3 on it's side (for more bolt clamping surface I am guessing) but that's really not taking advantage of the significant strength gain over square tube when run the other way. It's just wasted weight for no reason in my estimation but you already have it all cut and fit so no harm no foul.

From just looking at your photos I would ditch the decking and all the bolts, weld it up including the gussets. Pretty sure that would be more than sufficiently stout. Your advantage here is you can keep it bolted while welding which should significantly reduce heat related metal warping and shrinkage. Mount your box directly on the chassis and install nutserts in some of the current bolt holes to fasten it down quick and clean. Fill the rest.

The bolt holes on the bottom aren't a total deal breaker in my mind; it is nice to have drain holes in tube chassis so water doesn't collect and rust from the inside out. Redneck rust protection pro tip: slap a WD-40 type nozzle and straw on spray paint can and hose the inside with enamel paint from every opening. I would also take advantage of them and route wiring inside for protection.

I appreciate the out of the box approach but not sure it was wise in this case.
 

bricke

New member
Yes, the 2x3 was used that way to have more surface for the Timbren suspensions, 2x2 was already strong enough.

The original idea was to try to make a weld-free design that could be packed and shipped light, then bolted on with average Joe tools and no deep mechanical knowledge at all.
It was an experiment, I always thought that if it came out badly, I would weld it and move on. Now that is all done, I can see where I made mistakes, overall too beefy, too many bolts, etc. I believe the general idea could be worth exploring more in the winter but yes, I will follow your input and weld it up, would be actually pleasant to weld it up while it's being held in place, no movement or shrinkage is a nice perk :)
 

old_CWO

Well-known member
The original idea was to try to make a weld-free design that could be packed and shipped light, then bolted on with average Joe tools and no deep mechanical knowledge at all.

I think that's an interesting direction - lots of folks aren't set up to weld but can assemble like a champ (thank Ikea culture!) if you do it again, what about aluminum? That would be a lightweight unit for sure!
 

bricke

New member
My design, with all of his flaws, was a good balance between being strong and being "cheap", I would love to use aluminum but it's usually pretty prohibitive, cost-wise, or better, not worth it given the ready-made solution that are out there today.

Maybe a mix of steel and alu. I was planning to use T-slotted profiles for the box, it's just a challenge to design the frame to be compatible with those in a cost-saving way.
 

NatersXJ6

Explorer
What size were your bolts? Are they through-bolts with nuts? On the whole they look huge, I’m guessing you can’t torque them effectively without crushing the tubes unless you have sleeves all over too.
 

billiebob

Well-known member
Hello everyone, this is my first post here after a few years of reading discussions and learning, I am Matt and I live in Norther California, moved here a few years back from Italy and after getting my toes wet with offroad camping, I decided it's time to build myself a trailer to haul my stuff.
It all started with a Chevy Silverado that was big enough to get us to our camp spot, then a Land Rover Disco 2 that prematurely died (still crying over it) and today with a FJ Cruiser that is NOT big enough for us now that we have a dog. So trailer it is.

I have started a year ago taking Oxy-Acetilene welding/brazing classes, then I got into MIG and after that I got myself into TIG classes, having all the hardware in my shop and a modest experience with Autocad early in my life, I began designing my trailer in CAD and I started tinkering with the idea of a no-weld trailer, kind-of stupid given all the time and money I put into learning how to weld but hey, I was bored ok? :)
Thought that if I fail, I can always weld it up and call it a day.

Countless iteration later, counteless back and forth with the company that cuts my steel, I ordered the first set of tubing, laser cut to my designs.

The idea is to have a bolt-on design using as much off-the-shelf hardware as possible, will have Timbren Axle-less suspensions and a removable tongue (for storage/safety).

From my calculations the rolling frame should be around ~700 pounds, I believe I overdid it, better safe than sorry I guess.

View attachment 607601
700# is pretty average, scale it once it is built. But I'd say weld it, get rid of the gussets and bolts. The last thing you want is for bolts to rattle loose. And bolting thru tubing, they will rattle loose.
 
Last edited:

bricke

New member
Bolts are 1/2in, also overkill.

Given the plates on top and bottom of the tubing, I don't feel it's easy to crush the tubes, it will require a lot of force. In my mind I would torque them to 80-100lbf-ft and add red thread locker for safety.
I could even tack-weld them in place if I decide to keep them, I haven't made up my mind but you bring a valid point, I would not want them to rattle loose.
 

NatersXJ6

Explorer
To keep them from rattling loose you will have to torque into that 100 ft-lb range. The tension on that bolt is pretty high. You might see some tubes deform. I would include some thread locker or Nylock nut because you probably will end up under torque on some bolts.
 

bricke

New member
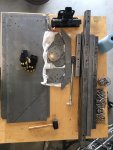
Taking everything apart and starting the paint process. I will paint everything inside and out, then once all is put together I will do a rubber coating on the bottom
painting_prep.jpeg
 

dreadlocks

Well-known member
rivnuts should be rather good for sheer forces, plus nuts are designed for any pulling forces.. or go overboard and drill all the way through and double nut it on both sides.

I'm holding my 325W folding solar with an M10 Rivnut in the frame tubing but I drilled all the way thru and put a full threaded bolt with a fender washer and lock nut on the inside.. that's not going anywhere and I didn't have to crank down on my aluminum tubing to get it that way..
 

jgaz

Adventurer
Interrresting!

I've only see these used for attaching loads to sheet material.

Are there lots of relevant examples of such fundamentally structural use cases in production?
Various Jeeps use, or did use, rivnuts to secure skid plates and cross members to frames and unibody rails.
 

Forum statistics

Threads
188,145
Messages
2,902,698
Members
229,582
Latest member
JSKepler
Top