My OVRLND build

dstefan

Well-known member
Here's my current setup in a Ranger with a 5 foot bed. It's all pretty budget, and I wouldn't even really call it a "build," as the only thing that's really permanent are the drawers.
  • I carpeted the walls using some cheap, adhesive, berber squares. Probably adds a tiny bit of insulation, but mostly I like the look, and it's easy to attach velcro patches.
  • Decked drawers. This was a big question mark for me. I was concerned about losing head room, and I didn't like that they don't use all the available space they take up, but I'm really glad I went this direction. They're just so convenient, and they still hold pretty much all of my kitchen stuff and a lot of miscellaneous camping gear, folding chairs, and tools. Also, it makes it really easy to clear out a big flat space if I want to use my truck to haul stuff. The plywood storage contraption I had before was a pain to remove, and now I can keep most of my gear even while helping friends move furniture. Also, with the top up, I've still got 5'9 between the cross beams, so I can change pretty comfortably.
  • Molle panels on the wall. Can't really see them in this pic, but there are some plywood panels that I've attached a punch of pouches to. Stuff I need pretty regularly goes in there (towels, sanitizer, flashlights, water bottle.
  • My power system is just a Renogy 160 watt panel on the roof and a Jackery 1000. I run USB string lights and a USB fan on the ceiling directly into the Jackery, and it powers a cheap Alpicool fridge with ease (3-4 days without recharging, but solar usually keeps the battery at 100%). I wanted a Maxfan, but I didn't have the clearance in my garage. The little USB desk fan was only 6 bucks at a hardware store, and it's enough to keep the air moving at night.
  • The "sofa" in the back is a pair of custom Rhino Trunks with a cushion on top. Rhino only charges a $100 design fee for custom sizes, and they're really heavy duty (9 inches high, and about 29 square). These hold clothes and personal effects, recovery gear, and consumables for longer trips (for a short trip, everything I need fits in the Decked drawers). There's enough storage that really the only thing that looks different from this photo when I'm fully packed is that there's a plastic folding table sitting on top of the sofa.

View attachment 670793

Nicely done minimalist setup! Do you find it hard to push up the front of the roof with the trunks there? Been contemplating an 8020 cabinet/seating platform across the back where you have your trunks, and been wondering if leaning over it to open the roof is harder (gotta bad back …)
 

jreddy

Member
Nicely done minimalist setup! Do you find it hard to push up the front of the roof with the trunks there? Been contemplating an 8020 cabinet/seating platform across the back where you have your trunks, and been wondering if leaning over it to open the roof is harder (gotta bad back …)

Thanks!

I find it pretty easy. I kneel on the cushion when I'm pushing it up, so I'm doing it all with my arms rather than my legs, but my back is straight. The front seems to take a lot less force than the back.
 

skyfree

Active member
My original goal was to avoid any suspension upgrades by keeping the weight down, but I recently blew a DSSV shock in the back so started looking at this a little closer. I also weighed everything except the camper itself so I had a better idea of what I'm dealing with.

Turns out my furniture unit comes in at 106 lbs with the storage bins, propane carrier, pump, plumbing, battery tray, etc. This is more than I was expecting since I was using thinner wood than is normal for this type of build, and went with the 1" 8020. Here are the weights.

OVRLND (with insulation, electrical,
and foam mattress, approx): 335
12 gallons of water + jerrys: 105
Battery box: 23
Fridge: 33
Furniture: 106
E-bike and charger: 55
All other gear, food, clothes
in the back: 112

Total: 769 loaded
440 empty

So my "lightweight" build ends up right at about 970 lbs with me and gear in the front on a normal trip. Still 130 under GVWR, but when my wife and dog are along I'm just over (no bike on those trips).

I sometimes tow a trailer with a 450 lb tongue weight so that is almost 900 lbs on the back.

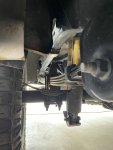
Even empty with just the camper and furniture it's sitting on the overloads. I did some measuring to the wheel well apex and the truck is basically level with the camper and furniture on. The stock ZR2 has a 1 1/2 - 2" rake so it's down by that much in the back. Here is the before view of the springs:

IMG_0918.jpg

So step 1 was to add-a-leaf. Peak suspension has a pretty inexpensive add-a-leaf for the ZR2:


Here is the after:

IMG_0926.jpg
It's no longer sitting on the overloads, there is a 1 1/2" rake and the ride has actually gotten much smoother since it's not on those heavy overload springs. I haven't tested it with the full load yet. Those plastic pieces on the added leaf have a post that will likely flatten out when they come in contact with the overloads under load. I might cut them off if not. Strange design though.

Step 2 is that I have King shocks/struts on order all around. They are more robust and can be rebuilt vs. just tossing a $550 shock in the trash like you have to do with the DSSV's which are not rebuildable.
 

Andrew_S

Observer
Overloads look great. Probably fetch a fair price for you DSSV's and recoup some funds.
It's amazing how light those Ovrlnd campers are built. Most set-ups start at 1k...
Awesome progress.
 

aaaslayer

Active member
OP, where in CA are you located? I am in Socal and will be taking ownership of my OVRLND build in January. If you're nearby, maybe I can check your build out in person if you don't mind.
 

skyfree

Active member
OP, where in CA are you located? I am in Socal and will be taking ownership of my OVRLND build in January. If you're nearby, maybe I can check your build out in person if you don't mind.
Hey aaaslayer, sorry I didn't see this earlier. I'm in South Lake Tahoe which is quite a ways away from you. I think you already picked up your camper. I have some hand drawn plans for the aluminum extrusion part if you or anyone else are interested.

After using it for a year or so it's really working out well.
 

RAM5500 CAMPERTHING

OG Portal Member #183
My original goal was to avoid any suspension upgrades by keeping the weight down, but I recently blew a DSSV shock in the back so started looking at this a little closer. I also weighed everything except the camper itself so I had a better idea of what I'm dealing with.

Turns out my furniture unit comes in at 106 lbs with the storage bins, propane carrier, pump, plumbing, battery tray, etc. This is more than I was expecting since I was using thinner wood than is normal for this type of build, and went with the 1" 8020. Here are the weights.

OVRLND (with insulation, electrical,
and foam mattress, approx): 335
12 gallons of water + jerrys: 105
Battery box: 23
Fridge: 33
Furniture: 106
E-bike and charger: 55
All other gear, food, clothes
in the back: 112

Total: 769 loaded
440 empty

So my "lightweight" build ends up right at about 970 lbs with me and gear in the front on a normal trip. Still 130 under GVWR, but when my wife and dog are along I'm just over (no bike on those trips).

I sometimes tow a trailer with a 450 lb tongue weight so that is almost 900 lbs on the back.

Even empty with just the camper and furniture it's sitting on the overloads. I did some measuring to the wheel well apex and the truck is basically level with the camper and furniture on. The stock ZR2 has a 1 1/2 - 2" rake so it's down by that much in the back. Here is the before view of the springs:

View attachment 673136

So step 1 was to add-a-leaf. Peak suspension has a pretty inexpensive add-a-leaf for the ZR2:


Here is the after:

View attachment 673138
It's no longer sitting on the overloads, there is a 1 1/2" rake and the ride has actually gotten much smoother since it's not on those heavy overload springs. I haven't tested it with the full load yet. Those plastic pieces on the added leaf have a post that will likely flatten out when they come in contact with the overloads under load. I might cut them off if not. Strange design though.

Step 2 is that I have King shocks/struts on order all around. They are more robust and can be rebuilt vs. just tossing a $550 shock in the trash like you have to do with the DSSV's which are not rebuildable.

Id STRONGLY suggest buying the bullet and getting custom rear springs. Add a leafs generally create their own sets of issues and I’ve seen MANY crack.

If you look close, the add a leaf doesn’t arch the same as the stock springs while sitting, even if that plastic piece was removed. This is going to cause them to move differently than the rest of the pack and likely eventually crack.

I’ve learned all of this the hard and expensive at the expense of myself and my friends.

My mantra from all I’ve learned is “An ounce of prevention saves a pound of headache”

But I’m digging the build and a great platform.

Again, i highly recommend replacement custom read springs. They’ll be worth every cent

my .02
 

skyfree

Active member
Id STRONGLY suggest buying the bullet and getting custom rear springs. Add a leafs generally create their own sets of issues and I’ve seen MANY crack.

If you look close, the add a leaf doesn’t arch the same as the stock springs while sitting, even if that plastic piece was removed. This is going to cause them to move differently than the rest of the pack and likely eventually crack.

I’ve learned all of this the hard and expensive at the expense of myself and my friends.

My mantra from all I’ve learned is “An ounce of prevention saves a pound of headache”

But I’m digging the build and a great platform.

Again, i highly recommend replacement custom read springs. They’ll be worth every cent

my .02

Agree. This is definitely something I plan to do eventually. First I'm replacing the stock DSSV shocks with Kings all around. I ordered them back in May 2021 and they are just now shipping (!). I've already blown one DSSV and they are just not strong enough for regular off-road use. Pics and an update coming in a few weeks...
 

Andrew_S

Observer
In regards to the add-a-leaf. I agree the typical add-a-leaf kits are not ideal, uneven pressure, stiff ride, etc.

I've had very good luck with combining multiple leaf packs with the same arch profile and building "bastard packs".
Things to look for are staggered lengths that don't line up with your existing leafs. This is a nice way to customize your leafs, you can choose between the longer ride springs and shorter overloads depending on your need, more lift or load capacity.

At the moment I'm running a 6 spring pack with 2 extra leafs. Junk yards typically sell individual leafs for 5$ each.
That combined with a bushing kit and a new longer grade 8 center pin, I have maybe $50 into my set up.
Some food for thought.
 

RAM5500 CAMPERTHING

OG Portal Member #183
In regards to the add-a-leaf. I agree the typical add-a-leaf kits are not ideal, uneven pressure, stiff ride, etc.

I've had very good luck with combining multiple leaf packs with the same arch profile and building "bastard packs".
Things to look for are staggered lengths that don't line up with your existing leafs. This is a nice way to customize your leafs, you can choose between the longer ride springs and shorter overloads depending on your need, more lift or load capacity.

At the moment I'm running a 6 spring pack with 2 extra leafs. Junk yards typically sell individual leafs for 5$ each.
That combined with a bushing kit and a new longer grade 8 center pin, I have maybe $50 into my set up.
Some food for thought.

Agree with this also 100% if you got time and patience

what I used to do with it older land cruisers and trucks was find a stock OEM spring, cut the main leafs off 2-3” before the bushing and redo the spring pack putting those under the main. It was a cheap DIY fix and worked ok for sagging old springs, probably not so much for load
 

ITTOG

Well-known member
I finally "finished" (is it ever?) my OVRLND camper build so I thought I would do a multi-part build post for others to get ideas from.

My wishes were:
- Insulated
- Once piece of furniture that could be easily removed
- As lightweight as possible
- Pressurized water system
- 50 amp-hours of lithium battery
- 1 drawer that contains the entire kitchen setup
- Fridge slider
- Adequate interior lighting

This is the camper on my Chevy ZR2. I actually haven't done anything to the truck itself, other than 589Fab shock skids (which get used regularly). My camper is sized to the truck with a little extra room in the cabover so I could accommodate 3" foam cushions. I got HD36-HQ foam from the Foam Factory (AKA Foam by Mail), and it's super comfy and just thick enough not to hit bottom with that particular foam.
View attachment 660639

Part 1: Insulation and ceiling lights

I spent a cold night in the camper in November 2020 when it was down into the upper 20's. Sitting in an uninsulated aluminum box is actually worse than just sitting outside. The cold seems to be radiated from the metal and you feel it. So after consulting with my friends who lived in a van year-round for 2 years, I came up with a plan.

1" foil-backed (on both sides) Polyiso foam was the first layer. I attached it with VHB tape because I didn't want to mess with glue in my cold garage in December:
View attachment 660633

After doing the walls, I did the ceiling and added 2 RV style LED lights at the same time so I could conceal the wires:
View attachment 660635

Notice the large sections of bare metal in the next photo. This is a good start, but I knew that metal would conduct a lot of cold into the space:
View attachment 660634

To break the thermal bridge, I added a layer of Reflectix over this. My friends suggested attaching it with Velcro so any moisture trapped between the layers could be aired out and any mold cleaned up. We will see how this plays out, but for practical purposes handling Velcro is easier and cheaper than more VHB so this worked out well:
View attachment 660636
The ceiling:
View attachment 660637

Notice that there is a section with no Reflectix where the bed slide slides out. The tolerances are too tight to allow it there. Not perfect, but this gets completely covered when the slide is out.
View attachment 660638

This insulation makes a huge difference when sitting inside when it's hot or cold outside. The tent part is not insulated of course, but the thick tent material seems adequate and I don't think I'll be adding any insulation up there. The truck bed has a spray coating on it that seems to provide some barrier to thermal transfer, but that could be covered with Reflectix later if I decide I need more.
How is the reflectix working for you. Have you had any wetness or mold behind it? What about wetness on the interior? Just curious as I get to this point someday on my build.
 

skyfree

Active member
How is the reflectix working for you. Have you had any wetness or mold behind it? What about wetness on the interior? Just curious as I get to this point someday on my build.
No mold or wetness whenever I've taken a peek behind the reflectix. I've been camping in well below freezing temps a few nights and have been surprised at the lack of condensation. I'm not cooking inside though.

Dealing with condensation and mold is why I mounted it with Velcro, but that will probably turn out to be unnecessary. It has been useful when I want to easily pull it off for other modification like wiring though.

Not that I care, but Reflectix is ugly of course. It's like being inside of a disco ball in there.
 

skyfree

Active member
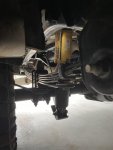
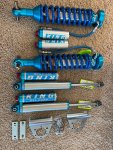
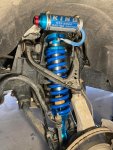
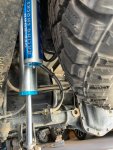
Suspension and tire upgrades have happened!

After a 9 month wait -- 2 months longer than expected, I got my King suspension. I did this because of the unreliability of the DSSV shocks. One of them blew and spewed oil all over the floor. They are expensive to replace and nobody is rebuilding them (currently). The rumored issue is that the shaft is too wimpy for sustained off-road use and it flexes. Some people are reporting < 5,000 miles until they fail, but I got somewhere around 53,000 miles on mine so not terrible. I didn't really want to continue replacing them for $600 a pop and tossing a big piece of metal in the trash every few months.

I only wanted to do the rears for now because the OVRLND is probably at least partially responsible for the failure, but King only offers full kits for front and back, so I bit the bullet. I went for 600 lb springs on the front vs the default 650s. I don't have any additional weight on the front (like a bumper) and I noticed when the camper is fully loaded for a trip the front actually comes up a tiny bit. This was a good choice because the end result was right in the expected range of lift.

The back shocks are charged under considerable tension so I ended up with 1/4" lift there and almost 1.5" on the front. King includes sway bar relocating blocks to correct the geometry with the lift. I did not replace the upper control arms with the extended travel ones, so the Kings are adjusted for standard travel. I don't really feel like I need more travel. Now the truck is within about 3/8" of level after settling in.

I don't have any off-road experience with it yet, but it feels awesome on the road with the camper on.

Note that the add-a-leafs are working well and have settled in with the proper bend. I have no complaints about them (as long as they last!).

Lastly, I got 66,000 miles out of my first set of OEM 265/65R17's but replaced them with 265/70R17's which fit just fine with no rubbing. Strangely the larger tires are cheaper on TireRack.
 

Attachments

  • IMG_1820.jpg
    IMG_1820.jpg
    2.4 MB · Views: 38
  • IMG_1822.jpg
    IMG_1822.jpg
    1.9 MB · Views: 39
  • IMG_1823.jpg
    IMG_1823.jpg
    1.5 MB · Views: 39
  • IMG_1824.jpg
    IMG_1824.jpg
    1.5 MB · Views: 41

Forum statistics

Threads
188,179
Messages
2,903,452
Members
229,665
Latest member
SANelson
Top